How to Remove Wax From Candle Jar: 3 Easy Methods to Reuse
You've burnt through your favourite candle and now you're left with a beautiful jar and a stubborn layer of wax stuck to the bottom. Tossing it feels wasteful, but figuring out how to remove wax from candle jar containers seems like more trouble than it's worth. That leftover wax clings tight, and scraping it out with a knife risks damaging the glass or leaving you with waxy fingers and frustration.
The good news is you don't need special tools or expensive cleaning products. Three simple methods using items you already have at home will get that jar perfectly clean and ready for its next purpose. Whether you prefer freezing, hot water, or a gentle heat approach, each technique takes less than fifteen minutes of active work.
This guide walks you through each method step by step, plus how to remove those pesky labels and sticky residue. You'll learn which technique works best for different jar sizes and wax types, what supplies you need, and the safest way to clean and prep your containers for reuse. By the end, you'll have spotless jars ready to store kitchen staples, hold fresh flowers, or house your next homemade candle.
Why reusing candle jars matters
Learning how to remove wax from candle jar containers saves you money and reduces waste in one simple action. Those high-quality glass vessels cost manufacturers pounds to produce, yet most people bin them after a single use. Your average candle jar weighs between 200 and 400 grams of glass, and when you multiply that across millions of candles sold each year in Australia alone, the environmental toll adds up quickly. Reusing these containers keeps perfectly good glass out of landfills whilst giving you free storage solutions for your home.
Environmental impact of glass waste
Glass takes over one million years to decompose in landfills, making every discarded candle jar a permanent addition to Australia's waste problem. Recycling programs help, but only about 57% of glass collected actually gets processed into new products, according to industry reports. The rest ends up in landfills or used as low-grade fill material. Manufacturing new glass requires intense heat (around 1,400 degrees Celsius) and significant energy consumption, producing carbon emissions throughout the production chain. When you salvage and reuse your candle jars, you eliminate the need for new glass production entirely, cutting out mining of raw materials, transportation fuel, and factory emissions in a single decision.
Reusing one glass jar has the same environmental benefit as recycling three.
Cost savings and practical benefits
Quality storage containers at homeware shops cost between $5 and $25 each, yet you're likely throwing away free alternatives every few weeks. Candle jars make excellent airtight storage for pantry staples like coffee beans, loose tea, spices, and baking ingredients. Their uniform sizes stack neatly in cupboards, and the glass won't absorb odours or stains like plastic containers do. You can use smaller jars for bathroom organisation (cotton buds, hair ties, bath salts) or desk supplies (paperclips, rubber bands, drawing pins). Larger vessels work perfectly as vases for fresh flowers, planters for succulents, or holders for makeup brushes and beauty tools.
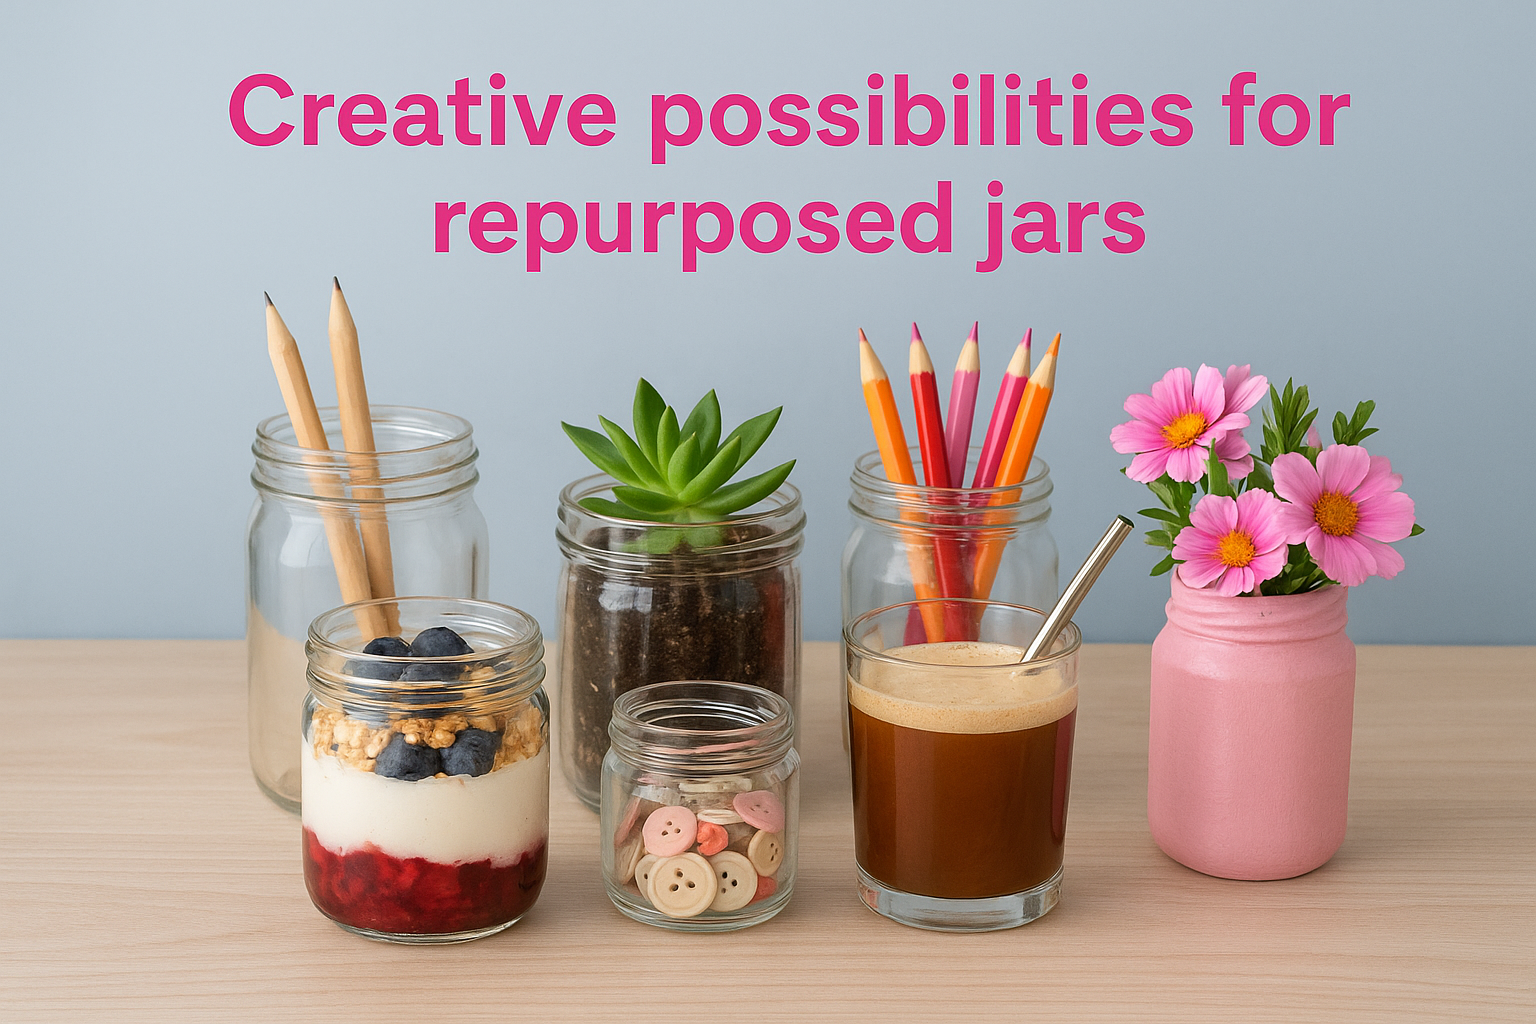
Creative possibilities for repurposed jars
Clean candle jars transform into DIY candle vessels when you want to pour your own wax creations at home. You already know the jar burns safely and looks attractive on display. Beyond candles, these containers serve as stylish drinking glasses for smoothies or iced coffee, especially the wider-mouth styles. Crafters use them for storing buttons, beads, and small craft supplies where you need to see contents at a glance. You can create layered desserts like parfaits or overnight oats directly in the jar for an elegant presentation. Some people use them as terrarium bases for miniature plant displays, or paint the outside to make custom pen holders and coin banks.
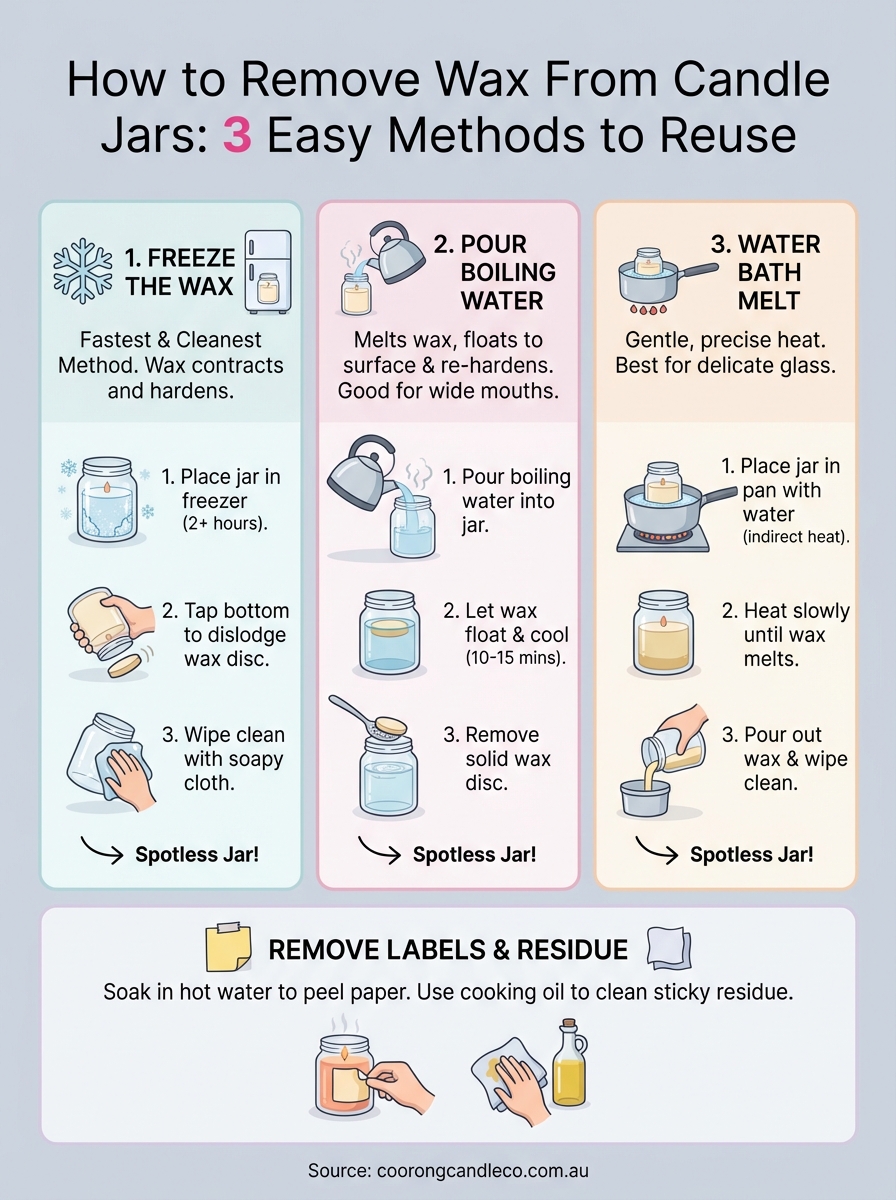
Method 1. Freeze the candle wax
Freezing offers the fastest and cleanest way to remove wax from your candle jar when you want instant results. Cold temperatures cause wax to contract and harden, breaking the bond between the wax and glass. This method works brilliantly for most wax types (soy, paraffin, beeswax blends) and takes only two to four hours from start to finish, with barely any hands-on effort required. You'll avoid messy scraping or dealing with hot water, making this the safest option if you're working with multiple jars at once.
What you need
Gather these basic supplies before you start the freezing process. You need freezer space that can accommodate your jar standing upright, a butter knife or spoon with a dull edge for lifting wax, and a clean tea towel or paper towels for wiping residue. Optional items include a small spatula for stubborn bits and washing-up liquid for the final clean. Most households already have everything required, so you won't need to purchase special tools or cleaning products.
Step-by-step freezing process
Follow these instructions to successfully remove wax using the freezing method. This technique demonstrates exactly how to remove wax from candle jar containers without damaging the glass or spending ages scraping.
- Place your empty candle jar upright in the freezer for a minimum of two hours (overnight works even better for thick wax layers).
- Remove the jar and check if the wax has fully solidified and shrunk away from the sides (you'll see small gaps forming around the edges).
- Turn the jar upside down and gently tap the bottom with your palm to dislodge the wax disc in one clean piece.
- If the wax doesn't pop out immediately, slide a butter knife between the wax and glass to create leverage and lift it free.
- Wipe away any remaining film with a warm, soapy cloth until the jar feels completely smooth to touch.
The wax disc should lift out in one satisfying piece if you've frozen it long enough.
Method 2. Pour boiling water into the jar
Boiling water creates a simple heat transfer that melts wax from the bottom up whilst keeping the process contained and controllable. This method works particularly well for wider-mouth jars where you can easily pour water and retrieve the floating wax afterwards. The hot water softens the wax layer until it lifts free from the glass, floating to the surface where it re-hardens into a removable disc. You'll find this approach useful when you don't have freezer space or want to clean multiple jars in quick succession without waiting for freezing time.
What you need
Prepare these essential items before you start the boiling water technique. You need a kettle or saucepan to boil water, a heat-proof surface to work on (like your kitchen counter or sink), and a towel to protect your hands from the hot jar. Have a slotted spoon or tongs ready to remove the hardened wax disc from the water surface, plus washing-up liquid and a clean cloth for the final wipe-down. Keep paper towels nearby to dispose of the solidified wax once you've lifted it out.
Step-by-step boiling water process
Follow these instructions to master how to remove wax from candle jar containers using the boiling water method. This technique delivers clean results without specialised equipment or extended waiting periods.
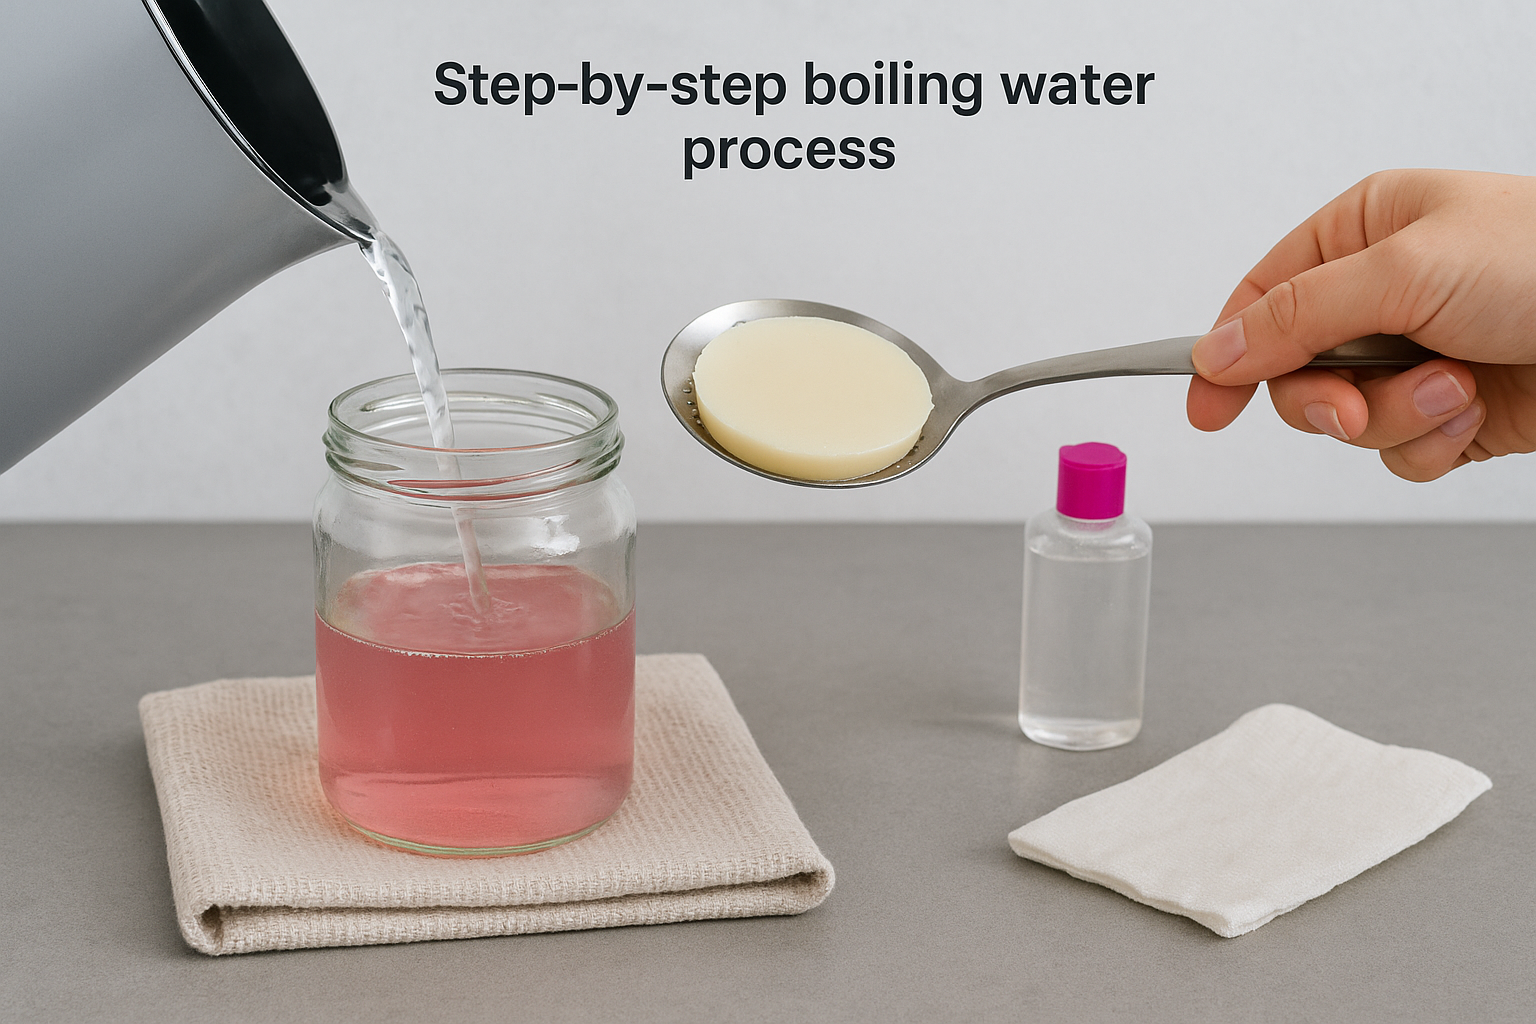
- Boil enough water in your kettle to fill the jar about three-quarters full (leave room for wax displacement).
- Place your candle jar in the sink or on a heat-resistant surface to catch any spills during the process.
- Pour the boiling water slowly into the jar, leaving approximately two centimetres of space at the top to prevent overflow.
- Let the jar sit undisturbed for ten to fifteen minutes whilst the heat melts the wax completely off the bottom.
- Watch as the melted wax floats to the surface and begins to cool into a solid layer on top of the water.
- Once the wax has fully hardened on the surface (usually another five minutes), use your slotted spoon to lift it out in one piece.
- Pour the remaining water down the drain and wash the jar with warm soapy water to remove any residual film.
Never pour wax-contaminated water down your drain whilst the wax is still liquid, as it will solidify in your pipes and cause blockages.
Method 3. Melt the wax in a water bath
The water bath technique gives you precise temperature control when learning how to remove wax from candle jar containers, making it the gentlest option for delicate or vintage glass. This method mimics professional candle-making practices by using indirect heat rather than exposing your jar to direct flame or extreme temperature changes. You'll appreciate this approach when working with thin glass vessels or jars with decorative elements that might crack under sudden temperature shifts. The process takes between fifteen and twenty minutes but requires your attention throughout, so it's best suited for cleaning one or two special jars rather than batch processing.
What you need
Collect these basic kitchen items before starting your water bath setup. You need a saucepan large enough to hold your candle jar, a folded tea towel or silicone mat to place in the bottom of the pan (this prevents direct glass-to-metal contact), and a pair of oven gloves or tongs for safely handling the hot jar. Keep paper towels ready for wiping away melted wax, plus washing-up liquid and a clean cloth for the final wash. Having a heat-proof container nearby lets you pour out melted wax safely without creating a mess on your countertop.
Step-by-step water bath process
Follow these instructions to safely melt and remove wax using the controlled heat of a water bath. This gentle approach protects your glass whilst delivering spotless results.
- Place a folded tea towel or silicone mat in the bottom of your saucepan to cushion the jar and prevent thermal shock.
- Set your candle jar upright on the towel and fill the pan with cold water until it reaches halfway up the side of the jar (never submerge the jar completely).
- Place the pan on your stovetop and turn the heat to medium-low, allowing the water to gradually warm rather than boiling rapidly.
- Watch as the wax begins to soften and pool at the bottom (this usually takes eight to twelve minutes depending on wax thickness).
- Once the wax has fully melted into liquid, use oven gloves to carefully lift the jar from the water bath and pour the liquid wax into your waste container.
- Wipe the inside of the warm jar immediately with paper towels to remove residual wax whilst it's still soft and pliable.
- Wash the jar with hot soapy water to eliminate any remaining oily film before drying thoroughly.
Never leave your water bath unattended, as overheating can cause jars to crack or wax to smoke.
How to remove labels and residue
After you've mastered how to remove wax from candle jar containers, those sticky labels and adhesive residue stand between you and a perfectly clean vessel. Most candle manufacturers use strong adhesives that leave behind gummy patches even after you peel away the paper. These residues attract dust and look untidy, but you can eliminate every trace using simple household products and a few minutes of focused effort.
Removing paper labels
Start with the easiest removal method that often works without additional products. Fill your clean jar with hot tap water and let it sit for five to ten minutes until the heat loosens the adhesive underneath the label. The warmth softens the glue layer, making the paper lift away more readily than when cold.
- Peel one corner of the label slowly whilst the jar remains warm from the water inside.
- Pull the label back at a low angle (almost parallel to the glass) rather than straight up to prevent tearing.
- If the label tears, rub the remaining bits with your thumb under hot running water until they ball up and wash away.
- For stubborn labels, apply a drop of cooking oil or eucalyptus oil to a cloth and rub it over the paper until it dissolves.
Cleaning sticky residue
Tackle leftover adhesive with products you already keep in your kitchen cupboard. Cooking oil works brilliantly because it breaks down the sticky compounds without damaging glass or leaving scratches behind.
- Apply a small amount of cooking oil directly onto the adhesive patches and let it sit for two minutes.
- Rub the area with a dry cloth using circular motions until the residue begins to roll off in small balls.
- Wash the entire jar with hot soapy water and a scouring pad to remove any oily film.
- Dry the jar immediately with a clean tea towel to prevent water spots from forming on the glass.
Bicarbonate soda mixed with cooking oil creates a gentle scrub that removes even the toughest adhesive without scratching your glass.
Ready to reuse your jar
You now have three proven methods for learning how to remove wax from candle jar containers, plus the techniques to eliminate sticky labels and residue completely. Each approach takes less than twenty minutes and uses items you already own, transforming those beautiful empty vessels into useful storage solutions, planters, or drinking glasses. The freezing method delivers the quickest results with minimal mess, boiling water works brilliantly for wider jars, and the water bath offers gentle heat for delicate glass.
Start with whichever technique suits your timeline and available supplies, then experiment with the others as you accumulate more jars. Your cleaned containers will serve you for years in countless ways around your home, from kitchen storage to bathroom organisation. When you're ready to refill those gorgeous jars with fresh fragrance, explore the handcrafted candles at Coorong Candle Co. for premium Australian soy candles that'll give you another reason to perfect your jar-cleaning skills.