A console table sits in some of the most visible spots in your home, the entryway, the hallway, behind a sofa, yet so many end up as clutter magnets or feel awkwardly bare. Learning how to style a console table doesn't require a design degree or an unlimited budget. It's really about balancing function with beauty and choosing pieces that actually reflect your personal taste.
The secret lies in layering objects with intention: mixing heights, textures, and meaningful items that tell your story. A well-styled console might include artwork propped against the wall, a stack of books, fresh greenery, and a beautifully scented candle that welcomes guests the moment they walk in. At Coorong Candle Co., we've seen firsthand how a handcrafted soy candle or luxury reed diffuser can shift a console from "just furniture" to a proper focal point worth lingering near.
This guide shares 10 easy ideas you can adapt for your own space, whether you're working with a narrow hallway entry or a generous living room setup. Each tip is designed for real Australian homes, not magazine-perfect rooms that nobody actually lives in.
What makes a console table work
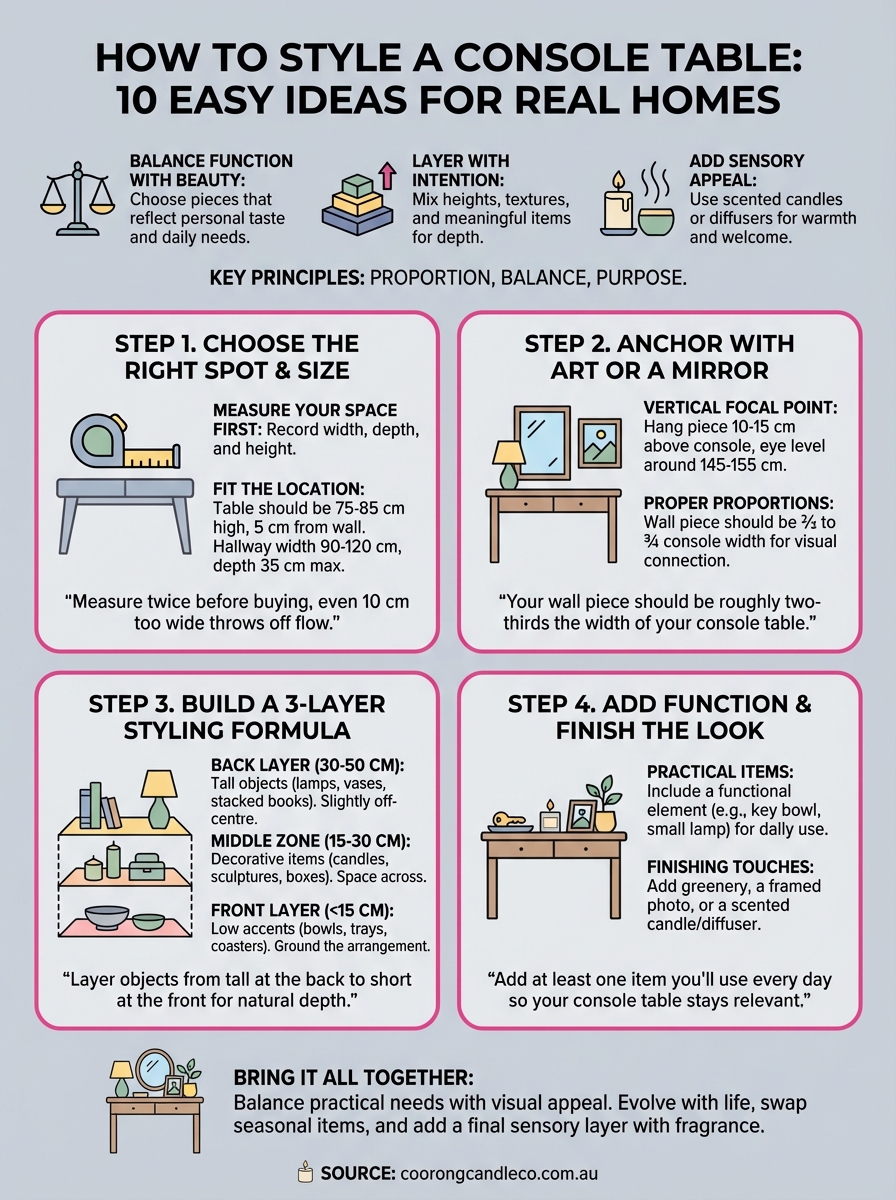
A successful console setup starts with understanding three core principles: proportion, balance, and purpose. You're not creating a static display that sits untouched for months. Instead, you're building a functional arrangement that serves your daily life while looking intentional. The best styled console tables share common traits, they have a clear focal point, they use varying heights to create visual interest, and they include at least one practical element you'll actually use.
The right proportions matter
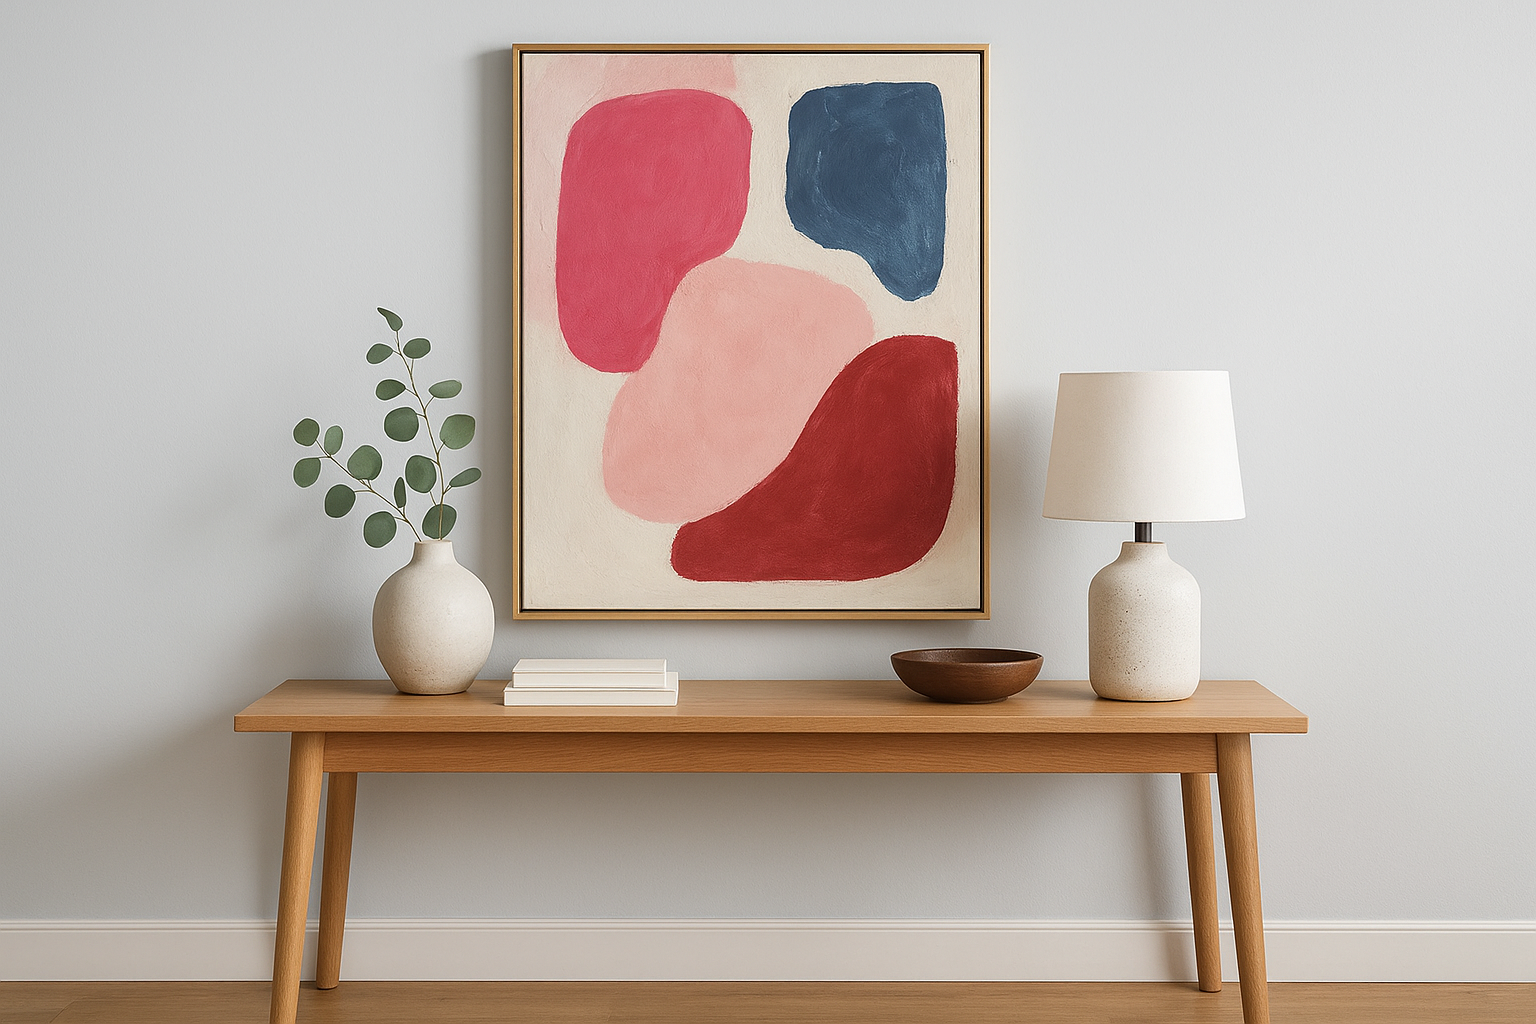
Your console table needs to relate properly to both the furniture around it and the people walking past it. Most console tables sit between 75 to 85 cm high, which puts them at a comfortable height for setting down keys or displaying objects you want to see from standing. The items you place on top should never overwhelm the table itself. A good rule: your tallest object should be no more than twice the table's height when measured from the floor. If you're hanging artwork or a mirror above, leave approximately 10 to 15 cm of space between the table surface and the bottom edge of whatever hangs above it.
Keep your largest decorative piece under two-thirds of your console's total length to maintain proper scale.
Balance visual weight
Learning how to style a console table means understanding that visual weight isn't the same as actual weight. A dark-coloured vase pulls the eye more strongly than a clear glass one of identical size. You want to distribute this visual weight across the entire surface rather than clustering everything to one side. Try the triangle method: place your tallest item slightly off-centre, then arrange medium-height objects on one side and shorter pieces on the other. This creates an asymmetrical balance that feels natural instead of staged. Textures matter too. If you're using smooth metal candlesticks, balance them with something organic like a wooden bowl or woven basket. The contrast between materials keeps the arrangement from feeling flat or one-dimensional, which is especially important in narrow hallways where people view your console from a single angle.
Step 1. Choose the right spot and size
Before you think about decorative objects or colour schemes, you need to nail down where your console table will live and whether it actually fits that spot. The location dictates everything else, from the table's dimensions to how you'll style it. A console crammed into a narrow entryway needs a completely different approach than one floating behind a sofa in an open-plan living room. Walk through your space and look for dead zones that could use visual interest or practical surfaces.
Measure your space first
Pull out a tape measure and record the width, depth, and height of your intended area. Your console should sit at least 5 cm away from the wall to allow for skirting boards and proper air circulation, especially if you plan to add a reed diffuser or scented candle behind other objects. Most hallway consoles work best between 90 to 120 cm wide and no deeper than 35 cm, which lets people pass comfortably without knocking things over. Behind a sofa, you can go deeper (up to 45 cm) since there's no foot traffic to worry about.
Measure twice before buying, a console that's even 10 cm too wide will throw off your entire room's flow.
Match the console to its location
Entry halls benefit from slimline designs with storage underneath for shoes or baskets. You'll want quick access to keys and sunglasses, so keep the surface relatively clear. Living room consoles can handle more decorative weight since they're viewed from a distance. Hallway setups work best with wall-mounted or very narrow tables that don't interrupt the walking path. Consider what you'll actually use in each spot before you commit to a size.
Step 2. Anchor with art or a mirror
Once you've positioned your console table, the next move is to create a vertical focal point that draws the eye upward. A piece of artwork or a mirror hung above your console serves as the anchor for everything else you'll add to the surface. This vertical element transforms your console from a random piece of furniture into a considered design feature. Without something on the wall behind it, your console setup will always feel incomplete, no matter how beautifully you arrange objects on top.
Choosing the right piece
Your artwork or mirror should span two-thirds to three-quarters of your console's width. Any narrower looks tentative and disconnected from the table below. Any wider overwhelms the setup and makes the console feel too small. For standard 100 to 120 cm consoles, look for pieces between 65 to 90 cm wide. Mirrors work brilliantly in narrow hallways because they bounce light around and make tight spaces feel larger. Artwork suits living room consoles where you want to introduce colour or personality rather than just reflecting what's already in the room.
Your wall piece should be roughly two-thirds the width of your console table to maintain proper visual connection.
Hanging height and placement
Position the bottom edge of your artwork or mirror 10 to 15 cm above the console surface. This creates breathing room while keeping the two elements visually connected. The centre of your wall piece should sit at eye level when standing, typically around 145 to 155 cm from the floor. If you're leaning artwork instead of hanging it, prop it securely against the wall at a slight angle and layer smaller objects in front for depth. This casual approach works particularly well when learning how to style a console table in relaxed, lived-in spaces.
Step 3. Build a 3-layer styling formula
The secret to professional-looking console styling lies in creating depth through three distinct height zones. This layering approach stops your console from looking like a flat lineup of objects and instead builds visual interest from every angle. You're arranging items from tallest at the back to shortest at the front, which creates natural depth and lets each piece shine without hiding behind another.
Start with your tallest layer
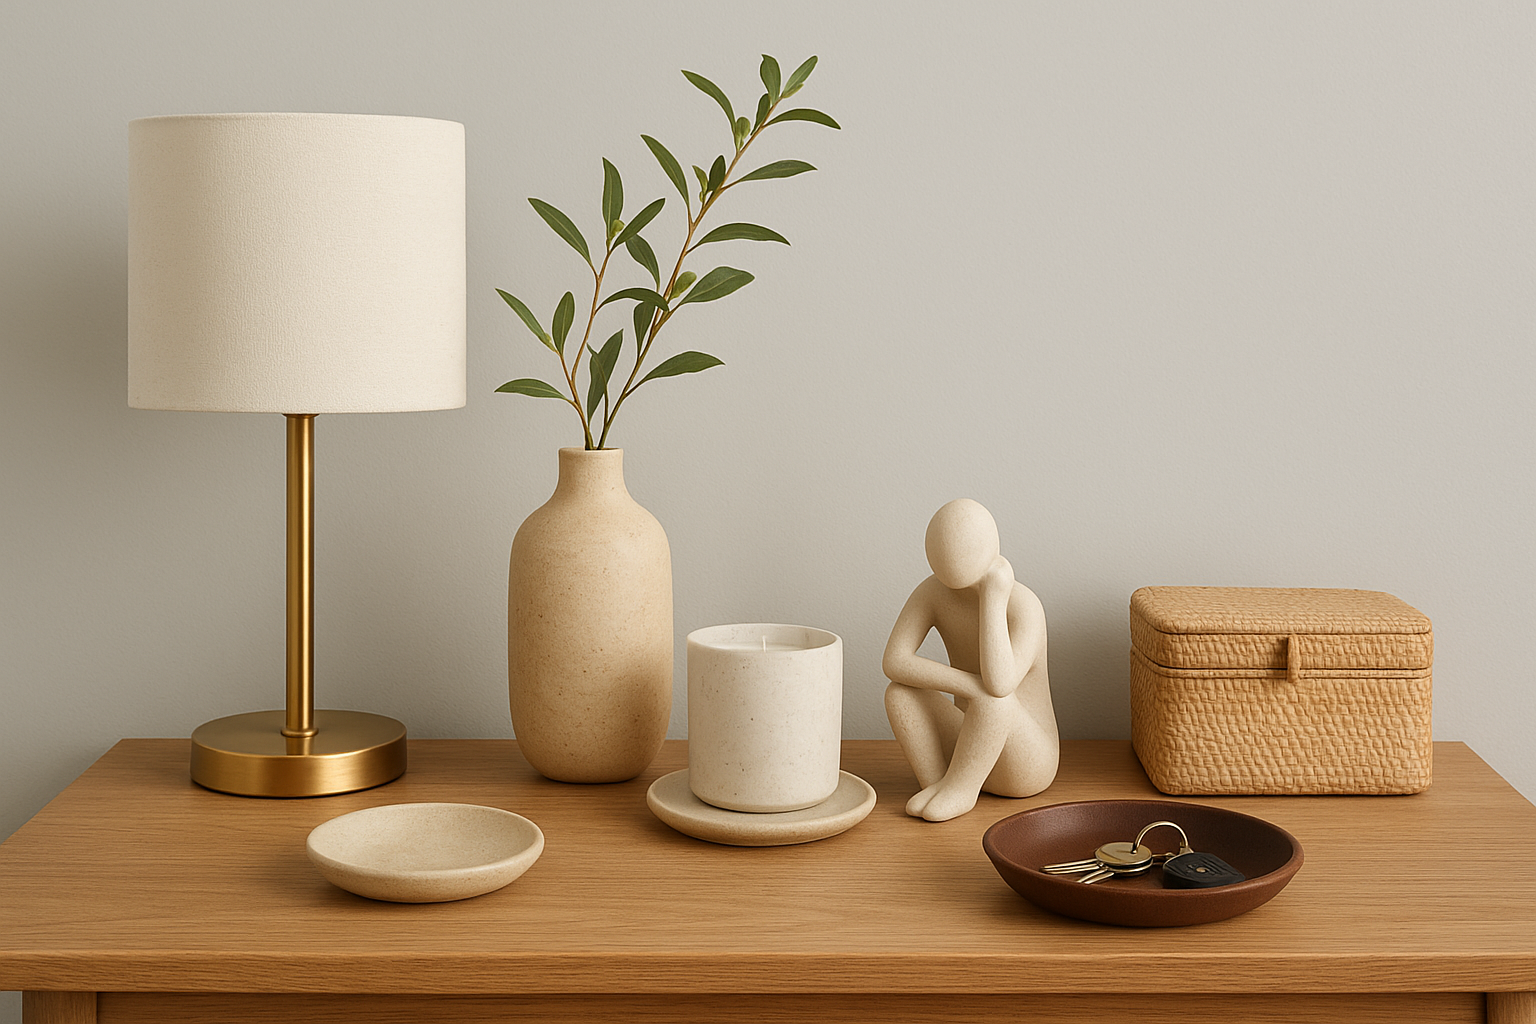
Your back layer holds the tallest objects, typically between 30 to 50 cm high. This is where you place table lamps, tall vases with branches, or stacked books. Position these items slightly off-centre rather than dead middle. A tall brass candlestick or ceramic vase anchors one end beautifully while leaving space for the other layers to develop. Keep this layer relatively sparse, one or two tall pieces maximum, so they frame your arrangement instead of crowding it.
Add your middle height pieces
The middle zone sits between 15 to 30 cm high and carries most of your decorative weight. This layer typically includes candles, small sculptures, or decorative boxes. A handcrafted soy candle from Coorong Candle Co. works perfectly here, the vessel adds texture while the fragrance creates atmosphere. Space these items across your console rather than grouping them together. You want breathing room between each piece so your eye can travel across the setup comfortably.
Layer your objects from tall at the back to short at the front to create natural depth and visibility.
Finish with low front accents
Your front layer uses objects under 15 cm high: small bowls, coasters, or decorative trays. These pieces ground your arrangement and provide practical spots for keys or sunglasses. Keep this layer minimal, two or three small items spread across the front edge work better than a crowded collection.
Step 4. Add function and finish the look
Your console table shouldn't just look good, it needs to earn its place in your home by serving a real purpose. The final styling step combines practical items you'll use daily with finishing touches that add personality. This balance between function and beauty separates a styled console from a cluttered one. You're not creating a museum display that nobody can touch, you're building a working surface that happens to look intentional.
Add practical items you'll actually use
Include at least one functional element in your arrangement that serves your household's actual needs. Entry consoles benefit from a decorative bowl or tray for keys, sunglasses, and loose change. Living room setups might hold a small lamp for ambient lighting or a stack of remote controls tucked into an attractive box. Hallway consoles can feature a basket underneath for shoes or a shallow dish for dog leads. These practical pieces work hardest when they match your console's overall aesthetic rather than looking like afterthoughts shoved between decorative objects.
Style with scent and finishing touches
Your final layer brings warmth and sensory appeal through fragrance and personal items. A handcrafted soy candle or luxury reed diffuser from Coorong Candle Co. adds both visual texture and welcoming scent the moment someone approaches your console. Position these pieces where they won't get knocked over but can still disperse fragrance effectively. Complete your styling with small personal touches that reflect how you actually live:
- Fresh or dried greenery in a simple vase
- A small framed photograph positioned at an angle
- A coffee table book you genuinely read
- A decorative catch-all for daily essentials
Add at least one item you'll use every day so your console table stays relevant to your routine rather than becoming ignored decor.
These finishing elements transform how to style a console table from a purely aesthetic exercise into functional home design that serves you properly.
Bring it all together
Learning how to style a console table comes down to balancing practical needs with visual appeal. You've worked through choosing the right location, establishing a focal point with wall art, layering objects at three distinct heights, and adding functional finishing touches. Each step builds on the previous one to create an arrangement that serves your household while looking intentional from every angle.
Your console table should evolve with your life rather than staying frozen as a static display. Swap out seasonal greenery, rotate artwork when you tire of it, or change your fragrance to match your mood. The formula stays consistent even when individual pieces change: tall anchors at the back, medium decorative items in the middle, low practical objects at the front.
Transform your console into a proper welcome point that greets guests with beautiful scent. Browse our collection of luxury reed diffusers handcrafted in South Australia to add that final sensory layer your styled console needs.