There's something deeply satisfying about lighting a candle you've made yourself. Soy candles with essential oils offer a cleaner burn, longer-lasting fragrance, and a connection to the creative process that store-bought alternatives simply can't match. Whether you're after a specific scent combination or want to avoid synthetic fragrances altogether, making your own puts you in full control.
At Coorong Candle Co., we've spent years perfecting our hand-poured soy candles, learning what works and what doesn't through countless batches and experiments. That hands-on experience shapes everything in this guide. You'll benefit from the same principles we use in our South Australian workshop, from choosing the right wax to blending essential oils that actually throw scent effectively.
This step-by-step guide covers everything you need to get started: equipment, ingredients, techniques, and troubleshooting tips. By the end, you'll have the knowledge to create beautiful, eco-friendly candles that fill your home with natural fragrance, or make thoughtful handmade gifts for the people you care about.
What you need before you start
Before you light your first wick, you need to gather the right tools and materials. Making soy candles with essential oils doesn't require a fully stocked laboratory, but having everything ready before you begin prevents frustration and wasted ingredients. Most items are inexpensive and available from craft suppliers or online retailers across Australia.
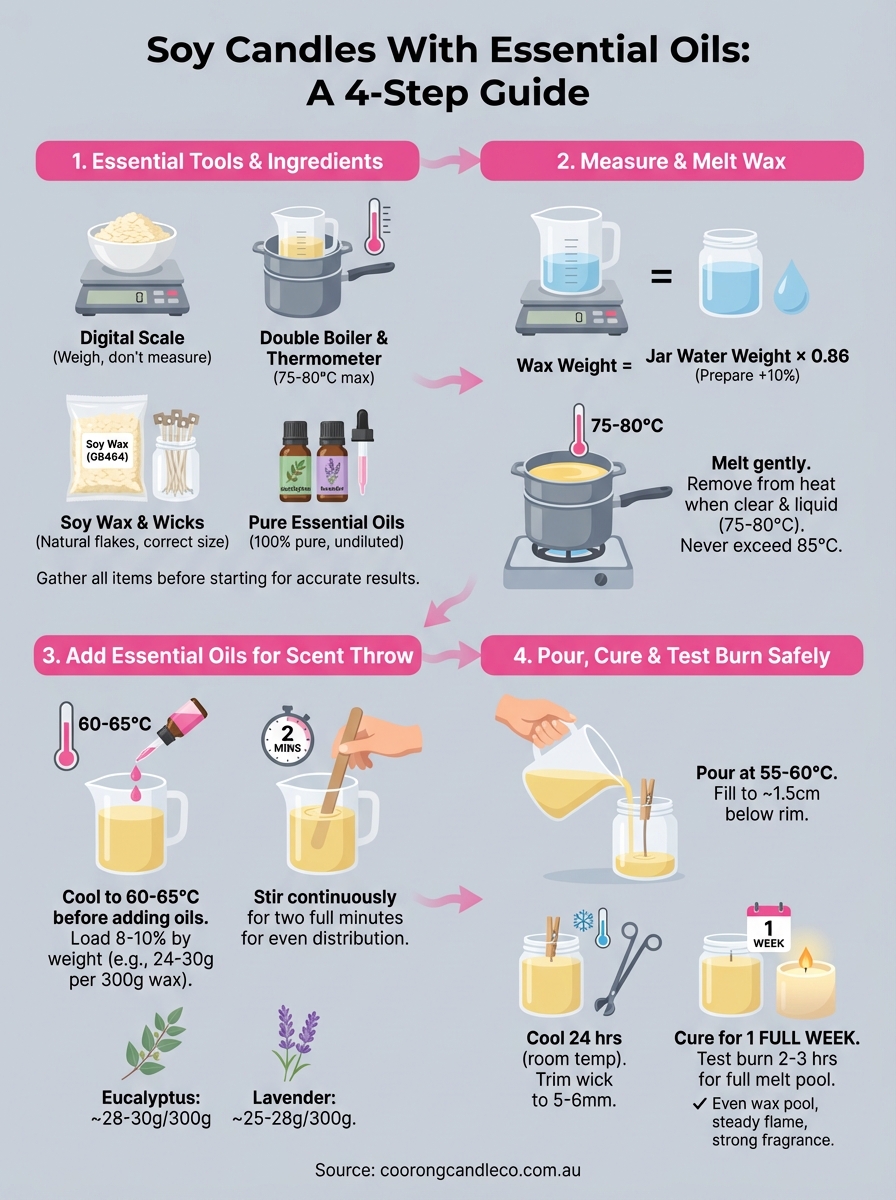
Essential equipment for candle making
You'll need specific tools to measure, melt, and pour your candles accurately. A digital kitchen scale measures wax and oils by weight, which gives far more consistent results than volume measurements. A double boiler setup (or a heat-safe pouring jug placed in a saucepan of water) melts wax gently without scorching. You'll also need a thermometer that reads between 40°C and 100°C to monitor temperatures precisely.
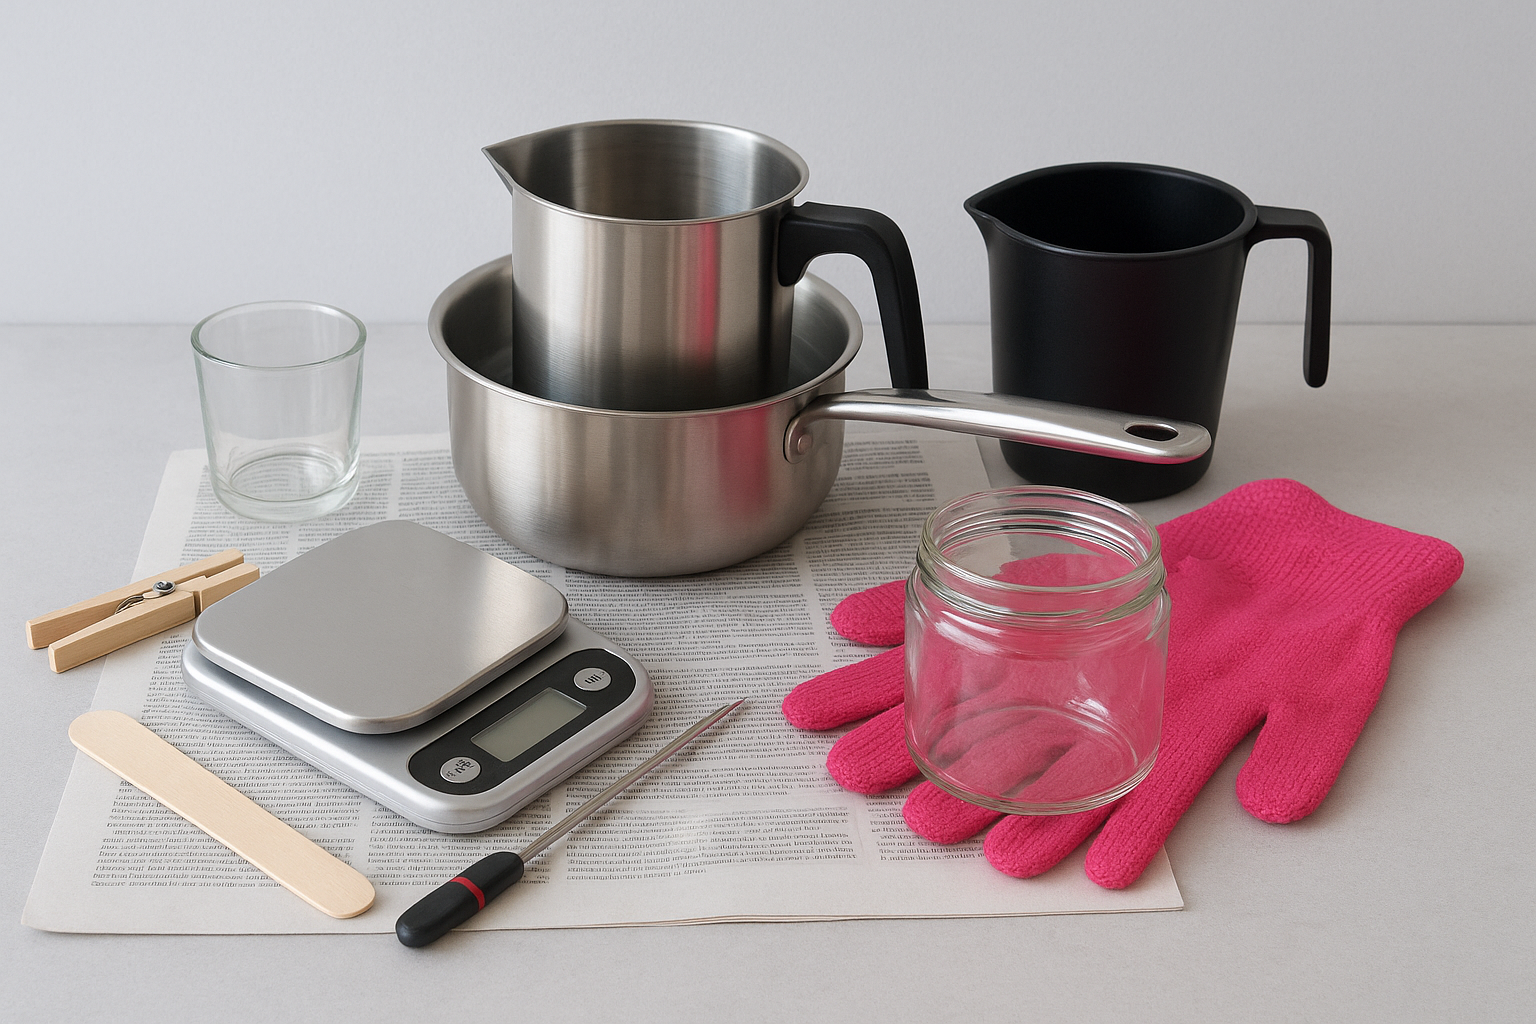
Additional equipment includes:
- Wooden stirring sticks or silicone spatulas for mixing
- Clothes pegs or wick holders to centre wicks while pouring
- Old newspapers or baking paper to protect your workspace
- Heat-resistant gloves for handling hot containers
Core ingredients and materials
Soy wax flakes form the foundation of your candles. Look for 100% natural soy wax specifically formulated for container candles, typically labelled as GB464 or similar grades. You'll need pre-tabbed cotton wicks sized appropriately for your jar diameter (most 350g candles use ECO 10 or CD 12 wicks). Essential oils provide your fragrance, and you'll want high-quality, pure oils rather than fragrance oils with synthetic additives.
Container options matter too. Glass jars with straight sides and wide openings work best for beginners. Avoid narrow necks or decorative ridges that make pouring difficult and can create air pockets.
Quality ingredients create quality results. Cheap wax or diluted essential oils compromise both scent throw and burn performance.
Setting up your workspace safely
Choose a well-ventilated area with good lighting where you can work uninterrupted. Your kitchen bench works perfectly, provided you cover surfaces with newspaper or silicone mats. Keep pets and children away while working with hot wax, and never leave melting wax unattended on the stove.
Have clean, dry containers ready before you start melting wax. Any moisture in your jars causes problems with adhesion and finish. Arrange everything within arm's reach so you're not scrambling for equipment when working with time-sensitive steps later in the process.
Step 1. Choose your wax, wick, jar, and oils
Your first decision shapes everything that follows. Getting the right combination of materials from the start saves you from troubleshooting problems later, and ensures your soy candles with essential oils burn cleanly and throw scent effectively. Each component plays a specific role in the final product's performance.
Selecting the right soy wax grade
GB464 soy wax works best for container candles because it adheres well to glass and holds fragrance effectively. This grade creates a smooth finish with minimal frosting (the white crystalline appearance that sometimes forms on soy candles). You'll find it readily available from Australian candle supply stores in 1kg or 5kg bags.
Alternative grades like CB Advanced or EcoSoya also work well, but avoid pillar wax formulations in containers. These harder waxes pull away from glass as they cool, creating unsightly gaps and poor burn pools.
Matching wick size to your container
Container diameter determines your wick size. For standard 8cm diameter jars (typical 350g candles), use ECO 10 or CD 12 wicks. Wider containers need thicker wicks, while smaller tins require thinner options like ECO 6 or CD 8.
| Container Diameter | Recommended Wick |
|---|---|
| 6-7cm | ECO 6, CD 8 |
| 8-9cm | ECO 10, CD 12 |
| 10-11cm | ECO 14, CD 16 |
The wrong wick size creates tunnelling (wax remaining on jar sides) or excessive smoking, even when everything else is perfect.
Choosing containers and essential oils
Straight-sided glass jars with heat-resistant properties work most reliably. Avoid recycled food jars unless they're specifically tested for candle use, as some glass types crack under sustained heat.
For essential oils, select pure, undiluted varieties from reputable suppliers. Lavender, eucalyptus, and peppermint work well for beginners because they maintain strong scent throw in soy wax. You'll need approximately 50-60g of essential oil per kilogram of wax for noticeable fragrance.
Step 2. Measure and melt wax the right way
Accurate measurements and controlled melting make the difference between professional-looking candles and disappointing results. Soy wax responds poorly to guesswork and high heat, so you need to approach this step with precision and patience. The process takes approximately 20 minutes from weighing to melting, but rushing creates problems that surface when your candles cool.
Calculate the right amount of wax
Measure your wax by weight, never volume. Place your empty jar on your digital scale, zero it out, then fill the container with water to your desired wax level. Record this weight and multiply by 0.86 (soy wax's density factor). For a 350g jar filled to 2cm below the rim, you'll need approximately 300g of soy wax flakes.
Always prepare 10% extra wax to account for what adheres to your pouring jug and stirring tools.
Melt wax using the double boiler method
Fill your saucepan with 5-7cm of water and place it on medium-low heat. Set your heat-safe jug containing the measured wax into the water, ensuring the water level reaches halfway up the jug's sides. The wax will melt gradually over 15-20 minutes, requiring occasional stirring with your wooden stick.
Monitor the temperature continuously. Once melted, remove from heat when the wax reaches 75-80°C. Never exceed 85°C as higher temperatures damage soy wax's molecular structure and reduce its ability to hold essential oils effectively. The wax should appear completely clear and liquid with no solid flakes remaining before you proceed to adding fragrance.
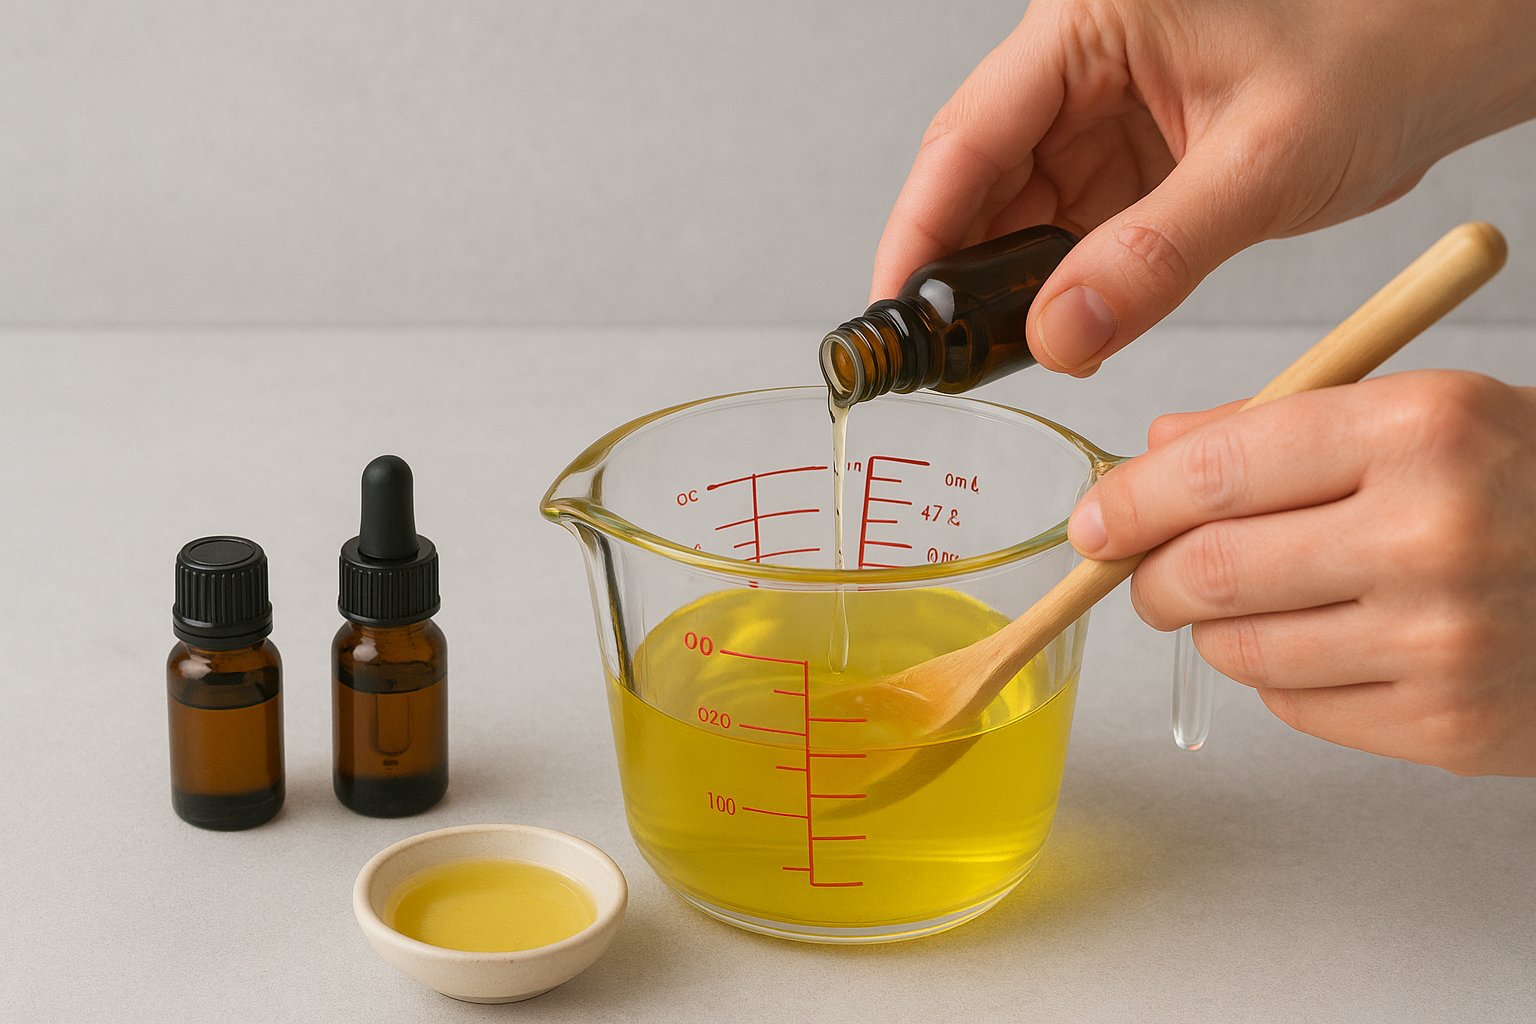
Step 3. Add essential oils for a strong scent throw
Your melted wax sits ready at the optimal temperature for accepting fragrance. This step determines whether your soy candles with essential oils fill a room or barely register when burning. Essential oils behave differently from synthetic fragrances, requiring specific techniques to bind properly with soy wax and maintain their scent profile through the burning process.
Wait for the right temperature before adding oils
Let your melted wax cool to 60-65°C before adding essential oils. Higher temperatures cause the volatile compounds in essential oils to evaporate instantly, wasting your ingredients and reducing scent throw. Use your thermometer to check the temperature precisely, stirring occasionally as the wax cools to maintain even heat distribution.
Adding oils at the correct temperature preserves their aromatic compounds and ensures they bond properly with the wax molecules.
Measure and blend your essential oils
Calculate 8-10% fragrance load by weight for strong scent throw. For 300g of wax, add 24-30g of essential oil. Pour the oils into your cooled wax and stir continuously for two full minutes using slow, deliberate movements. This thorough mixing distributes the oils evenly throughout the wax rather than letting them settle at the bottom.
Effective single-note options include:
- Eucalyptus: 28-30g per 300g wax
- Lavender: 25-28g per 300g wax
- Peppermint: 24-26g per 300g wax
Blend complementary oils at 60:40 ratios for more complex fragrances. Lavender (18g) paired with eucalyptus (12g) creates a balanced, spa-like scent that maintains clarity when burning.
Step 4. Pour, cool, cure, and test burn safely
Your wax sits perfectly blended with essential oils, ready for the final transformation into finished candles. This stage requires careful attention to detail because mistakes here affect burn quality and safety. You need to pour at the right temperature, allow adequate curing time, and test your first candle properly before making a full batch.
Secure your wick and pour at the correct temperature
Place your pre-tabbed wick in the centre of your jar using a clothes peg or wick holder to keep it upright. Pour your scented wax when it reaches 55-60°C, moving in a slow, steady stream to avoid air bubbles. Fill to approximately 1.5cm below the rim, leaving enough space to prevent overflow during burning.
Pouring too hot creates sinkholes and frosting, while pouring too cool causes poor adhesion and surface imperfections.
Allow proper cooling and curing time
Let your soy candles with essential oils cool at room temperature for 24 hours without moving them. Avoid refrigeration, which causes cracking and frosting. After cooling, trim the wick to 5-6mm above the wax surface. Then leave your candles to cure for one full week before burning. This curing period allows the essential oils to bind completely with the wax molecules, maximizing scent throw.
Test your first burn properly
Light your test candle in a draft-free location on a heat-resistant surface. The first burn should last 2-3 hours minimum to establish a full melt pool across the entire surface. Watch for these indicators:
- Even wax pool reaching all edges
- Steady flame without flickering or smoking
- No excessive soot on jar walls
- Strong fragrance release after 30 minutes
Adjust your wick size if needed before making additional candles.
A simple wrap-up and what to do next
You now have everything needed to create soy candles with essential oils from scratch. Start with a single test batch using one fragrance rather than attempting multiple variations immediately. This approach lets you master the temperature controls and timing before experimenting with complex blends.
Keep detailed notes during your first few attempts. Record your wax temperature, essential oil percentages, and burn test results. These records become invaluable when troubleshooting issues or recreating successful batches. Most candle makers need three to five attempts before achieving consistent results, so expect some trial and error.
If you want to experience professionally crafted soy candles while perfecting your technique, explore our handmade candle collection. Each one demonstrates the quality you're working towards, with carefully balanced fragrances and proven burn performance. They also make excellent reference samples for comparing scent throw and finish against your homemade versions.