Choosing the wrong wick can ruin an otherwise perfect candle. Too small and you get tunnelling, wasted wax, and weak scent throw. Too large and you're dealing with sooty jars, mushrooming, and flames that burn dangerously high. If you've been searching for a CandleScience wick guide, you're clearly past the guesswork stage and ready for a systematic approach to wick selection, and that's exactly what this article delivers.
At Coorong Candle Co., wicking is something we take seriously. Every hand-poured soy candle we produce goes through multiple burn tests before a fragrance ever makes it into our range. We've learned through years of working with natural soy wax, and plenty of trial and error, that the wick is the single most important variable in candle performance. It dictates how evenly the wax melts, how well the fragrance fills a room, and how long the candle lasts.
This guide breaks down CandleScience's wick recommendation system step by step, covering wick types, sizing charts, and how variables like container diameter and fragrance load affect your choice. Whether you're a hobbyist pouring your first batch or refining an existing recipe, you'll walk away knowing exactly how to match the right wick to your specific setup.
What the CandleScience wick guide can and can't do
The CandleScience wick guide is a practical reference system that helps you narrow down wick options based on your specific candle setup. It covers a range of wick series, from the popular CD and ECO series through to cotton core and wood wick options, and it pairs each series with guidance on which wax types and container sizes they suit best. Before you can use it effectively, you need to understand what the system is designed to do and where it stops being useful.
What the guide does well
CandleScience's wick resources give you a structured starting point rather than leaving you to test every wick in their catalogue blindly. The charts cross-reference container diameter in inches with wick size recommendations for specific wax blends, so you can immediately eliminate dozens of options and focus on a shortlist of two or three candidates. For common setups, like a 3-inch diameter jar with a single-pour soy wax, the guide will often point you directly to the right size range on your first attempt.
This kind of pre-filtered shortlist saves significant time and wax, especially when you're producing candles in small batches and want to limit your testing material.
The guide also helps you understand wick series differences. Each series burns differently: CD series wicks burn cooler and suit high-fragrance-load soy candles, while ECO wicks produce a slightly larger flame and suit harder wax blends. Knowing this before you order means you're choosing based on performance logic rather than guesswork.
Where the guide has limits
No wick chart can account for every variable in your specific recipe. Fragrance oil composition affects melt pool behaviour significantly, and two fragrance oils at the same load percentage can produce very different results because of differences in their flash points and viscosity. The guide won't tell you how a particular floral fragrance versus a woody fragrance will interact with your chosen wick.
Your container shape, pour temperature, and curing time also sit outside what any chart can predict. A straight-sided jar and a tapered jar with identical top diameters will wick differently because the melt pool dynamics change as the candle burns deeper. Treat the wick guide as the first filter in your process, not the final word. Every serious candle maker still needs to run physical burn tests before committing to a wick for production.
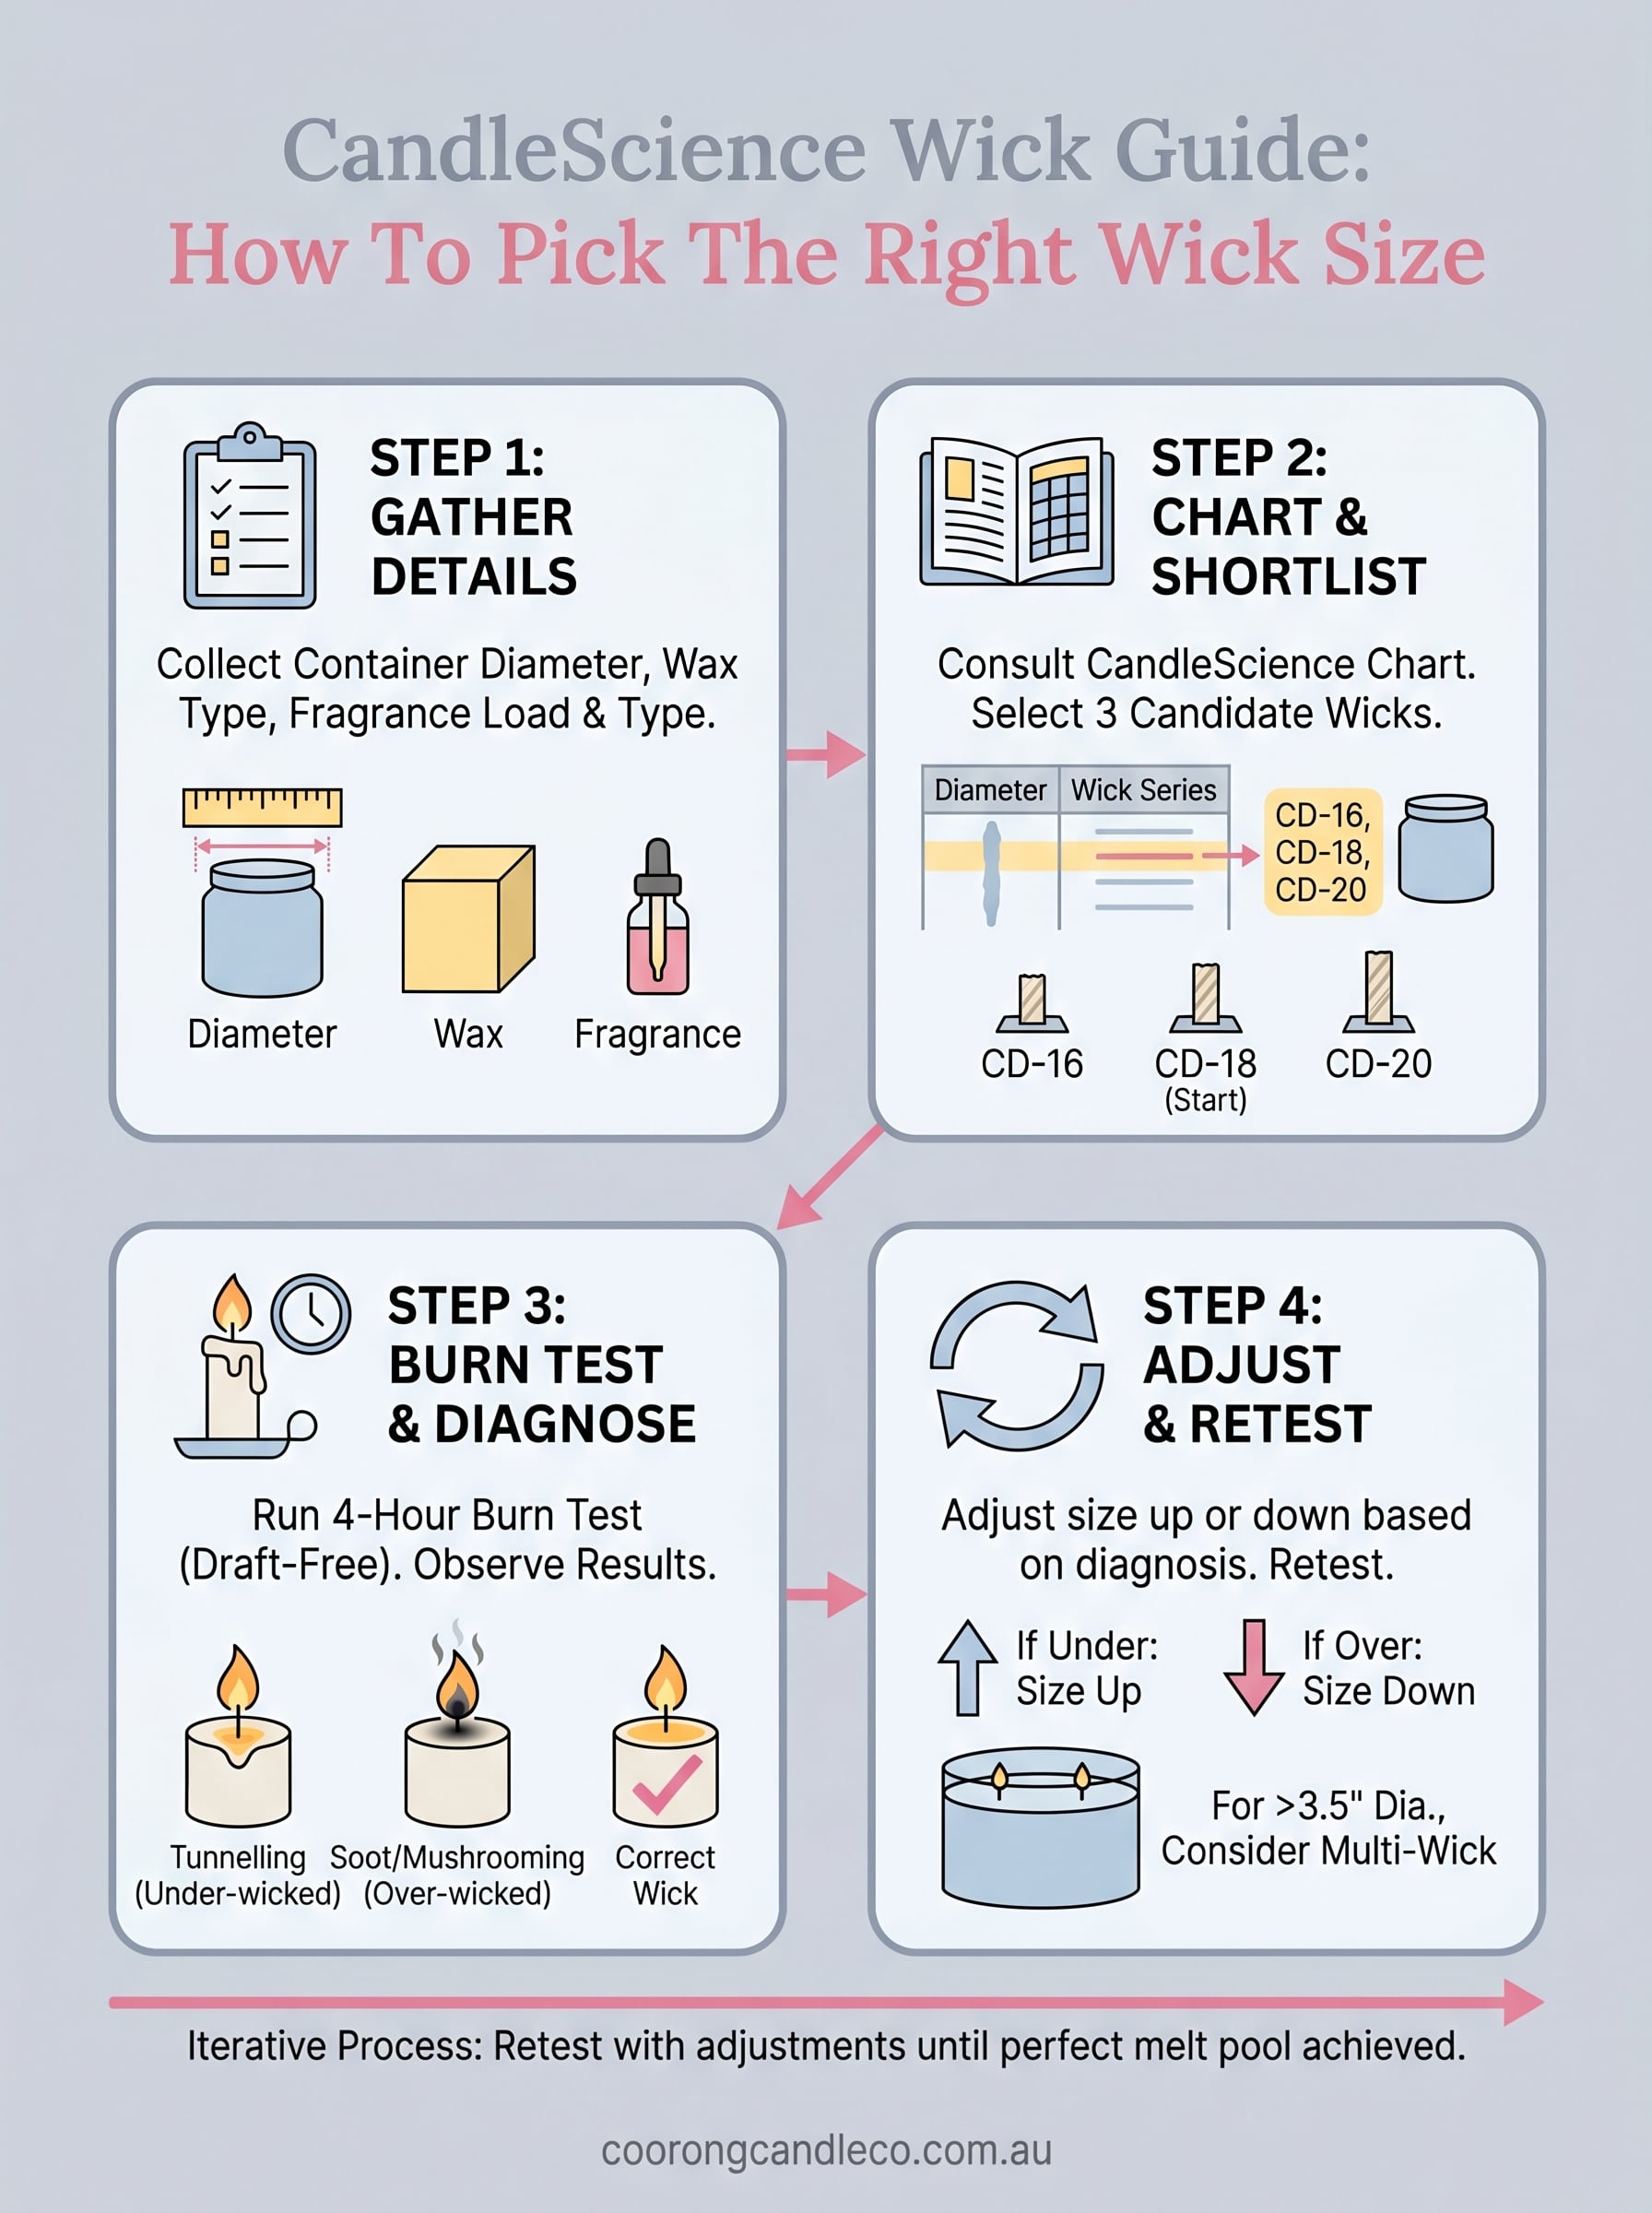
Step 1. Gather the details that change wick size
Before you open the candlescience wick guide and start cross-referencing charts, collect four specific pieces of information. Container diameter, wax type, fragrance load percentage, and fragrance oil type are the variables that determine which wick range suits your candle. Have these noted down before you look at a single chart.
Container diameter and shape
Container diameter is the most important measurement you'll take. Measure the internal diameter at the top of your container in inches, because CandleScience's charts use imperial measurements. A 3-inch diameter jar sits in a very different wick range than a 3.5-inch jar, so use a ruler or calipers and record the figure to the nearest quarter inch.
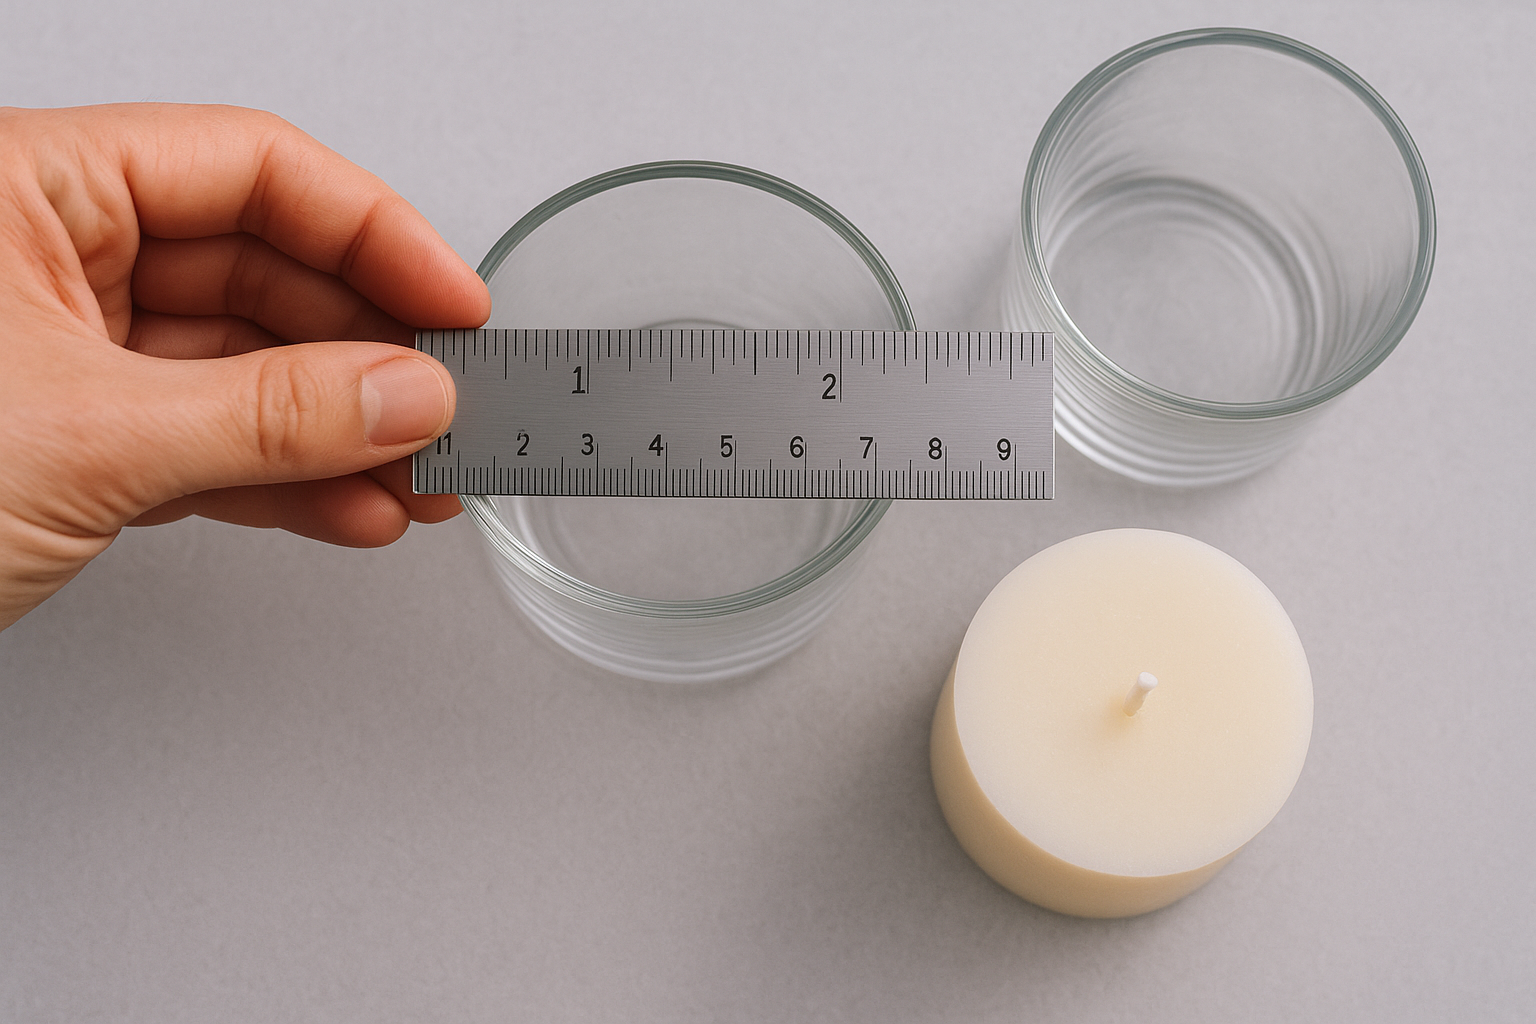
If your container tapers inward toward the base, note both the top and bottom diameters, because the wick has to handle different melt pool widths as it burns deeper.
Straight-sided containers produce the most predictable melt pool and are the easiest to wick accurately. Tapered or curved jars often need a slightly larger wick than the chart suggests based on top diameter alone, so factor that in when you build your test shortlist.
Wax type and fragrance load
Wax type determines which wick series will perform in your candle. Soft single-pour soy waxes burn differently from coconut-paraffin blends, and chart recommendations shift significantly between wax categories. Write down your exact wax product name before consulting any chart.
Your fragrance load percentage changes the burn behaviour even within the same wax. A 6% load behaves differently from a 10% load in the same jar, as higher fragrance content softens the wax pool and typically requires a larger wick to achieve full melt coverage.
Step 2. Read the wick chart and pick a starting wick
With your details in hand, open the CandleScience wick guide and navigate to the wick series section that matches your wax type. CandleScience organises its charts by wick series, so locate the series recommended for your specific wax first, then cross-reference your container diameter to find the suggested size range. Each series page also lists the wax types it suits best, which helps you confirm you're in the right section before you start reading sizes.
How to read the size columns
Each chart lists container diameter ranges across the top and wick sizes down the side. Find the column that matches your measured diameter and scan down to your wax type row. CandleScience typically highlights two or three candidate sizes for each diameter range rather than a single answer, because fragrance load and container shape require you to test within that shortlist rather than rely on one fixed recommendation.
If your container diameter falls between two columns, always pull candidates from the larger column as your starting point, then work downward if the burn runs too hot during testing.
Build your shortlist from the chart
Once you identify the recommended size range, write down three wicks: the middle size and one above and one below it. For example, if the chart points to a CD-18 for your setup, add CD-16 and CD-20 to your test list. This range gives you enough variation to diagnose burn issues without ordering excessive quantities of materials.
Order a small quantity of each candidate before committing to a bulk purchase. Label each test jar clearly with the wick size and pour date so your results stay organised and easy to compare. Running all three wicks simultaneously cuts your overall testing time and gives you a direct side-by-side comparison.
Step 3. Burn test and diagnose under or over wicking
Once your three labelled test jars are ready, light each one at the same time and let them burn for four hours in a draft-free room. Place them on a heat-safe, level surface and check in at the one-hour mark and again at the four-hour mark. Write down what you observe at each checkpoint rather than relying on memory, because the differences between wick sizes are subtle and easy to mix up after multiple rounds of testing.
Setting up a valid burn test
A valid burn test needs consistent conditions across all three jars. Use the same fragrance load, the same wax batch, and the same pour temperature for every test candle. If any of those variables differ between jars, your results won't tell you which wick size caused the performance difference, and you'll need to repeat the entire round from scratch.
Allow each candle to cure for at least 48 hours after pouring before you light it, because fresh wax hasn't fully set and will burn differently from a cured candle.
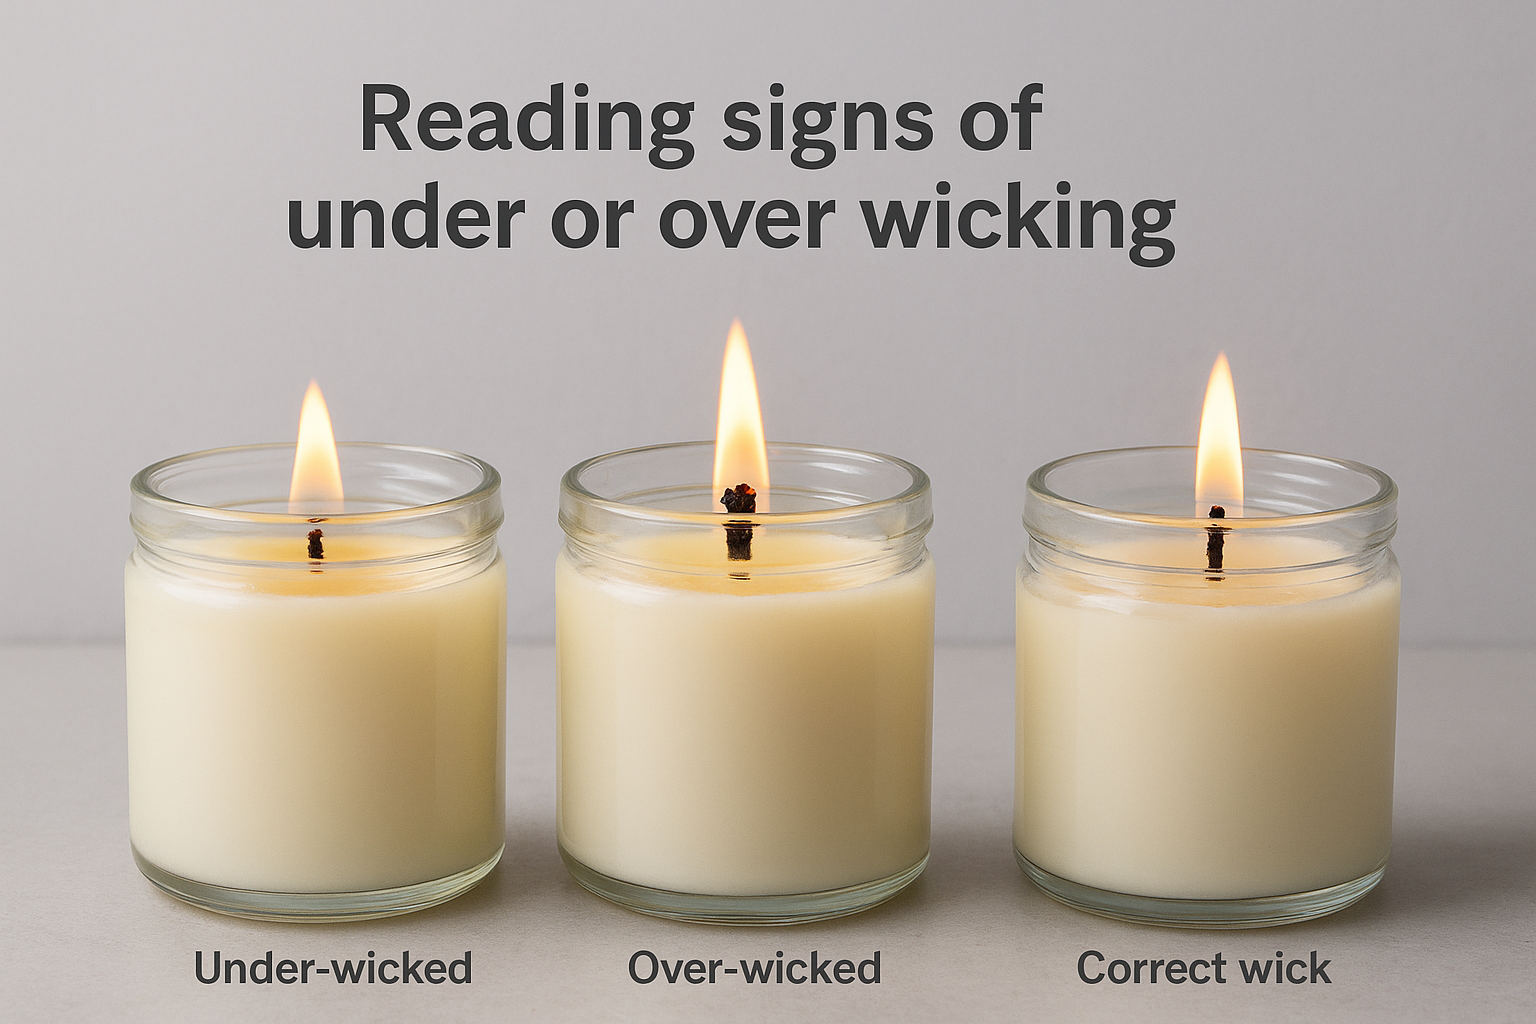
Reading signs of under or over wicking
The candlescience wick guide outlines expected burn behaviour for each wick series, and the table below gives you a direct reference for diagnosing your results after a four-hour burn.
| Sign observed | Likely cause |
|---|---|
| Tunnelling, no full melt pool at four hours | Under-wicked |
| Mushrooming carbon on wick tip | Over-wicked |
| Soot forming on jar walls | Over-wicked |
| Weak scent throw throughout burn | Under-wicked |
| Full melt pool, steady flame, clean wick | Correct wick size |
A full melt pool should reach close to the container walls by the four-hour mark without the flame running excessively high or the jar becoming too hot to hold near the base.
Step 4. Adjust, retest, and decide on multi-wick
After your first burn round, you'll have a clear result for at least one of your three test wicks. If none of them performed correctly, your setup likely sits between two wick series rather than within one, and consulting the candlescience wick guide again with that in mind will help you identify an alternative series to test. If one wick came close but not quite right, your adjustment is simpler than starting over.
Adjusting based on burn test results
Move one size up from your closest result if you saw tunnelling or weak scent throw, and one size down if you saw mushrooming or sooting. Rerun the four-hour burn test with your adjusted candidate alongside your previous best performer so you have a direct comparison in front of you. Record your observations using the same format as your first round, keeping the conditions identical.
If your second round still produces inconsistent results, check whether your fragrance oil load has changed between batches, as even a 1% difference can shift your burn behaviour noticeably.
When to move to a multi-wick setup
Some container diameters above 3.5 inches simply cannot achieve a full melt pool with a single wick without running dangerously hot. If your largest single-wick candidate creates a flame that makes the jar base hot to touch before reaching the container walls, a two-wick configuration is your correct path forward. Divide your container diameter roughly in half to estimate wick placement, space each wick symmetrically from centre, and retest using a size two steps below your single-wick candidate. Multi-wick setups burn faster, so account for that in your expected burn time calculations before finalising your recipe.
A simple way to finish and feel confident
Wick selection feels overwhelming at the start, but the CandleScience wick guide reduces it to a repeatable four-step process: gather your variables, consult the chart, run a four-hour burn test, and adjust based on what you observe. Follow those steps in order and you'll have a confirmed wick for your recipe within two or three rounds of testing, with clear notes to back up every decision you made.
Your records matter as much as your results. Every time you change your wax batch, fragrance oil, or container, run the process again from Step 1 rather than assuming your previous wick choice carries over. Small recipe changes shift burn behaviour more than most makers expect, and a fresh round of testing is far cheaper than a failed production batch.
If you're looking for inspiration on what a well-wicked candle can achieve, browse our handcrafted soy candle collection and see the results for yourself.