You've invested in a beautiful soy candle, lit it with anticipation, only to watch wax build up around the edges while a tunnel forms down the centre. It's frustrating, wasteful, and all too common. Understanding how to fix candle tunneling can save your favourite candles from an early retirement, and ensure you get every hour of burn time you paid for.
At Coorong Candle Co., we hand-pour every soy candle with care, but even the best-made candles can tunnel if they're not burned correctly during those first crucial hours. The good news? Tunneling isn't permanent. With a few simple techniques using items you likely already have at home, you can rescue an uneven candle and restore its full burn potential.
This guide walks you through proven methods to fix tunneling, from the popular aluminium foil trick to using a hair dryer, plus practical tips to prevent it from happening again. Whether you're salvaging a treasured candle or simply want to get more value from your purchase, you'll find straightforward solutions that actually work.
What candle tunnelling is and why it happens
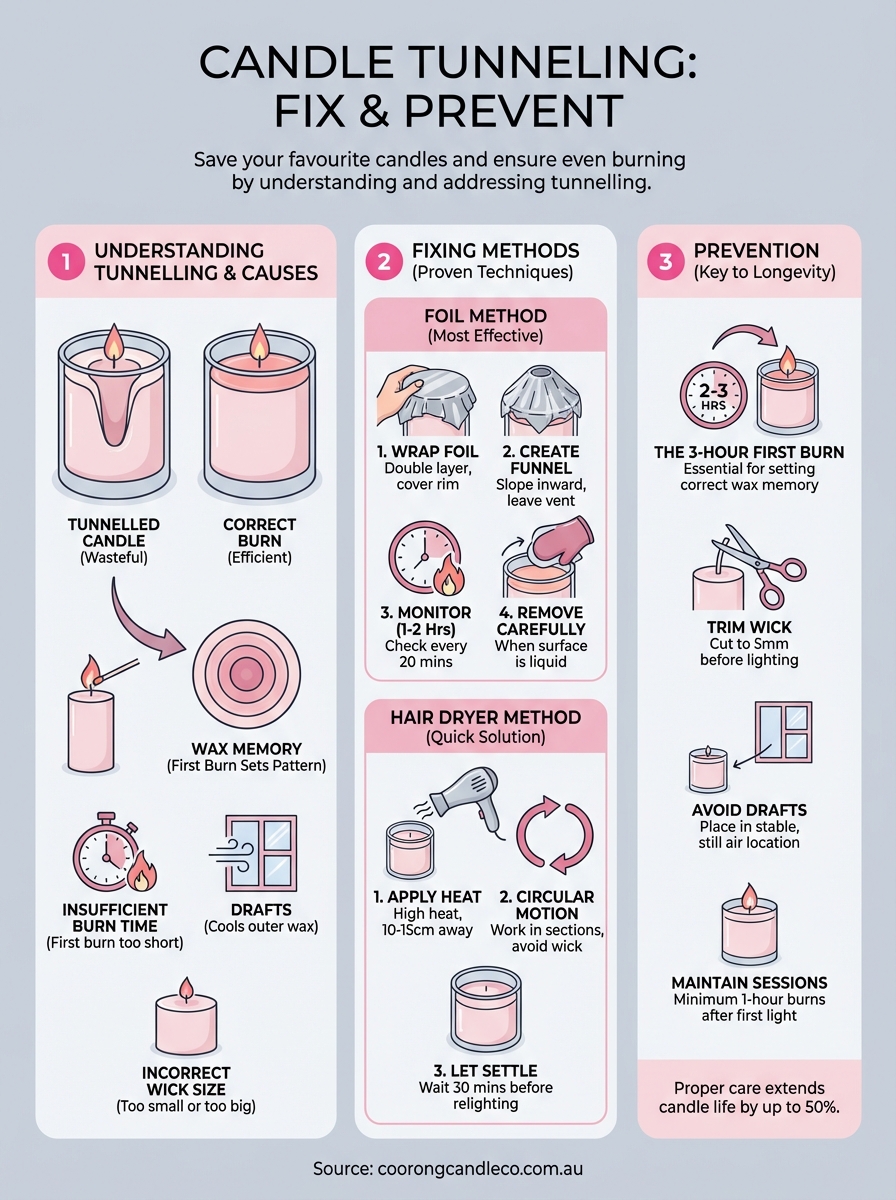
Candle tunnelling occurs when wax burns down the centre of your candle while leaving a thick wall of unused wax around the rim. Instead of melting evenly across the entire surface, the flame creates a narrow tunnel that grows deeper with each burn. This wastes a significant portion of your candle and shortens its total burn time by up to 50%.
The science behind wax memory
Soy wax (and all waxes) has a unique property called wax memory. During your candle's first burn, the wax creates an invisible boundary line that marks how far it melted across the surface. Every subsequent burn will struggle to melt past that initial melt pool, effectively locking your candle into the same burn pattern. This memory effect is why understanding how to fix candle tunneling starts with recognising that the first burn matters most.
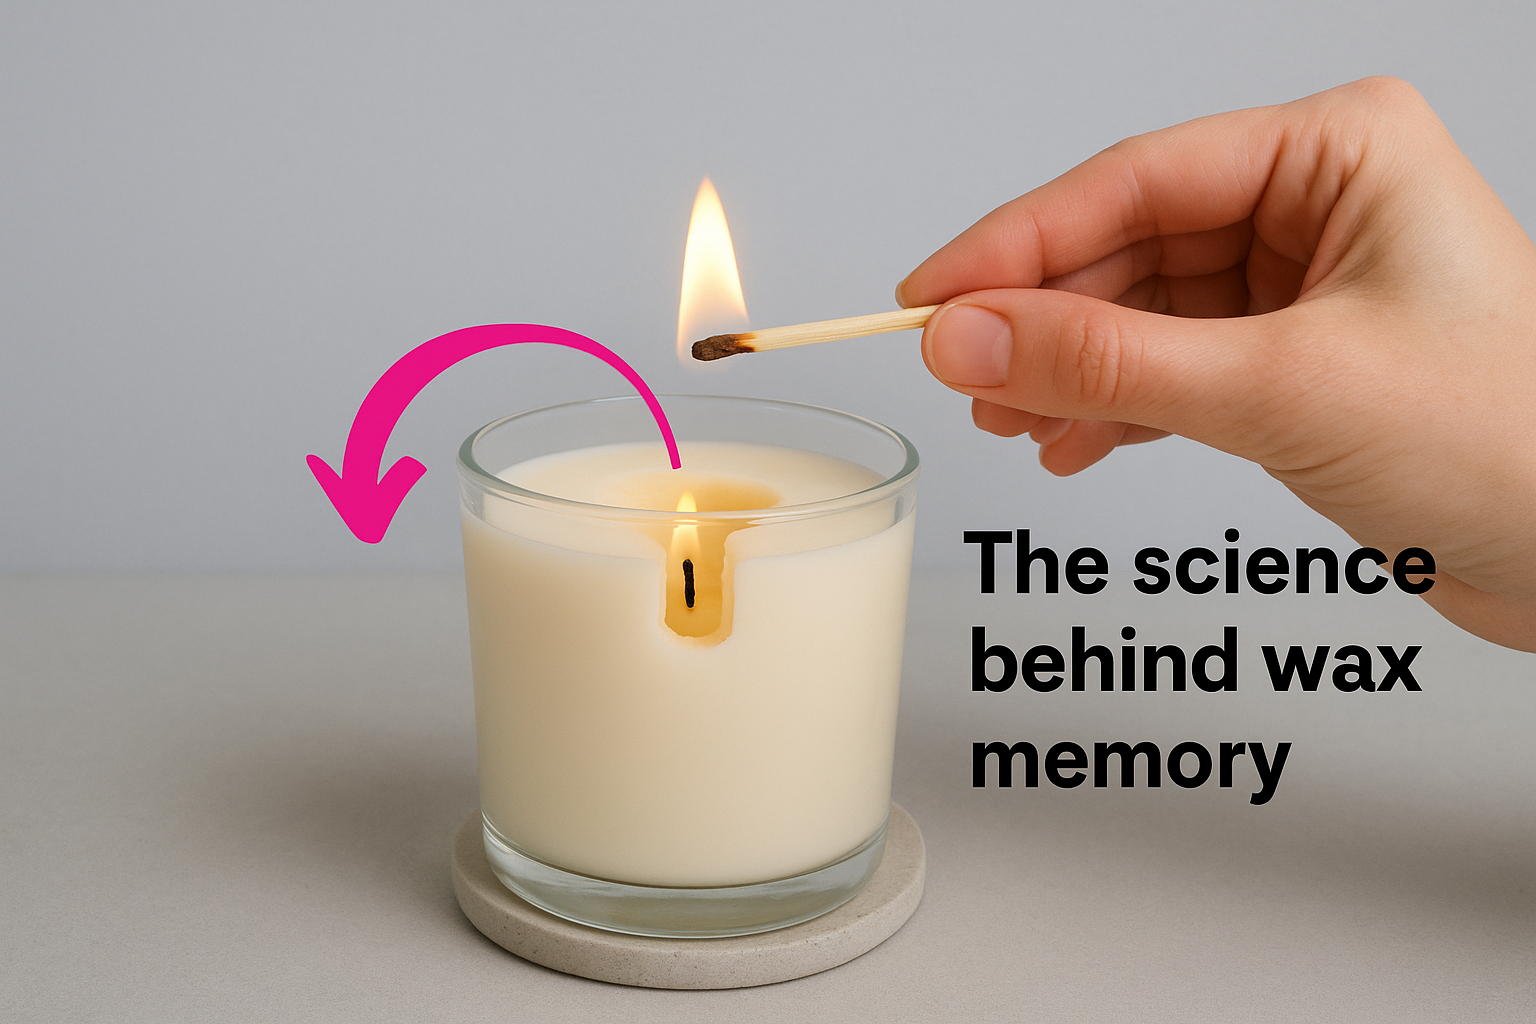
Your candle's first burn sets a permanent melt pool pattern that all future burns will follow.
Think of it like training your candle. If you only burn it for 30 minutes on the first light, you're training the wax to melt only that far every time, creating a tunnel that becomes harder to correct with each subsequent use.
Common causes of tunnelling
The most frequent culprit is insufficient burn time during early uses. When you extinguish a candle before the entire top surface melts, you're reinforcing the memory ring and making tunnelling inevitable. Most quality soy candles need at least two to three hours on their first burn to establish a proper melt pool.
Drafty environments also contribute to tunnelling by cooling the outer wax faster than the centre can melt it. Similarly, wicks that are too small for the candle diameter can't generate enough heat to melt the full surface, while oversized wicks create excessive heat that burns too quickly down the middle.
Step 1. Fix tunnelling with aluminium foil
The aluminium foil method is the most effective way to fix candle tunneling because it creates a makeshift oven that traps heat around the rim. This concentrated warmth forces the stubborn outer wax to melt and level out with the centre. You'll need regular kitchen foil and about two hours of supervised burn time to restore your candle's surface.
How to apply the foil method
Start by lighting your candle and letting it burn for 10 to 15 minutes to establish a flame. Tear off a sheet of aluminium foil large enough to cover the entire top of your candle jar, then fold it to create a double layer for better heat reflection.
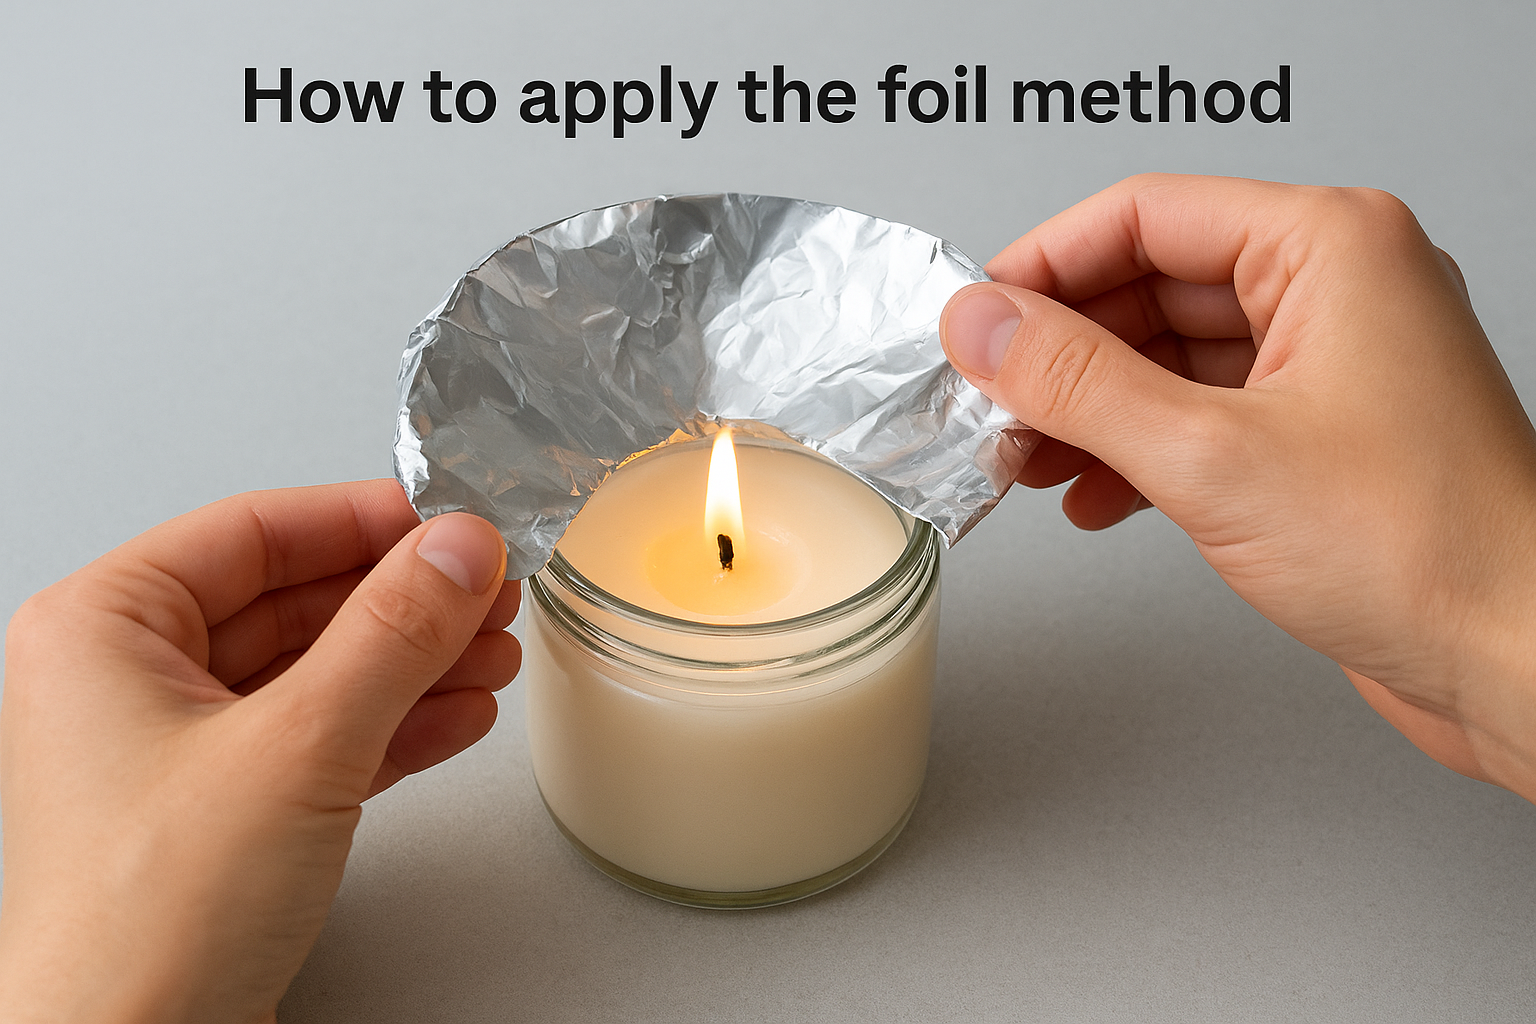
- Wrap the foil around the top rim of your candle jar, leaving the centre completely exposed
- Create a funnel shape so the foil slopes inward toward the flame without touching it
- Leave a 5cm opening in the centre for the flame to breathe and prevent smoke buildup
- Monitor the candle every 20 minutes until the entire surface reaches a liquid state
- Remove the foil carefully using oven mitts once the wax pool reaches the jar edges
The foil redirects heat outward, forcing reluctant rim wax to finally melt and join the centre pool.
This method typically takes one to two hours depending on how severe your tunneling problem is. Never leave the foil-wrapped candle unattended, as the trapped heat can cause the jar to become extremely hot.
Step 2. Melt the rim with a hair dryer
If you prefer a quicker solution or don't have aluminium foil handy, a standard hair dryer offers another effective way to fix candle tunneling. This method works by directing concentrated heat specifically at the built-up wax rim, softening and melting it until the surface levels out. You'll achieve results in about 10 to 20 minutes, making it ideal when you need immediate correction.
How to use a hair dryer safely
Set your hair dryer to its highest heat setting and hold it approximately 10 to 15 centimetres above the candle's rim. Move the dryer in slow circular motions around the entire perimeter, keeping the airflow angled down toward the wax wall rather than directly at the wick.
- Work in sections of about 5 to 10 seconds per area
- Watch for the wax to soften and begin pooling toward the centre
- Rotate the candle jar as you go to ensure even melting
- Stop immediately if the jar becomes too hot to touch
- Allow the melted wax to settle for 30 minutes before relighting
A hair dryer gives you precise control over exactly where heat is applied, targeting problem areas without waste.
Never let the hair dryer touch the wax directly or hover over the wick for extended periods. The concentrated airflow can blow out your flame or create uneven heating patterns that worsen the problem.
Step 3. Correct wick and draft problems
Sometimes learning how to fix candle tunneling means addressing underlying issues that prevent proper burning. A wick that's too long creates an oversized flame that burns too hot and fast down the centre, while air currents from windows, fans, or air conditioning units cool the outer wax before it can melt. Both problems sabotage your candle's ability to maintain an even burn pool.
Trim your wick to proper length
Before every burn, use scissors or a wick trimmer to cut your wick to 5 millimetres in length. This measurement creates the ideal flame size for soy wax, generating enough heat to melt the full surface without burning too aggressively. Wicks longer than 8 millimetres produce excessive soot and uneven heating patterns that reinforce tunneling.
Check your wick after the first hour of burning. If it develops a mushroom-shaped carbon cap, extinguish the flame, let the wax cool for 10 minutes, then trim away the blackened tip before relighting.
Eliminate drafts during burning
Move your candle away from open windows, ceiling fans, and air vents that create air movement across the surface. Place it in a central location on a stable, heat-resistant surface where airflow remains minimal. Drafts cause one side of your candle to cool faster than the other, creating uneven wax pools that eventually lead to tunneling.
A properly trimmed wick in a draft-free location gives your candle the best chance at achieving a full melt pool.
Step 4. Prevent tunnelling on every burn
Once you understand how to fix candle tunneling, prevention becomes far more important than correction. The most critical burn happens when your candle is brand new, as this first lighting establishes the wax memory pattern that dictates every future burn. Following a consistent routine eliminates tunnelling before it starts.
The three-hour first burn rule
Your candle's inaugural burn requires at least two to three hours of continuous flame time, or until the entire top surface melts into a liquid pool that reaches the jar edges. This complete melt creates a wax memory that trains future burns to follow the same wide pattern.
For Coorong Candle Co.'s 350g soy candles, plan your first burn when you have three uninterrupted hours available. Smaller 165g travel tins need approximately two hours to achieve a full melt pool.
Maintain proper burn sessions
After the first burn, continue lighting your candle for minimum one-hour sessions each time. Shorter burns don't allow the wax enough time to reach the edges, gradually shrinking your melt pool and creating the tunnelling effect you've worked to avoid.
Prevention takes less effort than correction, and proper burning habits extend your candle's life by 40%.
Trim the wick to 5 millimetres before every session and burn in draft-free locations for consistent results.
Key takeaways
Learning how to fix candle tunneling saves money and extends the life of your favourite candles by up to 50%. The aluminium foil method and hair dryer technique both work effectively to correct existing tunnels, but prevention remains your best strategy. Always burn new candles for two to three hours on the first lighting to establish proper wax memory.
Maintain your candles by trimming wicks to 5 millimetres before each session and burning in draft-free locations for minimum one-hour periods. These simple habits eliminate tunnelling problems before they start, ensuring you enjoy every gram of wax you purchased.
Ready to experience candles that burn perfectly from the first light? Explore our handcrafted soy candles made with premium ingredients and lead-free cotton wicks for a clean, even burn every time.