If you've ever wondered how to use essential oils in candle making, you're not alone. More crafters and small-batch producers are moving away from synthetic fragrances in favour of plant-derived alternatives, and for good reason. Essential oils bring authentic, complex aromas to your candles while keeping your ingredient list clean. But they also behave very differently to fragrance oils, and getting the details wrong can mean weak scent throw, wasted wax, or genuine safety hazards.
At Coorong Candle Co., we pour every candle by hand using natural soy wax and carefully chosen scent profiles inspired by the South Australian landscape. That process has taught us plenty about what works, and what doesn't, when it comes to scenting candles with botanical oils. Essential oils demand respect: the right ratios, the correct temperatures, and a solid understanding of flash points and skin-safe limits.
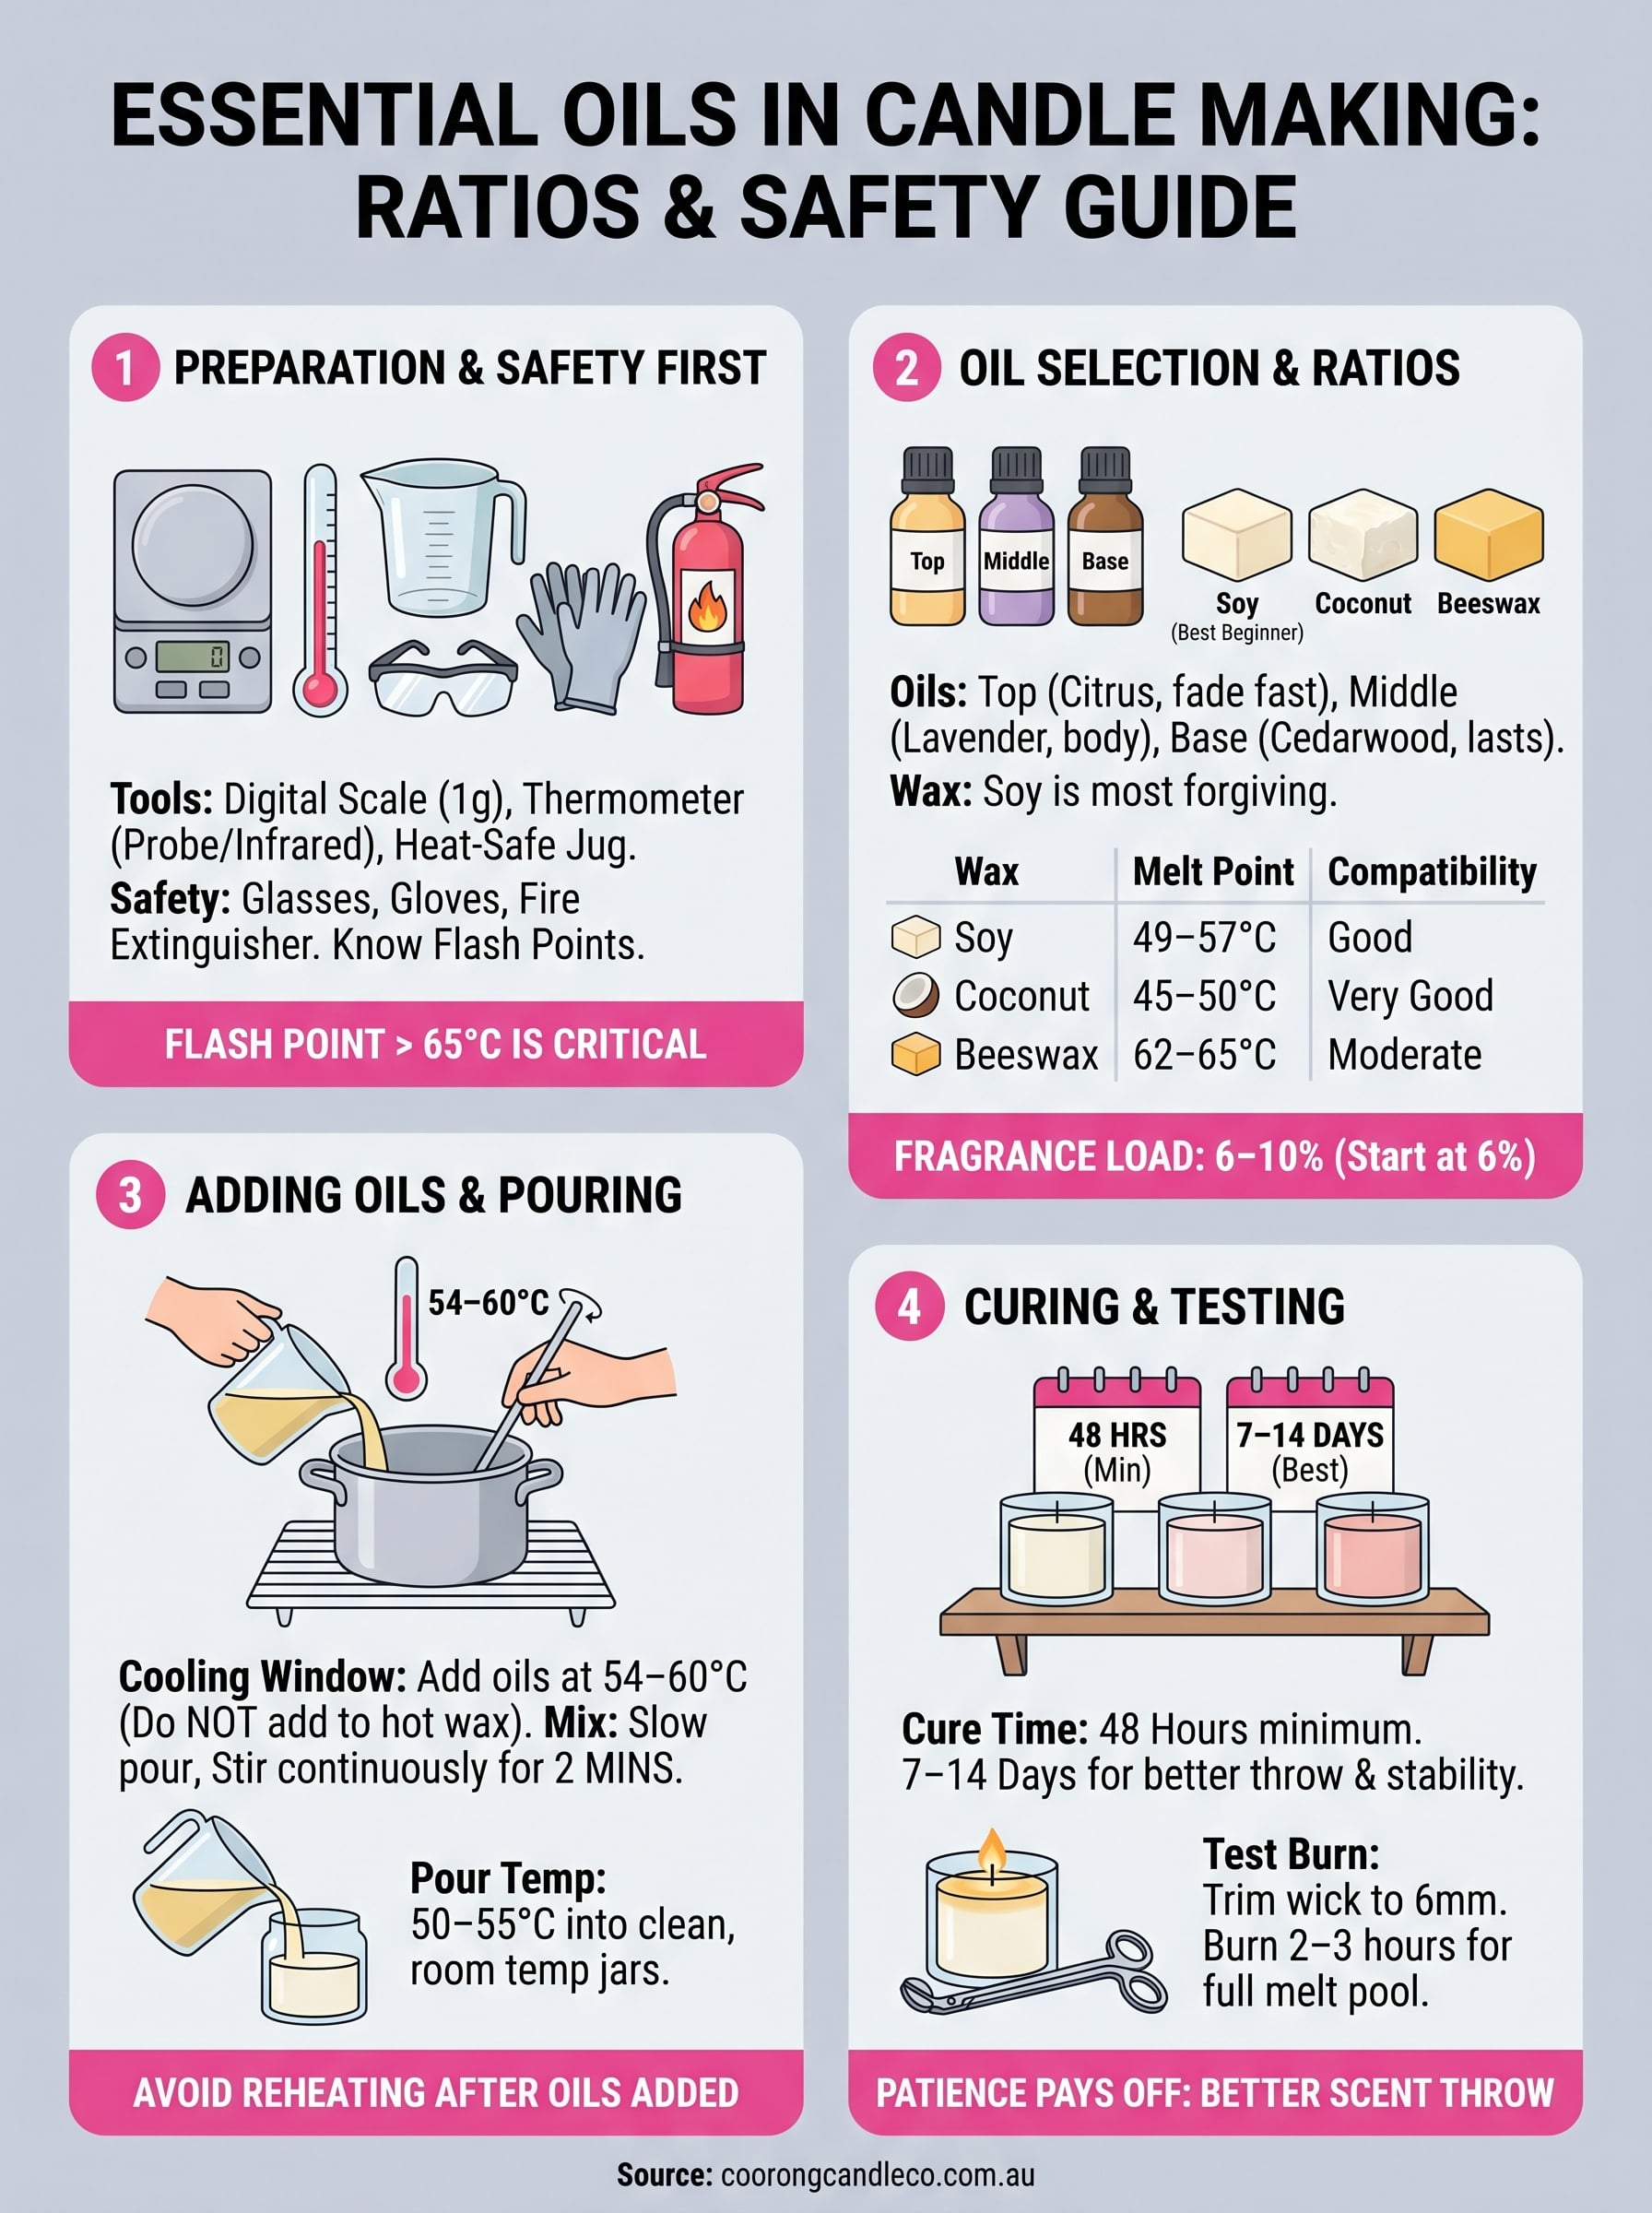
This guide covers the practical side of working with essential oils in soy and other natural waxes. You'll find recommended usage ratios, temperature guidelines, blending tips, and the safety precautions that matter most. Whether you're pouring your first batch or refining a recipe, this article will give you the clarity you need to get consistent, well-scented results.
What you need before you start
Before diving into how to use essential oils in candle making, gather everything in one place. Starting without the right materials leads to rushed decisions mid-pour, which is where most mistakes happen. You need a reliable natural wax, quality essential oils with known flash points, and the proper equipment to handle hot wax and concentrated botanicals safely.
Your wax
Natural waxes and essential oils work well together because both come from plant sources, and their similar molecular structures help the scent bind effectively. Soy wax is the most forgiving option for beginners because it has a lower melt point and holds essential oils reasonably well. Coconut wax and beeswax are also viable choices, though beeswax has a naturally strong honey scent that can compete with your chosen oils.
Here is a quick reference for common natural waxes:
| Wax type | Melt point (approx.) | EO compatibility |
|---|---|---|
| Soy wax (container) | 49–57°C | Good |
| Coconut wax | 45–50°C | Very good |
| Beeswax | 62–65°C | Moderate (strong base scent) |
| Paraffin | 46–68°C | Good, but not natural |
Your essential oils
Not every essential oil performs well in a candle. Citrus oils like lemon, lime, and grapefruit are highly volatile, meaning they burn off quickly and produce a weak hot throw. Heavier base note oils such as cedarwood, patchouli, sandalwood, and vetiver anchor a blend and last much longer through the burn.
Always check the flash point of any essential oil you plan to use. It must sit above 65°C to be safe in candle making, oils with lower flash points can ignite or evaporate before the wax even sets.
For a well-rounded scent, blend across three layers:
- Top notes (first impression, fade fast): lemon, orange, bergamot, eucalyptus
- Middle notes (body of the scent): lavender, rosemary, clary sage, geranium
- Base notes (depth and longevity): cedarwood, sandalwood, patchouli, frankincense
Your tools and safety gear
Candle making with essential oils requires a few specific tools. A digital kitchen scale accurate to one gram is non-negotiable, guessing measurements produces candles that either have no scent or seep oil onto the surface. You also need a reliable thermometer, either a digital probe or an infrared gun, to monitor wax temperature with precision throughout the process.

Beyond the basics, safety gear protects you from burns and chemical exposure. Essential oils are concentrated plant compounds, and direct skin contact with undiluted oils can cause irritation or sensitisation over time. Keep the following on hand before your first pour:
- Digital scale (1g accuracy minimum)
- Thermometer (probe or infrared)
- Heat-resistant pouring jug (stainless steel or high-density polypropylene)
- Wooden or silicone stirring rod
- Safety glasses and nitrile gloves
- Labels for recording your ratios and batch dates
- Fire extinguisher or fire blanket within reach
Record every batch you make in a simple notebook or spreadsheet, noting the wax type, oil percentages, pour temperature, and cure time. Without records, you cannot replicate a successful result, and you cannot diagnose what went wrong when a batch fails.
Step 1. Choose oils and set a safe ratio
Choosing the right oils and locking in a safe fragrance load are the two decisions that shape every candle you pour. Getting this step right before you add any heat saves you from discovering problems at the end of a batch. Understanding how to use essential oils in candle making starts here, because both oil selection and percentage directly affect scent throw, burn safety, and how well the oil binds with your wax.
Check the flash point before anything else
The flash point of an essential oil is the temperature at which its vapour can ignite when exposed to a flame. Any oil with a flash point below 65°C carries a genuine fire risk in candle making, because your wax may still be well above that temperature when you add the oil. Citrus oils are the most common offender: sweet orange typically flashes at around 48°C, which means it can partially combust or simply evaporate before your candle even sets.
Always request the safety data sheet (SDS) from your oil supplier and confirm the flash point in writing before you add any new oil to a blend.
Use this table as a quick reference before you finalise your oil selection:
| Essential oil | Flash point (approx.) | Safe for candles? |
|---|---|---|
| Cedarwood | 96°C | Yes |
| Lavender | 65°C | Yes (borderline) |
| Patchouli | 99°C | Yes |
| Frankincense | 79°C | Yes |
| Sweet orange | 48°C | No (top note use only in blends) |
| Lemon | 50°C | No (same caution applies) |
Set your fragrance load percentage
The standard safe range for essential oils in soy wax is 6 to 10 percent by weight of the wax. Do not chase the upper limit unless you have tested a specific oil at that load, because some essential oils seep out at anything above 8 percent and leave wet spots or frosting on the surface. Start at 6 percent and work up in 1 percent increments across separate test batches before committing to a final recipe.
Calculate your oil weight using this formula:
Oil weight (g) = wax weight (g) x fragrance load (%) / 100
For a 500g batch at 7 percent: 500 x 7 / 100 = 35g of essential oil total.
Step 2. Add essential oils at the right temperature
Temperature control is the single most important variable when you add essential oils to melted wax. Pour too hot and your oils evaporate before the wax solidifies, leaving you with a candle that has almost no scent throw. Pour too cool and the oils won't disperse evenly, which causes separation, frosting, or oil pooling on the surface.
Why the cooling window matters
Most crafters learning how to use essential oils in candle making make the mistake of adding their oils straight off the heat. Soy wax should cool to between 54°C and 60°C before you add your essential oils, not when it's freshly melted at 75°C or above. At higher temperatures, volatile top-note compounds like linalool and limonene burn off almost immediately, and what remains in the candle won't match the blend you intended.
Remove the wax from heat, let it cool to 54–60°C while stirring occasionally, then add your measured essential oils. This window retains enough heat for full dispersion without vaporising your blend.
How to add and mix your oils correctly
Once your wax hits the target temperature range, add your pre-measured essential oils in a slow, steady pour while stirring continuously. Dropping them all in at once and giving a quick stir is not enough. A slow addition with constant circular stirring for a full two minutes distributes the oil molecules evenly through the wax matrix and reduces the chance of separation during cooling.

Follow this sequence every batch:
- Remove wax from heat source
- Monitor with your thermometer until it reads 54–60°C
- Pour your pre-weighed essential oil blend in slowly
- Stir continuously for two minutes in a circular motion
- Confirm temperature still sits above 50°C before pouring into containers
Avoid reheating the wax after you've added the oils. If your wax drops below 50°C before you've poured it into containers, you've let it cool too far. Discard that batch rather than reheating, because a second heat cycle drives off much of the essential oil content and undermines the blend you carefully measured in Step 1.
Step 3. Pour, cure, and run a proper test burn
Once your wax and oils are thoroughly combined, you have a short window to pour before the wax begins to set. How you pour and how long you cure are two stages that most guides on how to use essential oils in candle making underplay, yet both directly affect scent throw and surface quality. Rushing either stage is one of the most common reasons a test batch underperforms, even when the oil ratios were measured correctly.
Pour at the right temperature and into clean containers
Your blended wax should still sit between 50°C and 55°C at the point of pouring. Containers must be clean, dry, and sitting at room temperature before the wax goes in. Pouring into cold containers causes rapid, uneven cooling and increases the likelihood of sinkholes and surface cracking. Pour in a slow, steady stream close to the container surface to reduce air bubbles trapped in the wax. If sinkholes appear after the first cool-down, top up with a small second pour of the same blended wax at a slightly lower temperature, around 48°C, rather than reheating the original batch.
Cure your candles before testing
Soy wax candles need a minimum cure time of 48 hours, though a full cure of 7 to 14 days produces noticeably better cold throw and a more stable wax structure. During this period, the essential oil molecules bind more fully into the wax matrix, which explains why a candle tested on day two almost always smells weaker than the same candle tested on day ten. Store curing candles in a stable environment away from direct sunlight and away from drafts that cause uneven surface cooling.
Patience during the cure phase is not optional if you want accurate test results. A candle tested too early will consistently underperform.
Run a proper test burn
Trim your wick to 6mm before every burn, including the very first one. Light the candle and allow it to burn until the melt pool reaches the edges of the container, which typically takes two to three hours for a standard 350g container candle. A full melt pool on the first burn sets the wax memory and prevents tunnelling in later burns. Record the melt pool depth, the scent throw in the room, and whether the flame remains steady throughout.
Fix weak scent and other common problems
Even when you follow the steps for how to use essential oils in candle making carefully, batches still fail occasionally. The problems tend to repeat across batches, which means identifying the pattern early is the fastest route to fixing it. The three most common issues are weak scent throw, oil pooling on the surface, and frosting or surface cracking.
Weak scent throw
Weak throw is almost always caused by one of three things: under-measuring your oil, adding it at too high a temperature, or cutting the cure time short. Before you adjust your fragrance load upward, check each of these variables first. Increasing your oil percentage without addressing the root cause wastes material and can push you past the safe load limit for your wax.
If your candle smells fine cold but loses scent during burning, your pour temperature was likely too high and the volatile top-note compounds burned off before the wax set.
Use this checklist to diagnose the cause before changing your recipe:
| Symptom | Likely cause | Fix |
|---|---|---|
| Faint cold and hot throw | Fragrance load below 6% | Increase by 1% per test batch |
| Good cold throw, poor hot throw | Oils added above 60°C | Lower addition temperature to 54–58°C |
| Inconsistent between batches | Cure under 7 days | Extend cure and retest before adjusting |
| Scent fades within one hour of burning | No base notes in blend | Add cedarwood or patchouli to anchor the blend |
Oil pooling and wet spots
Oil pooling happens when your fragrance load exceeds what the wax can bind, or when you stirred for less than two minutes after adding your oils. Wet spots visible on the inside of glass containers are a separate problem caused by the wax pulling away from the glass during cooling, not by excess oil. Both issues respond well to process corrections rather than recipe overhauls.
For pooling, reduce your fragrance load by 1 percent and extend your stir time to a full three minutes. For wet spots, warm your empty containers to around 25–30°C before you pour by resting them in a warm space, then pour your blended wax at the lower end of your target temperature window.
Frosting and surface cracking
Frosting is a natural characteristic of soy wax and does not affect burn quality or scent throw, but it can reduce the finished appearance of your candles. It occurs when the wax cools too quickly after pouring. Slow the cooling rate by covering your poured containers loosely with a cardboard box immediately after pouring to trap ambient warmth and extend the set time.
Final checks before you gift or burn
Mastering how to use essential oils in candle making comes down to consistent process, not luck. Before you burn a candle yourself or hand one to someone else, run through a short final check. Confirm the wick is trimmed to 6mm, the surface is smooth and free of pooled oil, and the label clearly states the fragrance ingredients and any relevant allergen information. For gifting, check that the jar is clean and the wax surface has no cracks or wet spots that suggest the oil did not bind properly.
A candle that passes these checks represents a complete, safe, and well-crafted product. If something looks off, go back to your batch notes and identify which step needs adjusting before your next pour. If you'd prefer to start with a professionally made reference point, browse the handcrafted natural soy candles at Coorong Candle Co. and see what a finished product should look and smell like.