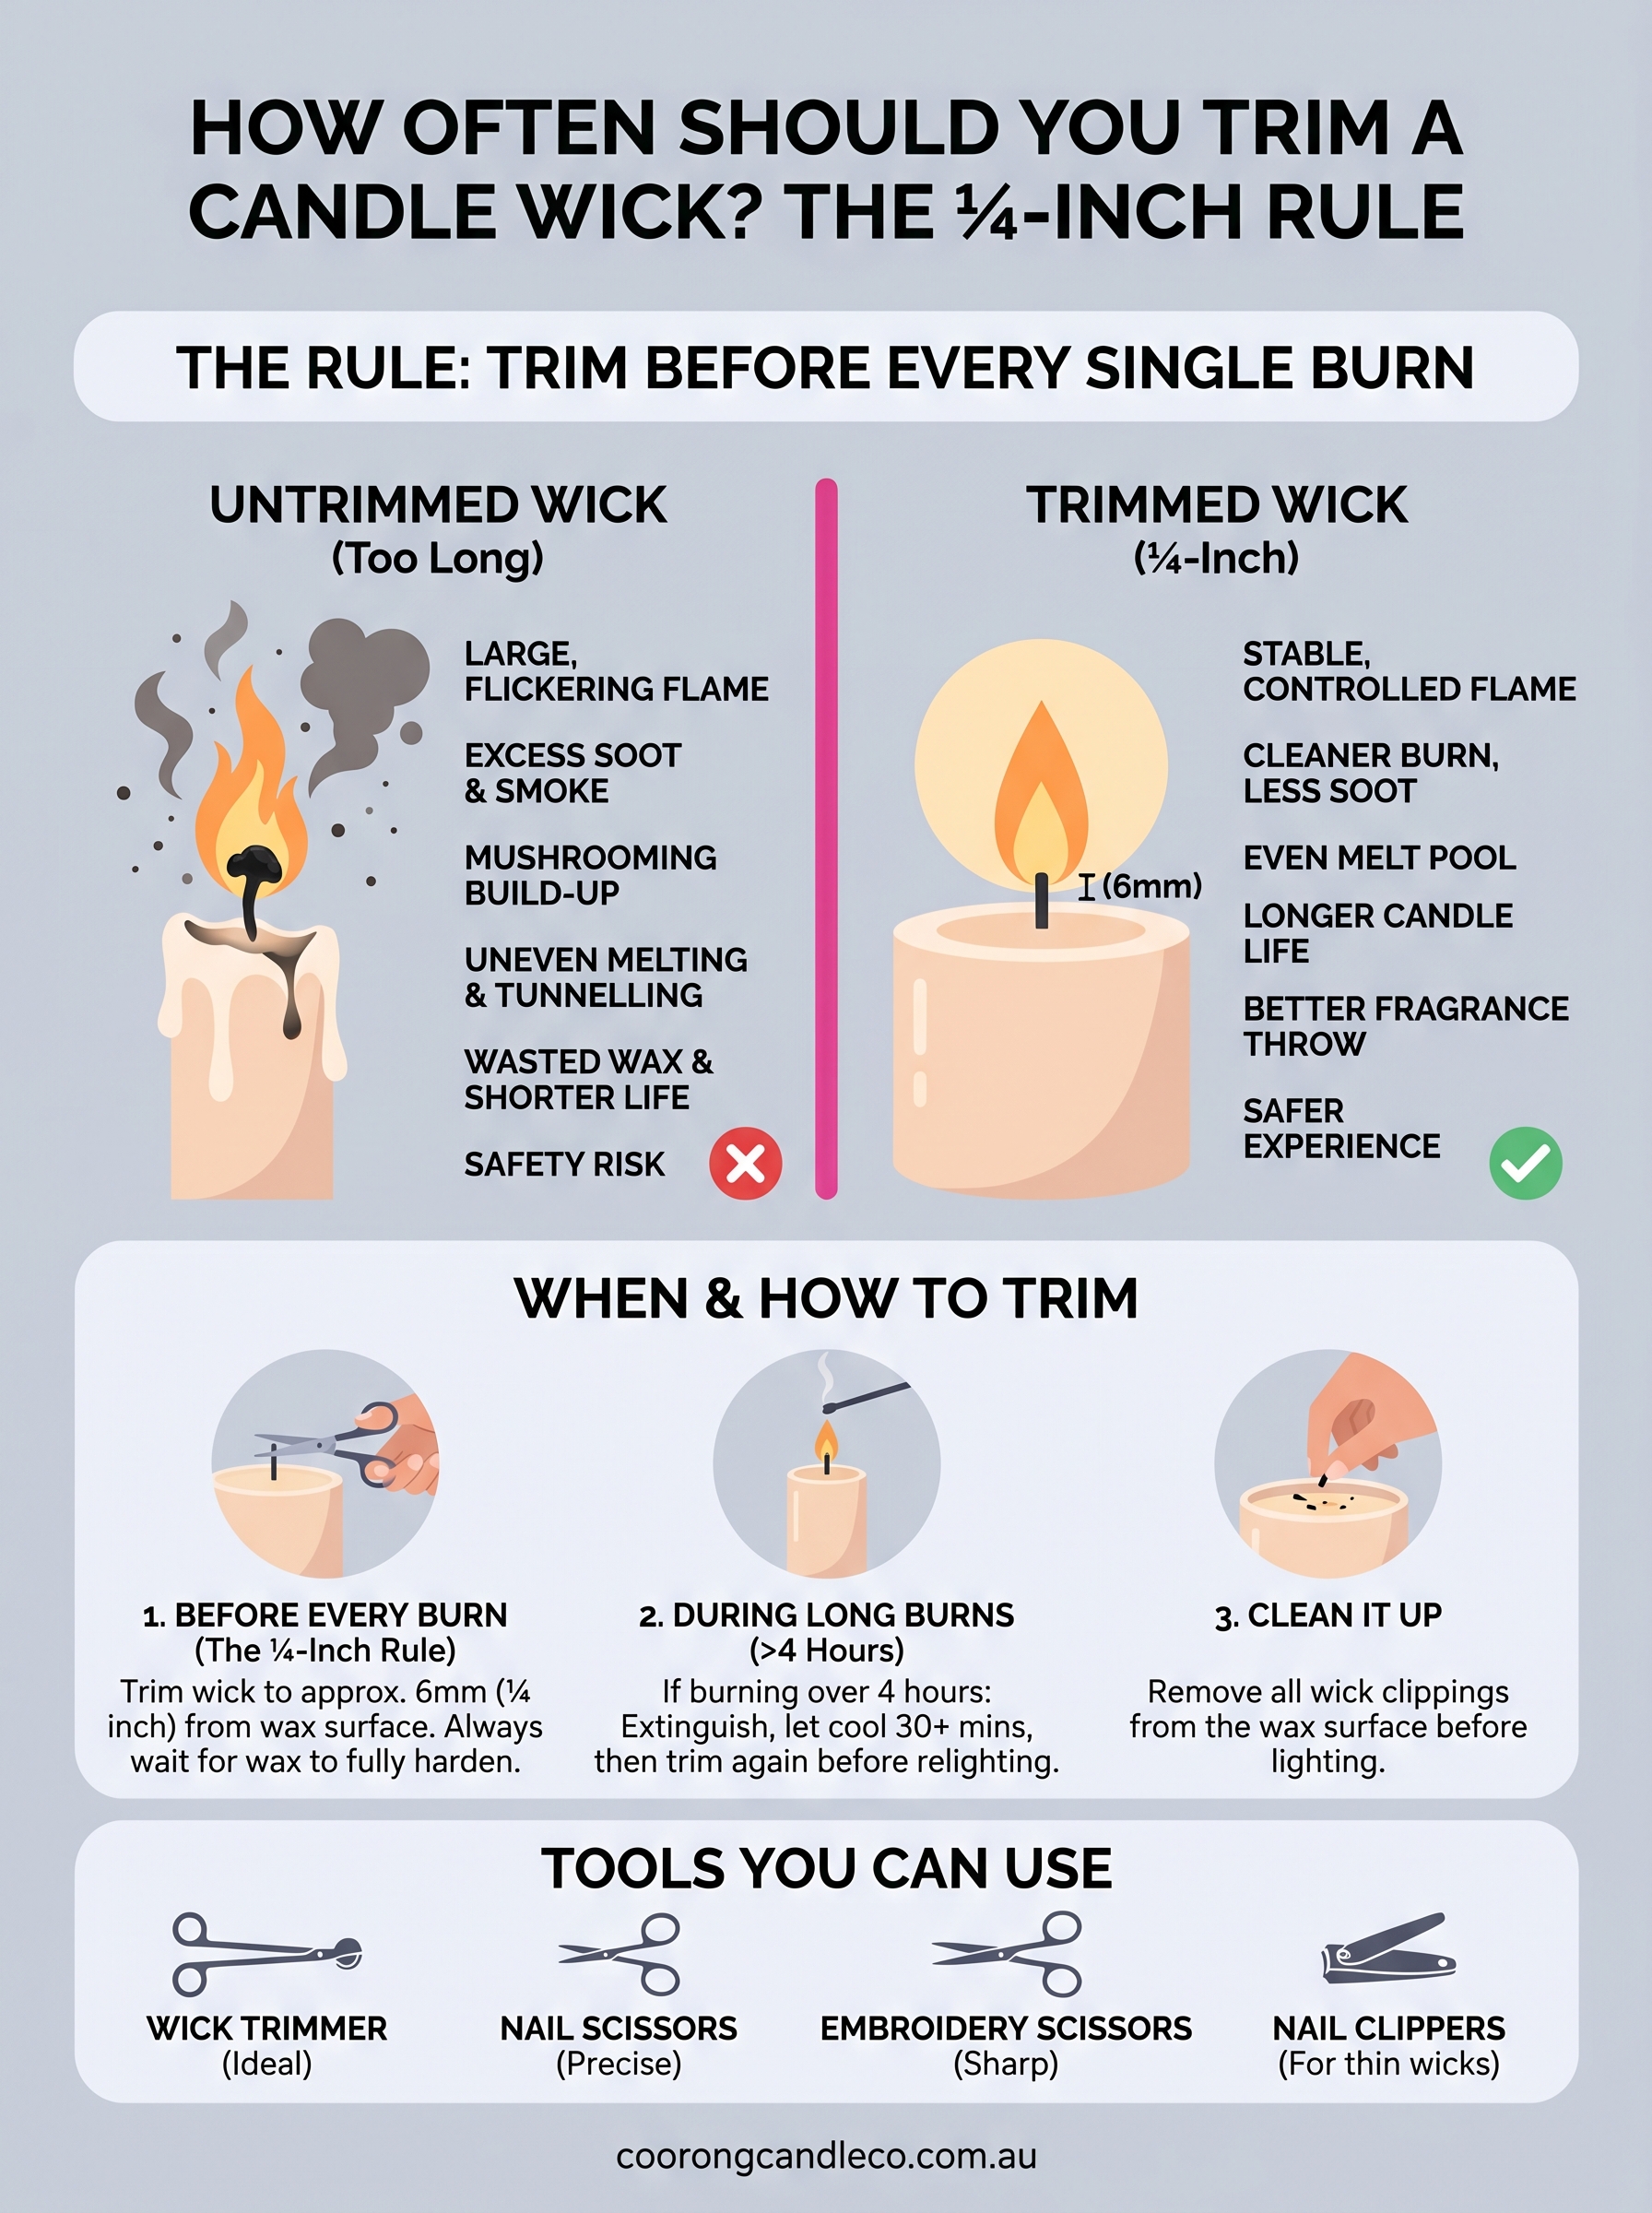
You've invested in a quality soy candle, maybe one inspired by the Coorong coastline or the Barossa Valley, and you want it to burn beautifully from first light to last. So, how often should you trim a candle wick? The short answer: before every single burn. Keeping your wick trimmed to roughly a quarter of an inch prevents soot, mushrooming, and uneven melting, which means you get a cleaner flame and more burn time out of every candle.
At Coorong Candle Co., we hand-pour each soy candle with lead-free cotton wicks, and even a well-made wick needs regular maintenance to perform its best. We see it firsthand in our workshop: a trimmed wick burns steadier, throws fragrance more evenly, and keeps the wax pool clean. An untrimmed one? It flickers, smokes, and shortens the life of your candle significantly.
This guide walks you through the quarter-inch rule, what it means, why it matters, and exactly how to put it into practice. Whether you're new to candle care or just want to get more from your favourite scent, you'll have everything you need to keep your candles burning at their best with just a few seconds of effort before each use.
What wick trimming does for burn quality and safety
When a wick grows too long, the extra length creates a larger flame than the candle is designed to produce. A flame that's too big consumes wax too quickly, and it also draws more fragrance oil than it can burn cleanly, which causes black soot to deposit on your jar, walls, and ceiling.
How an untrimmed wick affects your flame
When you skip trimming, the tip of the wick develops a carbon build-up called a mushroom. This bulbous residue feeds an oversized, flickering flame that produces far more smoke than a trimmed wick would. You'll notice a harsh, uneven scent throw rather than the clean, steady fragrance release that a well-maintained wick delivers.
A mushroomed wick can cause the flame to split, which creates two heat points and leads to uneven wax melting and tunnelling down the centre of your candle.
That uneven melt pool is a real problem for burn quality. Wax tunnels straight down the centre of your candle rather than spreading evenly to the edges, and once that tunnel forms, it's very difficult to reverse. You end up with wasted wax clinging to the sides of your jar, which cuts your total burn time significantly.
The safety case for regular trimming
Understanding how often should you trim a candle wick comes down to more than just aesthetics. A long wick produces a flame that reaches dangerous heights, and in a glass jar that excess heat can crack the vessel. Trim before every burn to keep the flame at a stable, controlled size throughout the session.
Consistent trimming also stops carbon deposits from falling into your wax pool. Those fragments contaminate the wax, clog the wick, and can reignite as secondary flame points. A quick trim before each burn takes seconds and keeps your candle both safe and performing exactly as intended.
When to trim: before each burn and during long burns
Timing your trim correctly matters just as much as doing it at all. The rule is simple: trim before every single burn, without exception. This keeps the wick at the right height from the first moment the flame catches, so you get a clean, controlled melt pool right from the start rather than playing catch-up with an overgrown wick.
Before every burn
Let the wax harden completely from the previous session before you trim. Cold wax gives you a stable surface to work over, and any trimmed debris stays on top of the solid wax rather than sinking in. Once you've trimmed, remove any clippings before lighting so they don't ignite in the melt pool.
During burns longer than four hours
So, how often should you trim a candle wick mid-session? If you plan to burn your candle for longer than four hours, extinguish it, let it cool for at least 30 minutes, then trim again before relighting.
Burning a candle for more than four hours at a stretch causes the wick to develop carbon build-up rapidly, which brings back all the problems a pre-burn trim was meant to prevent.
- Burns under two hours: trim before lighting only
- Burns of two to four hours: one pre-burn trim is enough
- Burns over four hours: trim again after the cool-down break
How to trim to the ¼-inch rule
Knowing how often should you trim a candle wick is only half the answer. The other half is getting the measurement right. A quarter-inch, roughly 6mm from the wax surface, gives your flame the fuel it needs without the excess length that causes smoking and mushrooming.
Step-by-step trimming method
Follow these steps each time before you light your candle:
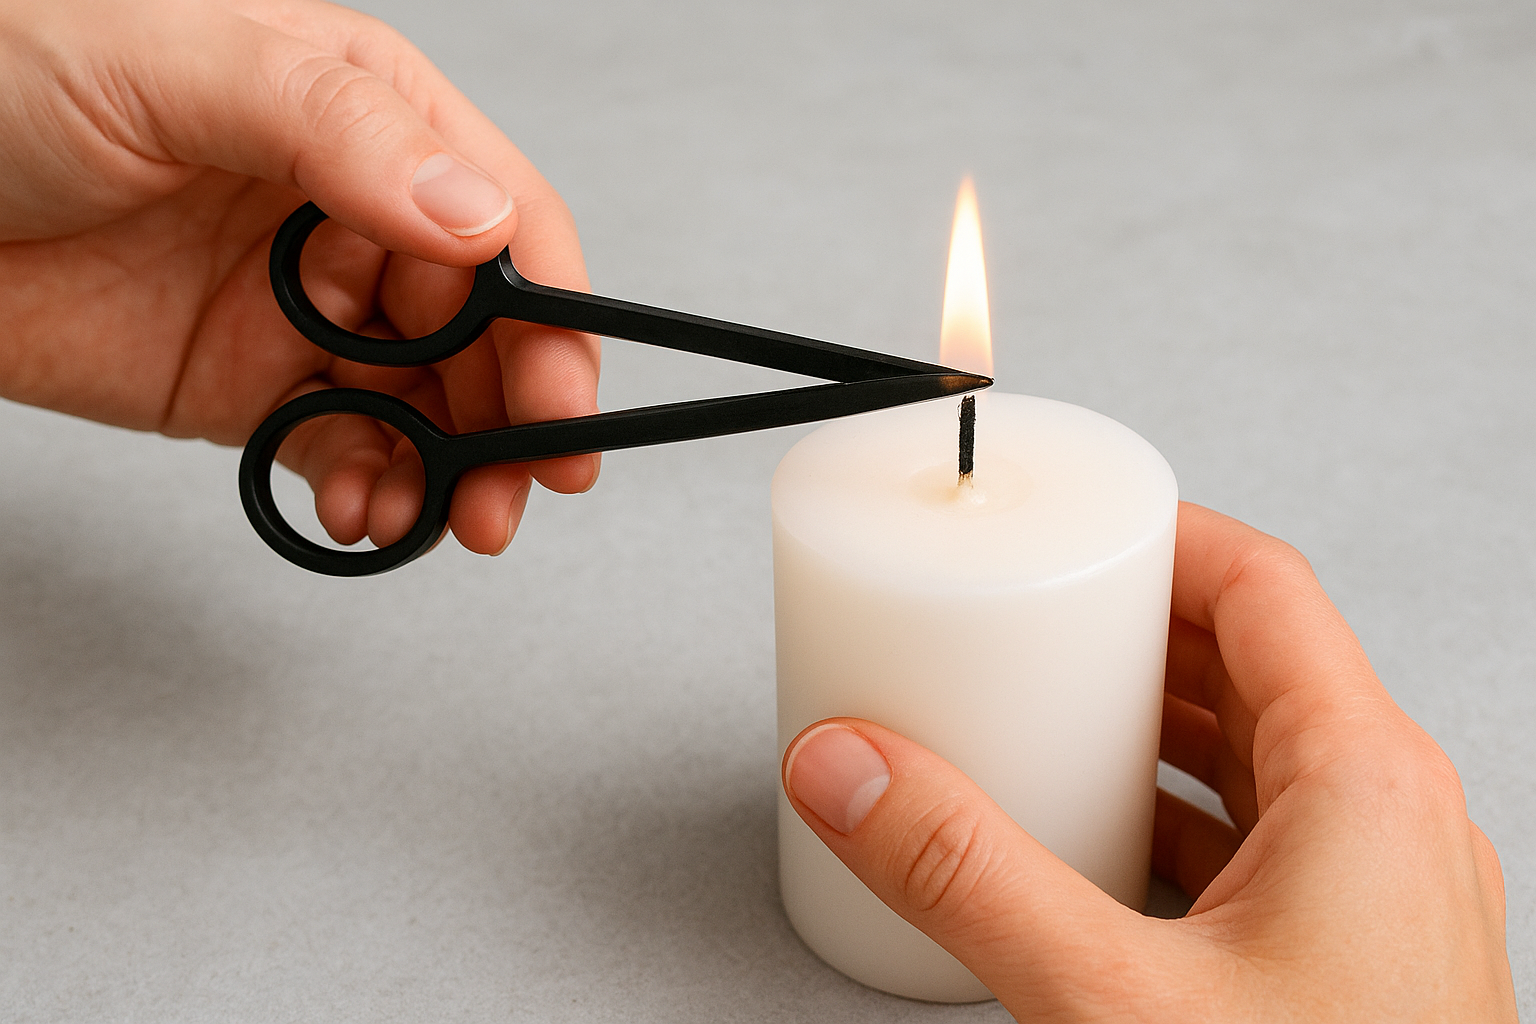
- Wait until the wax is fully solid and at room temperature.
- Hold the wick steady and measure approximately 6mm from the wax surface.
- Cut straight across cleanly, removing the burnt tip and any carbon build-up.
- Pick out all clippings from the wax before lighting.
- Check the wick is standing upright and centred before you strike a match.
If the wick bends or folds after trimming, gently straighten it with your fingers while the wax is still cold.
What a correctly trimmed wick looks like
A properly trimmed wick sits straight, firm, and free of dark residue at the tip. When you light it, the flame should reach roughly 2 to 3 centimetres in height and hold steady without flickering or leaning to one side. If your flame climbs higher than that or dances around, the wick is still too long and needs another small cut.
Tools you can use without a wick trimmer
A dedicated wick trimmer is useful, but you don't need one to look after your candle properly. Most households already have at least one item that cuts cleanly enough to keep your wick at the correct quarter-inch length. Knowing how often should you trim a candle wick matters far more than owning specialist equipment.
The key is always using something that makes a clean, straight cut rather than tearing or crushing the wick, which can fray the cotton fibres and affect how the flame behaves.
Household items that work well
Small scissors are the most practical substitute, particularly nail scissors or embroidery scissors, which are narrow enough to reach into a deep jar without scraping the glass sides. Fingernail clippers also work well, especially on thin cotton wicks, because they snap cleanly through the carbon tip in a single motion without dragging.
Here are your best no-trimmer options ranked by ease of use:
- Nail scissors: precise and easy to angle into a jar
- Embroidery scissors: sharp and narrow for deep vessels
- Nail clippers: quick and clean for thin wicks
- Standard scissors: fine for wide-mouth candles with easy access
Troubleshooting: mushrooming, soot, tunnelling, hard relights
Most candle problems trace back to the same root cause: an untrimmed wick that has been left too long. Understanding how often should you trim a candle wick helps you prevent these issues before they start, but if you're already dealing with one of the following problems, here's how to fix it.
Mushrooming and soot
A carbon mushroom forms at the wick tip when the wick hasn't been trimmed before lighting. Extinguish your candle, let it cool completely, then trim the entire mushroom off. Wipe any black soot from the inside of your jar using a dry cotton cloth before relighting.
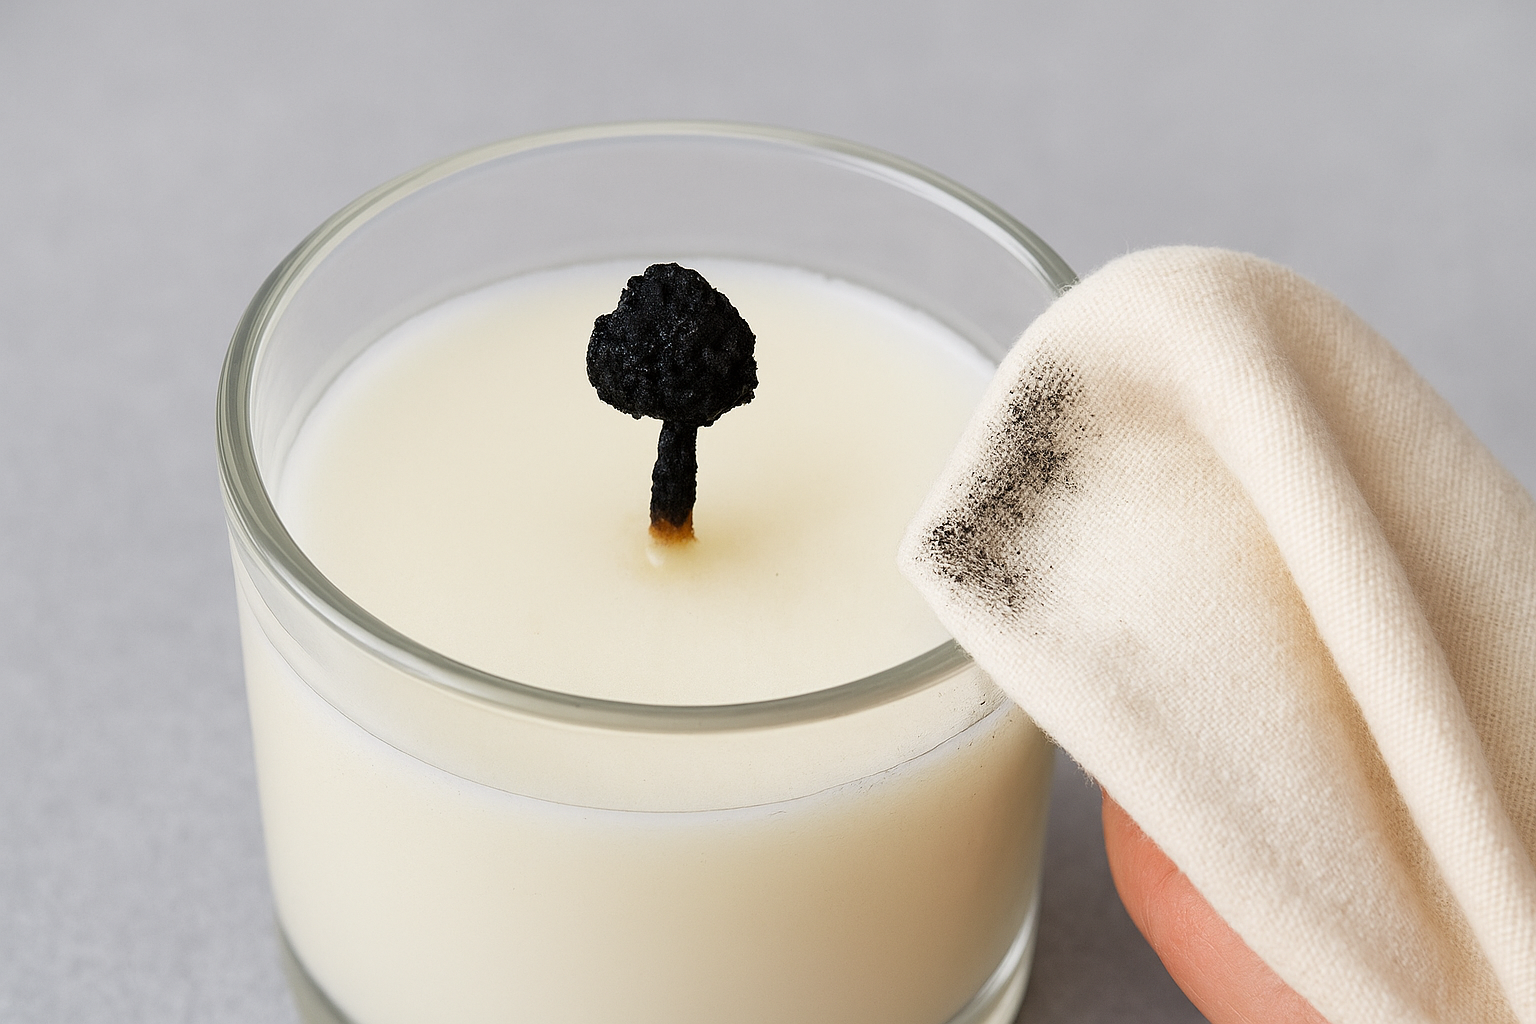
Never try to remove a mushroom while the wax is still liquid, as the debris will sink straight into the melt pool.
Tunnelling and hard relights
Tunnelling happens when the wax pool never reaches the jar edges during early burns. If you spot a tunnel forming, burn the candle for long enough during each session to achieve a full melt pool across the entire surface.
- Tunnelling: extend each burn session until the melt pool reaches the jar edge
- Hard relight: trim the wick back slightly and clear any wax debris from its base before striking a match
Final checklist for cleaner candle burns
Knowing how often should you trim a candle wick is simple once it becomes habit. Run through this checklist before every burn to keep your candles performing at their best:
- Trim to 6mm before every single burn
- Remove all wick clippings from the wax surface before lighting
- Burn for at least one hour per 2.5cm of candle diameter to achieve a full melt pool
- Never burn for longer than four hours without a break
- Wipe soot from the jar with a dry cloth when you spot it
- Keep your candle away from draughts and vents that cause uneven flames
Your candle care habits directly affect how long each candle lasts and how well it fills a room with fragrance. A few seconds of maintenance before each burn protects your investment and gives you a cleaner, safer experience every time. Browse our handmade soy candles and home fragrance sets to find your next favourite scent.