You've invested in a beautiful soy candle, the scent is filling your room perfectly, and now it's time to put it out. If you're wondering how to use a candle snuffer properly, you're not alone, it's one of the most common questions we get asked at Coorong Candle Co. Blowing out a candle seems simple enough, but it often leaves you with a face full of smoke and splatters of wax across your clean surface.
A candle snuffer is one of those tools that looks purely decorative until you actually use one. Then you realise it solves two annoying problems at once: excess smoke and wax mess. It's especially worth learning if you burn natural soy candles, where keeping the wax pool clean matters for an even, long-lasting burn.
In this guide, we'll walk you through the correct technique step by step, cover the mistakes that catch most people out, and share a few tips we've picked up from years of hand-pouring candles in our South Australian workshop. By the end, you'll snuff out your candles like a pro, no smoke trails, no mess.
What a candle snuffer does and why it helps
A candle snuffer is a small bell-shaped cup on the end of a long handle, designed to cut off the oxygen supply to a flame without disturbing the melted wax beneath it. When you learn how to use a candle snuffer correctly, you take control of how your candle finishes every single burn session. The tool has been around for centuries, originally used to manage taper candles in large spaces, but it works just as well on a modern soy candle sitting on your coffee table.
How a snuffer extinguishes the flame
The mechanism is simple. You lower the cup over the flame until it fully covers the wick, and the fire goes out because it runs out of oxygen to sustain itself. There is no force involved, no puff of air, and no sudden movement that could send liquid wax flying across the jar rim or onto your furniture. The flame just dies out quietly, which is exactly what you want after you've spent time creating a calm atmosphere at home.
The cup never needs to touch the wax; it only needs to seal around the flame long enough for the oxygen to deplete completely.
Why blowing causes problems
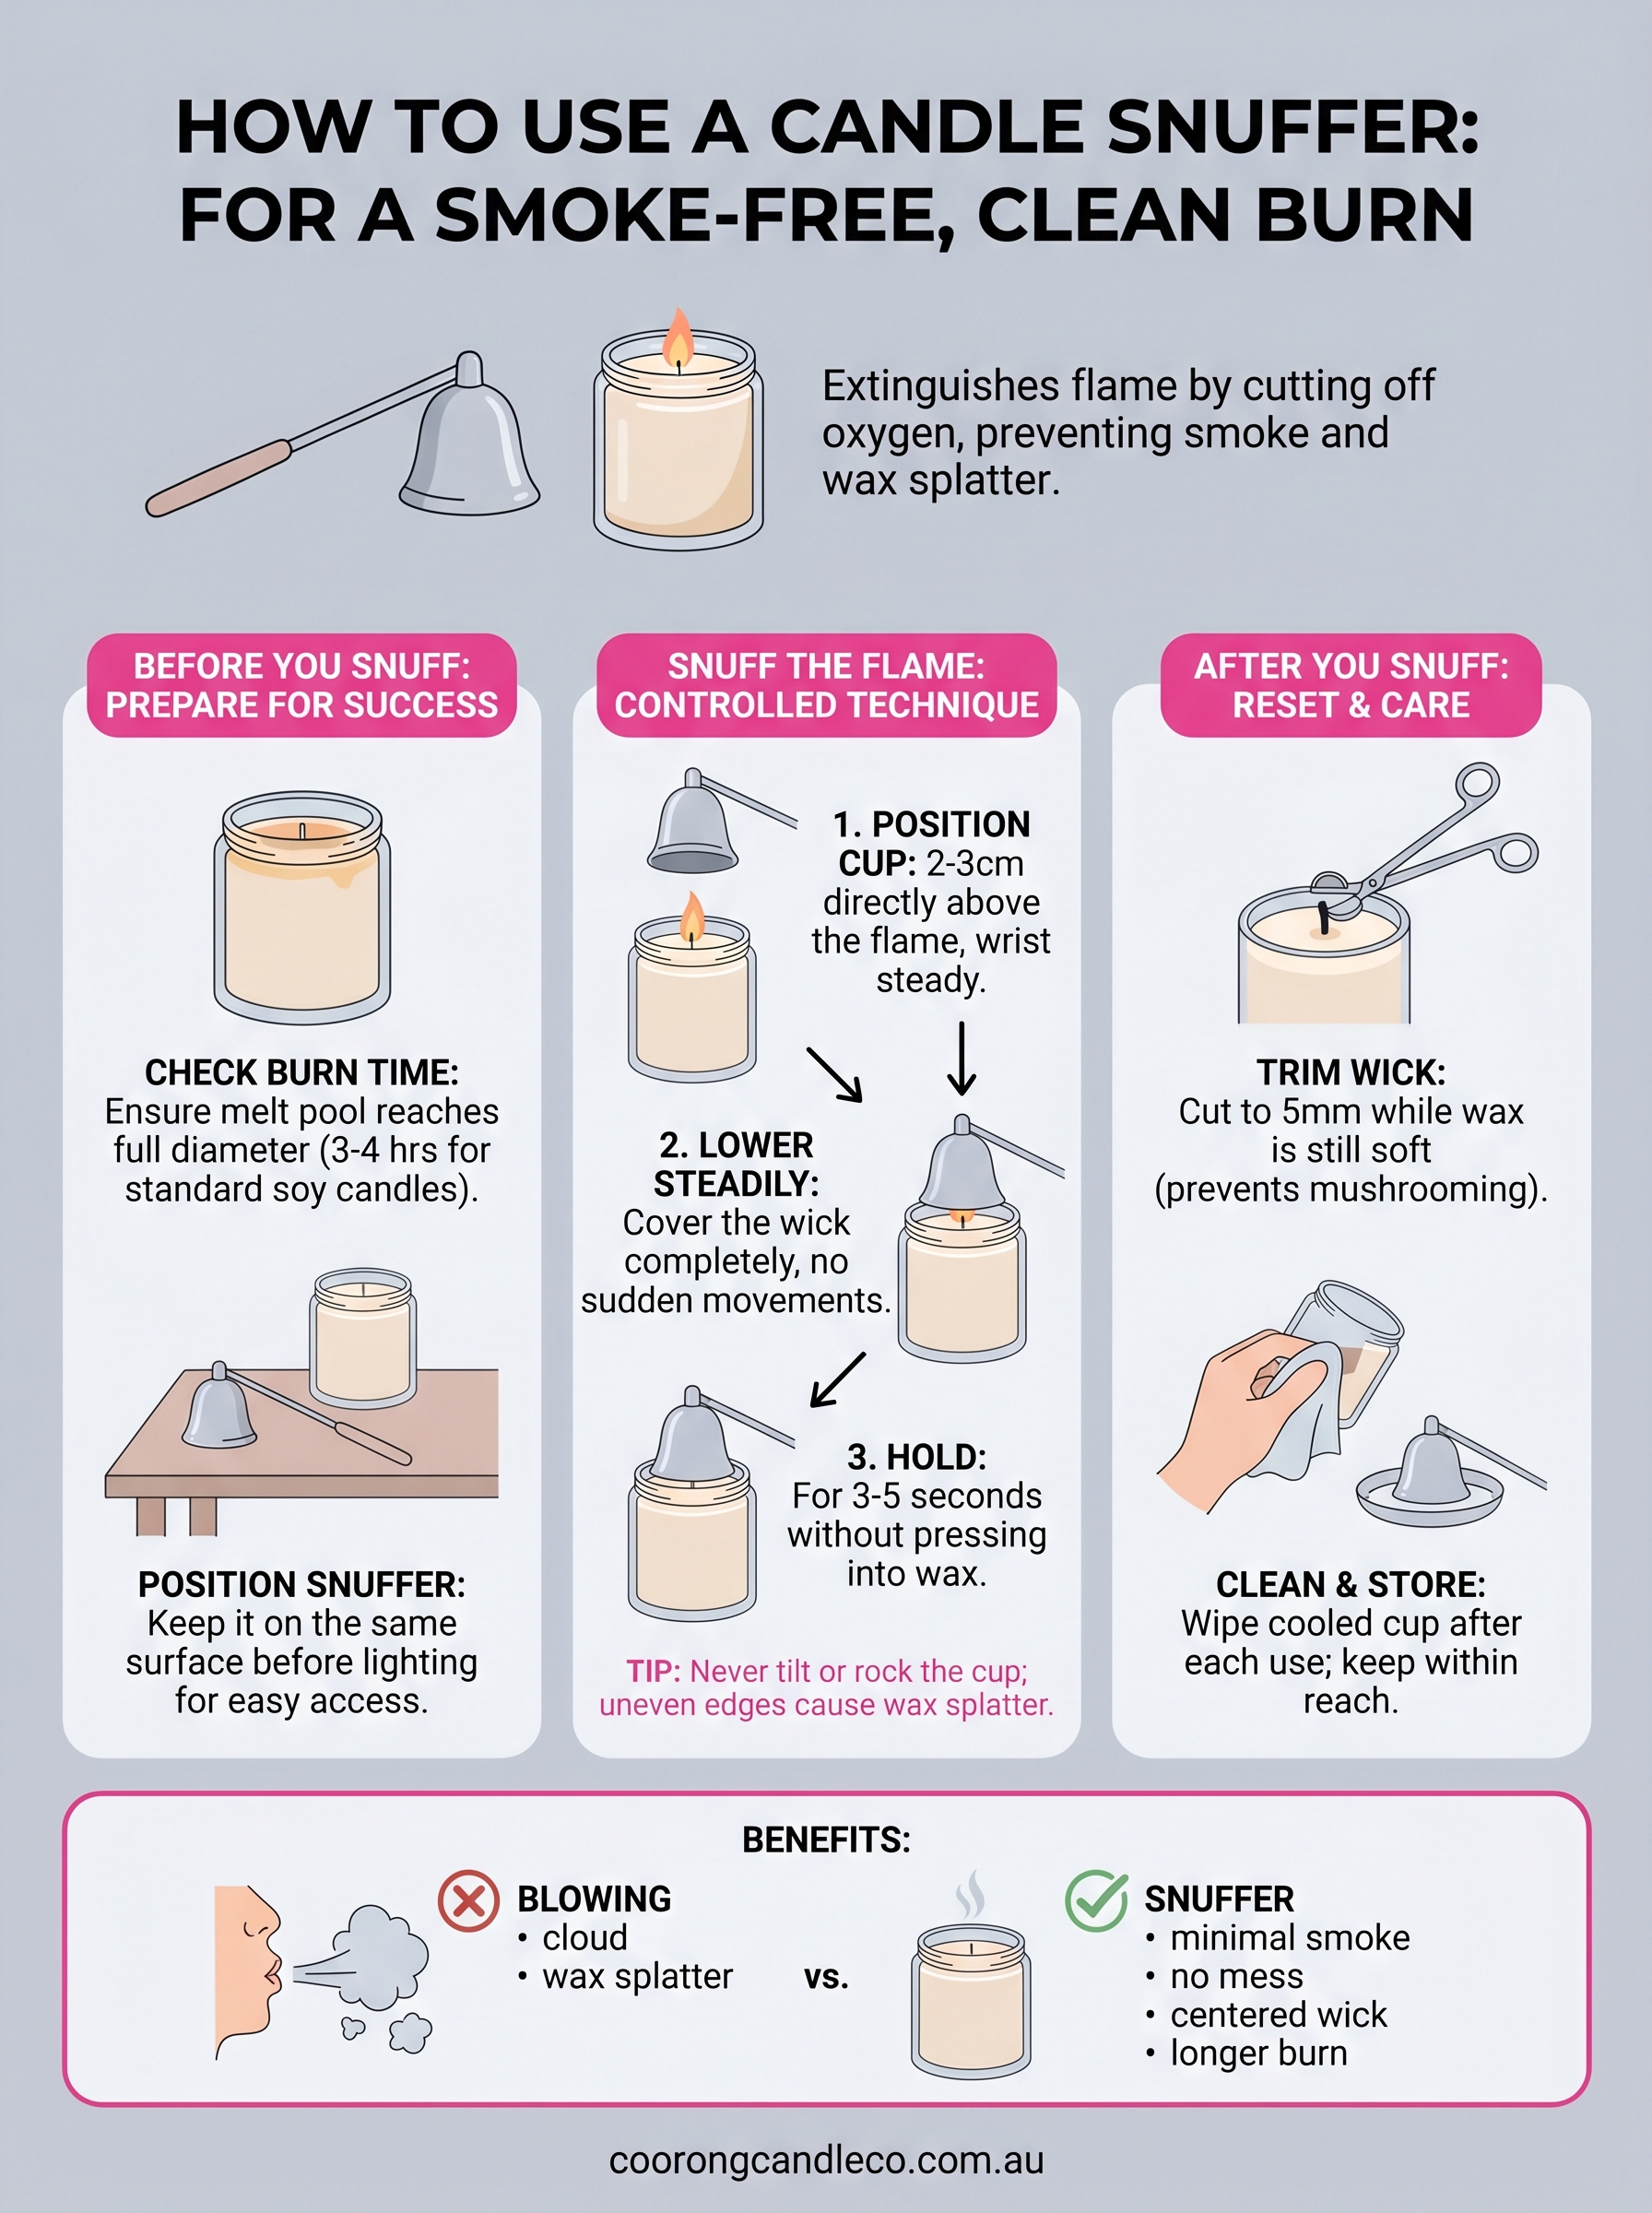
Blowing out a candle forces a sharp burst of air directly into the melt pool, the shallow layer of liquid wax surrounding the wick. That burst pushes melted wax onto the jar walls or the wick itself, leaving a sooty, uneven residue that disrupts the next burn before it even starts. It also produces a noticeable smoke trail that smells of burned wick rather than the fragrance you actually chose.
Your candle's lifespan shortens over time when you blow it out repeatedly. Here is how the two methods compare:
| Method | Smoke produced | Wax disturbance | Wick condition after |
|---|---|---|---|
| Blowing | High | Yes | Often off-centre |
| Snuffer | Minimal | None | Stays centred |
Before you snuff: set up for a clean burn
Getting good results with how to use a candle snuffer starts before you pick the tool up. A few quick checks will protect your wax pool and set your candle up for a better burn next time.
Check your burn time first
You want the melt pool to reach the full diameter of the jar before you snuff it. Snuffing too early creates a tunnel of unmelted wax that grows harder to correct with each burn. For most standard 350g soy candles, that means at least three to four hours of burn time.
Never snuff on the first burn before the melt pool spans the jar's full width, as tunnelling is nearly impossible to reverse.
Position the snuffer before you light
Place your snuffer on the same surface as your candle before lighting. This means you can reach for it calmly and without rushing when it is time to extinguish the flame.
Hot wax stays liquid for several minutes after you decide to stop burning. Use that window, lower the snuffer gently, and the wax pool will stay flat and undisturbed.
Snuff the flame without touching the wax
Now that your candle has burned long enough and your wax pool is fully melted to the jar's edge, you're ready to snuff. The key to how to use a candle snuffer without creating a mess is slow, controlled movement from the moment you pick the tool up. Rushing or tilting the handle are the two mistakes that send wax flying.
Lower the cup in three steps
Hold the snuffer by the handle above the candle, keeping your wrist steady and the cup level. Follow these steps to snuff cleanly every time:
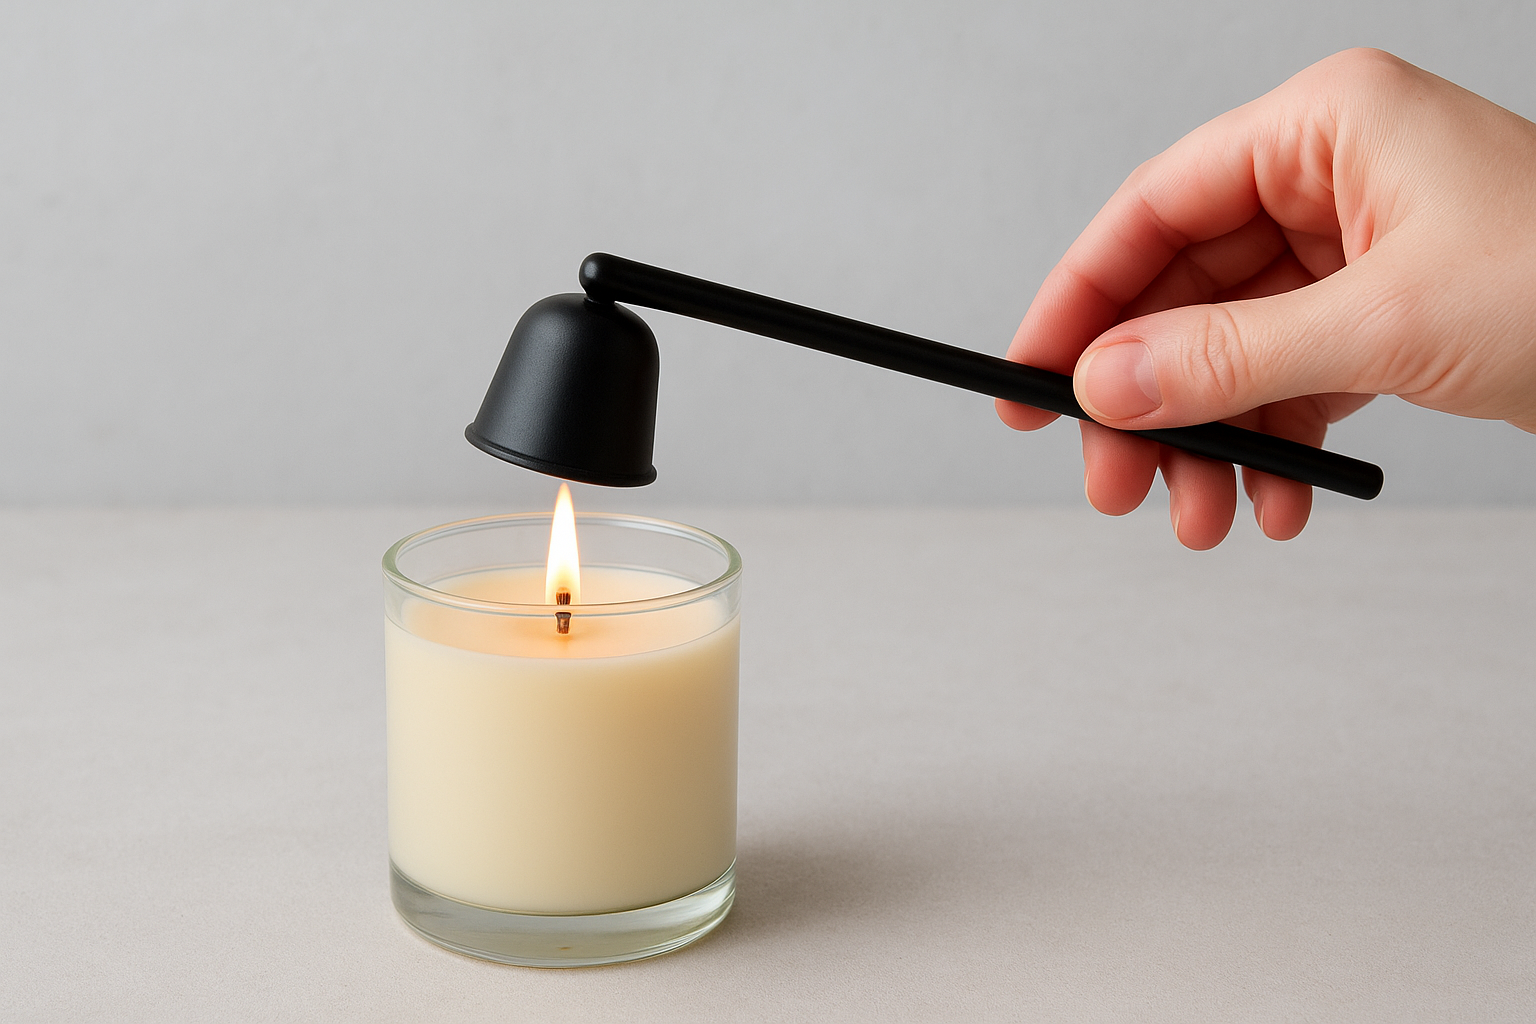
- Position the cup two to three centimetres directly above the flame.
- Lower it steadily until the cup completely covers the wick.
- Hold for three to five seconds without pressing into the wax.
Never rock or tilt the handle during those final seconds; an uneven cup edge is the most common cause of wax splatter.
What to do if smoke appears
A thin wisp of smoke after snuffing is usually a sign of a slightly long wick rather than poor technique. Trim your wick to five millimetres before the next burn and the issue typically disappears.
If smoke persists, check that the cup fully sealed around the flame rather than sitting off-centre. Repositioning the cup and snuffing again usually resolves it immediately.
After you snuff: reset the wick for next time
Once the flame is out, your job isn't finished. The wax surface and wick condition right after snuffing determine how cleanly your candle performs next time. Taking thirty seconds now prevents tunnelling and uneven burns later.
Trim the wick while the wax is still soft
The best time to trim your wick is right after snuffing, while the wax is still slightly warm. A wick left at full length will mushroom at the tip and produce excess soot on your next burn. Cut it back to five millimetres using a wick trimmer or scissors.
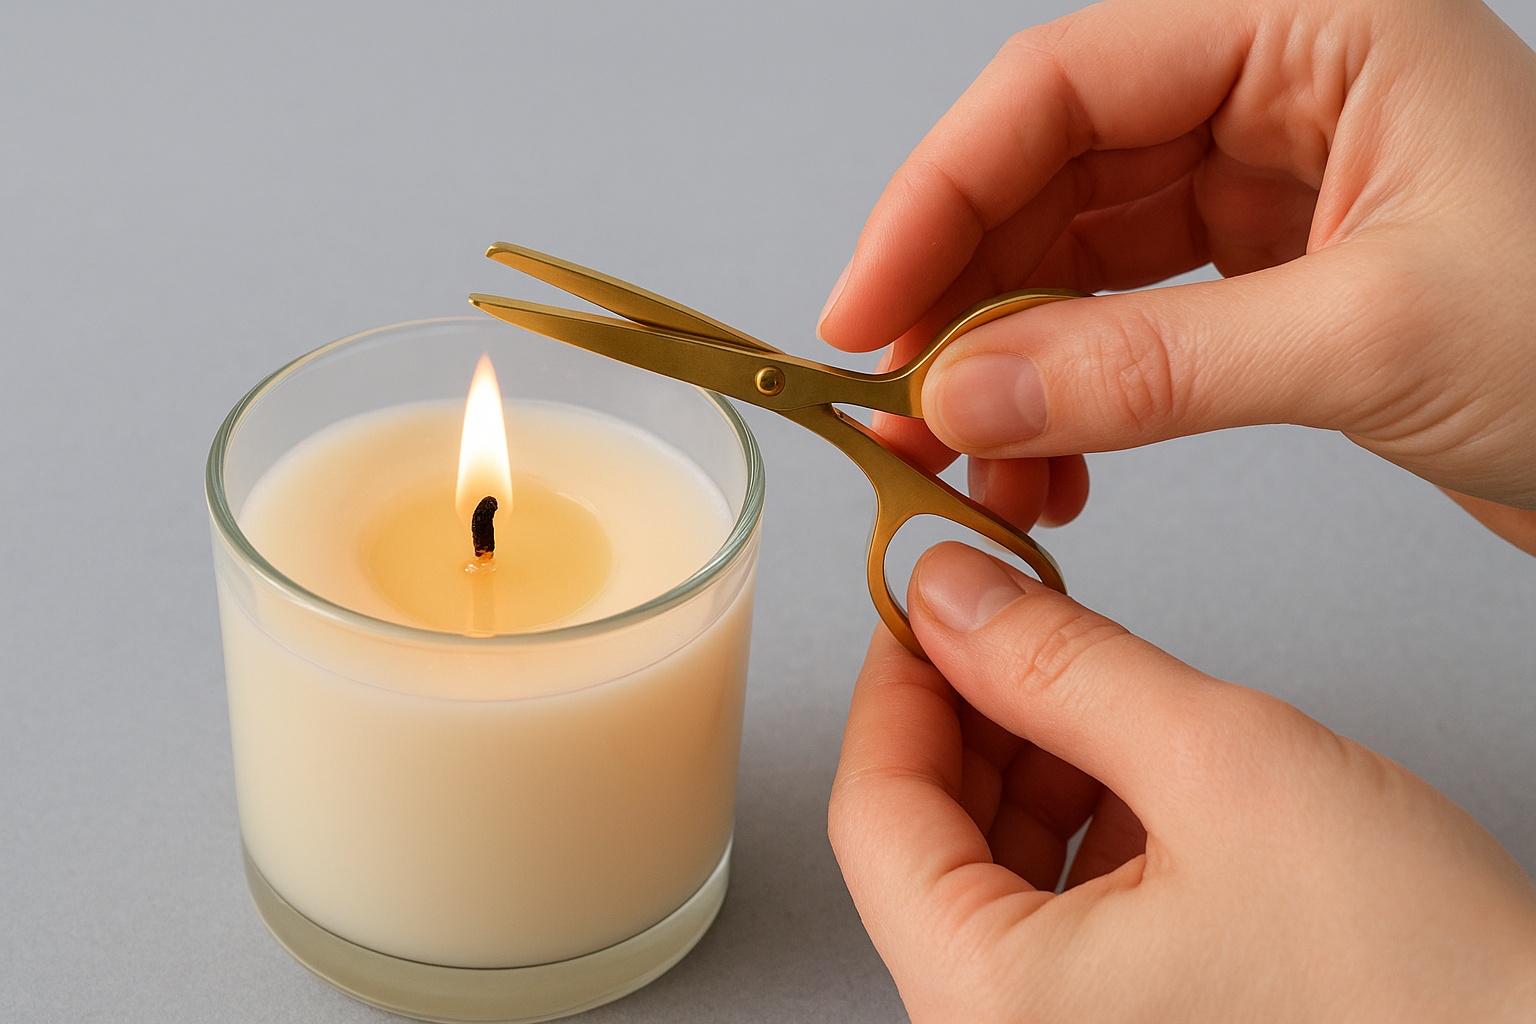
Trim before the wax fully hardens so clippings stay on top and are easy to remove.
Use a dedicated wick trimmer rather than regular scissors, as the angled blade gives you a clean, even cut without dropping clippings into the wax.
Check the wax surface before walking away
Run a quick visual check over your wax pool once the wick is trimmed. Remove any debris with a toothpick while the surface is still pliable.
Keeping the wax clean is part of how to use a candle snuffer well. Each small reset protects the quality of your next burn and extends the overall life of your candle.
Clean and store your snuffer
A snuffer that collects carbon residue and wax smudges will start to look neglected, and those deposits can transfer back onto your wax surface on the next burn. Keeping the tool clean is an important part of knowing how to use a candle snuffer well, since a clean cup seals more evenly around the flame.
Wipe the cup after each use
Let the snuffer cool for a few minutes after extinguishing the flame before you touch it. Once it has cooled, use a dry cotton cloth or paper towel to wipe the inside and outside of the cup. For stubborn wax residue, warm the cup briefly with a hairdryer on a low setting, then wipe while the wax is still soft and pliable.
Avoid using water directly on metal snuffers, as moisture trapped in the joint between the cup and handle can cause rust over time.
Store it within reach
Keep your snuffer on the same surface as your candle so it is always within easy reach. Tucking it away in a drawer means you'll be tempted to blow the candle out instead. Try one of these simple storage options:
- A small ceramic dish or tray beside your candle
- A windowsill or mantle where your candle already sits
- A dedicated candle accessory holder that keeps tools together
A cleaner way to finish every burn
Knowing how to use a candle snuffer properly is one of the simplest upgrades you can make to your candle routine. Every step in this guide, from checking your melt pool to trimming the wick after snuffing, adds up to a candle that burns cleaner, longer, and more evenly each time you light it. The snuffer itself does the heavy lifting, but your technique is what makes the real difference.
Your candles deserve a finish that matches the care that went into making them. At Coorong Candle Co., every candle is hand-poured in small batches using natural soy wax and lead-free cotton wicks, so the quality is already there from the first pour. Treat each burn with the same attention and you'll get every hour of fragrance your candle has to offer. Browse our natural soy candles and find the scent that suits your space.