
Christmas is coming, and if you love giving handmade gifts, xmas bath bombs are one of the easiest festive treats to pull together in a weekend. You don't need a chemistry degree or a cupboard full of specialty gear, just a few pantry staples, some essential oils, and a mould shaped like a bauble or a snowflake if you want that extra seasonal touch.
This guide walks you through exactly how to make bath bombs christmas ready, from the basic citric acid and bicarb soda ratio through to colouring, scenting, and moulding them so they hold their shape and fizz properly in the tub. We'll cover the common mistakes that cause cracking or crumbling, and how to fix them before you've wasted a batch.
At Coorong Candle Co. we spend our days hand-pouring soy candles at home and crafting bath products inspired by South Australia's coastline, so we know a thing or two about natural ingredients and getting a fizzy, fragrant recipe right. Whether you're making bath bombs xmas gifts for family or just want a relaxing soak this December, here's everything you need to get started.
What you'll need before you begin
Getting your christmas bath bombs to hold their shape and fizz properly comes down to having the right ratios and tools on hand before you start mixing. Rushing to the kitchen without weighing your dry ingredients or without a mould that actually releases cleanly is the fastest way to end up with a crumbly mess on the bench. Gather everything first, lay it out on a clean, dry surface, and you'll move through the whole process in under an hour.
Core dry ingredients
Every bath bomb recipe starts with the same base chemistry: an acid and a base that react the moment they hit water. Citric acid and bicarbonate of soda (bicarb soda) are the workhorses here, and getting the ratio right is what separates a bath bomb that fizzes for a full two minutes in the water from one that dissolves in a limp puddle.
| Ingredient | Amount (for 6 medium bombs) | Role |
|---|---|---|
| Bicarbonate of soda | 250g | Base, creates the fizz |
| Citric acid | 125g | Acid, reacts with bicarb |
| Cornflour | 60g | Binds and slows the fizz |
| Epsom salts (optional) | 60g | Adds a soothing, mineral soak |
A 2:1 ratio of bicarb soda to citric acid is the safest starting point for beginners chasing a strong, steady fizz.
Sift your bicarb soda before you weigh it. Clumps left in the mix cause uneven fizzing once the bomb hits water, and it's a five-second step that saves a whole batch.
Colour, scent and binding liquid
Natural mica powder gives you that festive red, green or gold shimmer without the skin irritation some synthetic dyes cause, and a few drops go a long way. For scent, reach for essential oils like cinnamon, clove, orange or pine rather than fragrance oils for bath bombs cut with alcohol, since alcohol reacts too early with the citric acid and sets off a premature fizz in the bowl.
You'll also need a binding liquid to hold the powder together long enough to press into a mould. Witch hazel is the go-to here because it evaporates cleanly and doesn't trigger the fizz reaction the way water does. Keep it in a small spray bottle so you can mist the mixture gradually rather than dumping it in.
Moulds, tools and safety gear
Spherical silicone moulds are the classic choice, and the same approach works for Easter egg bath bombs, but for xmas bath bombs specifically, look for snowflake, bauble, star or Christmas tree silicone moulds online or at a craft store. Silicone releases far more cleanly than hard plastic, which matters once your mixture has set.
- Digital kitchen scales (accuracy matters more than volume measuring here)
- A large mixing bowl
- A small spray bottle for the witch hazel
- Silicone moulds in festive shapes
- Disposable gloves, since mica powder and essential oils can stain hands
- Airtight containers or cellophane bags for storage once cured
Lay a sheet of baking paper down before you begin, because citric acid mixed with moisture can be corrosive to some metal benchtops over time.
Step 1. Mix the dry ingredients
Weigh out your bicarb soda, citric acid, cornflour and Epsom salts using digital kitchen scales rather than cups or spoons. Precise measurements matter more here than in almost any other kitchen craft, because even a 10g variance can throw off the fizz reaction or leave your christmas bath bombs too soft to hold their shape once they're out of the mould. Tip everything into a large, dry mixing bowl.
Whisk the dry ingredients together for a full two minutes, breaking up any lumps of bicarb soda as you go. Clumping is the single biggest cause of patchy, uneven fizzing once a bath bomb hits the water, so don't rush this step. A balloon whisk works better than a spoon here because it aerates the mixture and distributes the cornflour evenly, which is what gives the finished bomb its smooth, dense texture rather than a grainy one.
Whisk until the mixture feels like fine, dry sand with no visible clumps, that's the texture you're aiming for before you add a single drop of liquid.
Keep your workspace bone dry at this stage. Even a splash of humidity from a nearby kettle or a damp tea towel can trigger the citric acid to start reacting early, and once that happens the mixture loses its fizzing power before it's even in the tub.
Moisture is the enemy of every bath bomb recipe, so if you're making a big batch of bath bombs xmas gifts in one sitting, work in smaller sub-batches of 500g or less rather than mixing everything at once. Smaller batches are easier to control, and you'll waste less if something does go wrong.
Quick checklist before moving to Step 2
- Bicarb soda and citric acid weighed to the gram
- No visible clumps after whisking
- Cornflour fully incorporated
- Bowl and utensils completely dry
- Workspace free from steam, splashes or open windows on a humid day
Once your dry mix passes this checklist, you're ready to bring in colour and scent without risking a premature fizz.
Step 2. Add colour, scent and binding liquid
With your dry mix passing every check, it's time to bring your xmas bath bombs to life with colour and scent. Add these one at a time and work slowly, because rushing this stage is where most crumbly or streaky bombs go wrong.
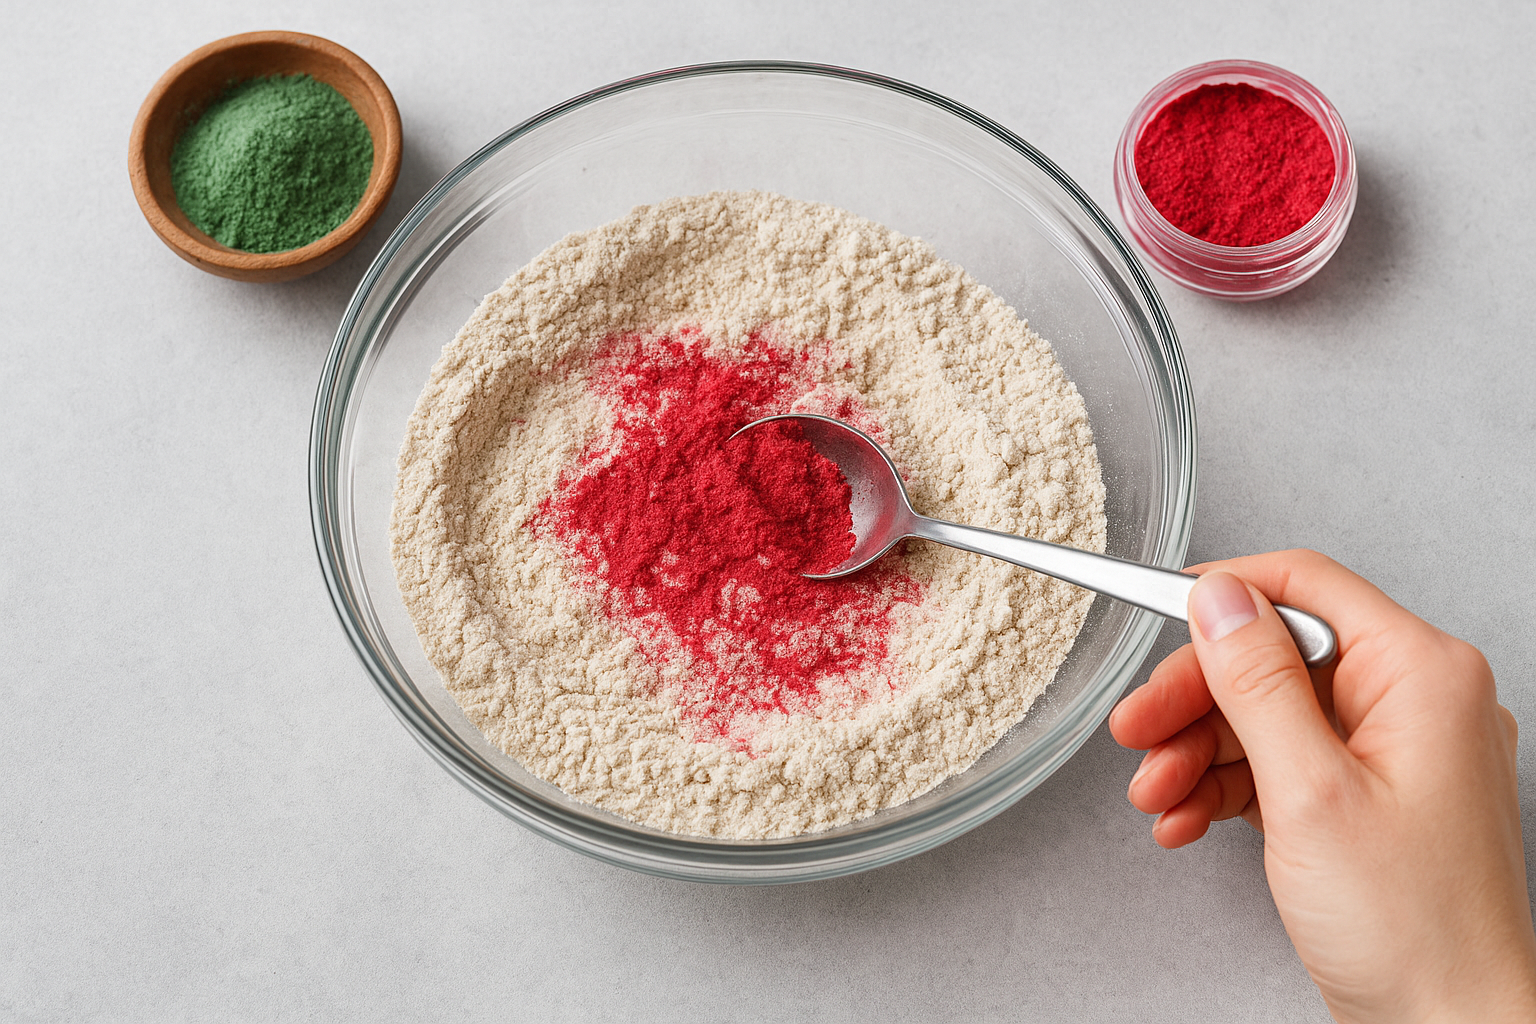
Colour with mica powder
Sprinkle a quarter teaspoon of mica powder into a small section of your dry mix rather than the whole bowl, then fold it through with a spoon until the colour looks even. Working in small pockets like this gives you marbled, snow-dusted swirls of red, green or gold rather than one flat block of colour, which suits the festive look far better than a solid tint. If you want a deeper shade for your bath bombs christmas gifts, add a touch more powder gradually rather than tipping in a whole teaspoon, since mica is far more concentrated than it looks in the jar.
Scent with essential oils
Add your essential oils next, using around 10 to 15 drops per 500g batch. Cinnamon, clove and orange blend well for a warm, spiced scent, while pine or eucalyptus gives a crisper, forest-like note that suits christmas bath bombs meant for an evening soak rather than a morning shower.
Add essential oils to the dry mix before the liquid binder, never after, or the oils will simply sit on the surface instead of soaking through the bomb.
Bring it together with the binding liquid
Finally, mist the witch hazel over the mixture in short bursts, folding the powder between each spray. You're aiming for a texture that holds together when squeezed in your fist, like damp sand, without feeling wet or sticky. Stop as soon as it clumps together, since over-spraying is the single most common reason bath bombs fizz too fast in the tub or crack once they've cured.
Step 3. Mould, freeze and cure the bath bombs
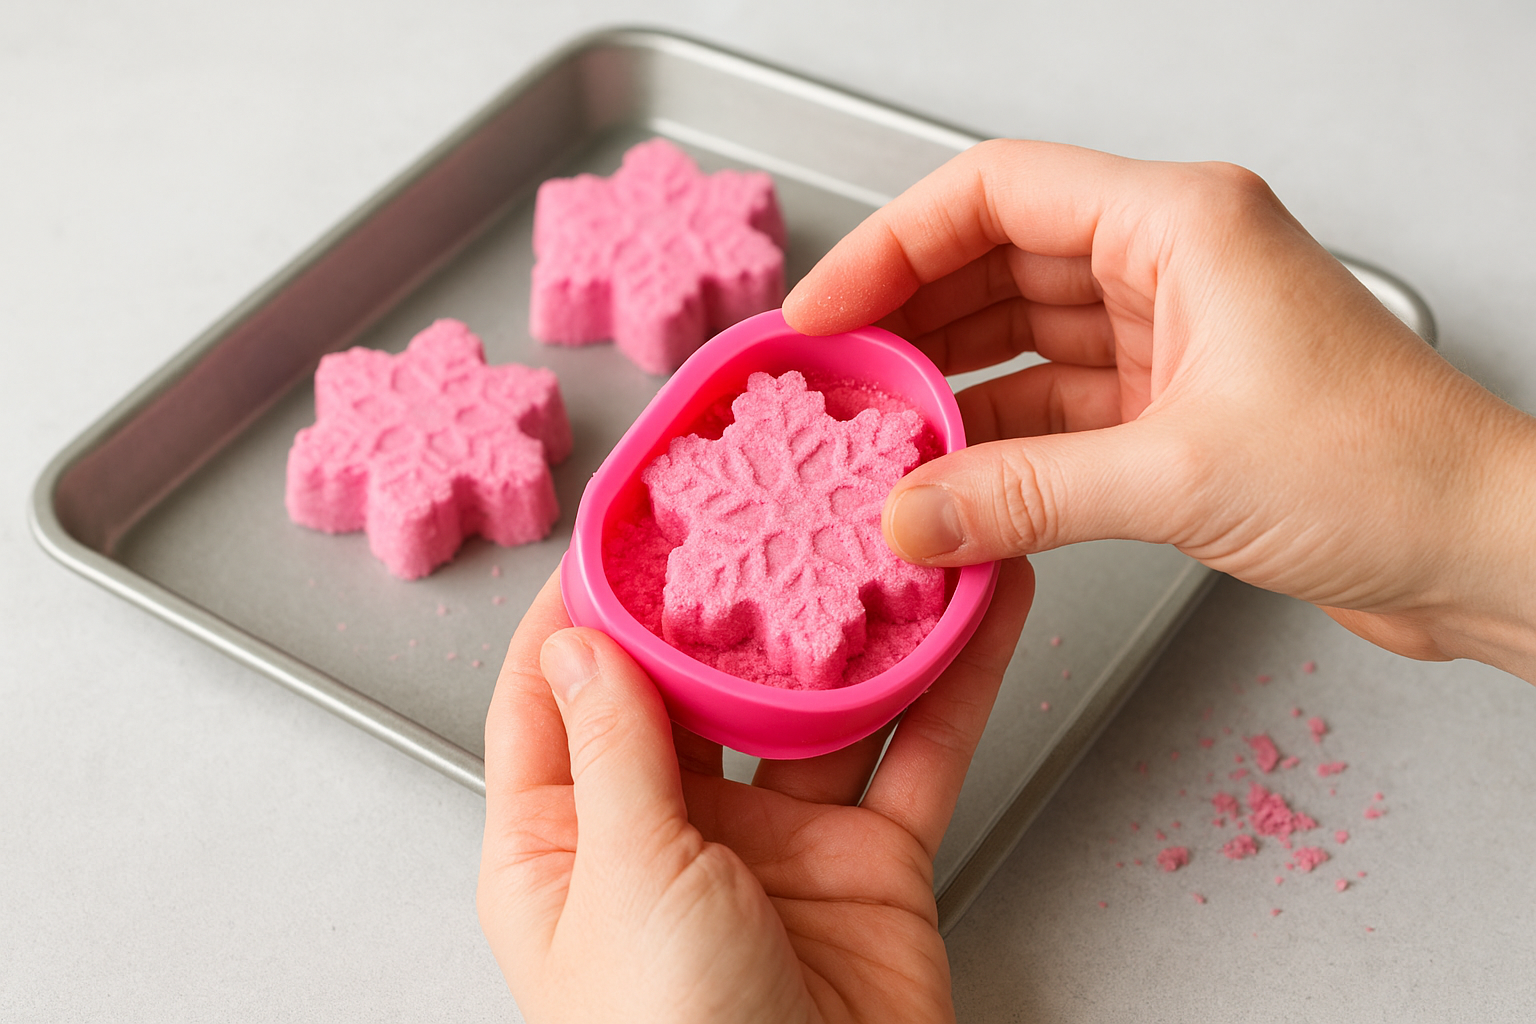
Once your mixture holds together like damp sand, pack it firmly into each half of your silicone mould, pressing right into the points of a snowflake or the ridges of a bauble shape so no air gaps are left behind. Overfill each side slightly, then press the two halves together with firm, even pressure and hold for about ten seconds. This is the moment that makes or breaks your xmas bath bombs, since a weak join here is the most common reason bombs split cleanly in half once they're out of the mould.
Freeze before you unmould
Leave the packed moulds sitting undisturbed for at least an hour at room temperature, then transfer them to the freezer for 15 to 20 minutes before attempting to release them. Freezing firms up the surface just enough to stop the shape from collapsing as you peel back the silicone, which matters a lot for detailed shapes like stars or trees where there's less structural bulk holding things together.
Never try to unmould a bath bomb straight from the bench, a short spell in the freezer is what stops fine details cracking off.
Gently twist the mould rather than pulling from one side, and release both halves at the same time if your mould is a two-piece sphere style. Rushing this step is where a lot of otherwise perfect christmas bath bombs lose a corner or a point.
Cure for at least 24 hours
Set the unmoulded bombs on a sheet of baking paper somewhere dry and cool, away from direct sun or a heater vent, and leave them to cure for a full 24 to 48 hours. Curing lets any remaining moisture evaporate slowly, which is what gives a finished bath bomb its hard, dense shell rather than a soft, crumbly one. Skipping this step, even when a bomb looks solid straight out of the mould, is the reason so many home-made batches fall apart the moment they touch bathwater.
Step 4. Decorate, wrap and store your bath bombs
Once your christmas bath bombs have cured for a full 24 to 48 hours, a light dusting of extra mica powder or a few dried flower petals pressed gently into the surface turns a plain sphere into something that looks properly gifted rather than homemade in a hurry. A soft-bristle brush works better than your fingers for this, since it lets you tap the powder on evenly without leaving smudges or fingerprints across the shell.
Add the finishing touches
Brush a fine layer of gold or silver mica across the top half of each bomb for a snow-dusted look, or press a sprig of dried rosemary or a cinnamon stick fragment into the surface while it's still slightly tacky from curing. Keep decorations sparse rather than heavy, because anything too bulky can chip off during wrapping or postage.
The best-looking xmas bath bombs are the simplest ones, a light dusting of shimmer beats an overloaded, cluttered surface every time.
Wrap them for gifting
Cellophane bags tied with twine or ribbon are the easiest way to wrap bath bombs xmas gifts without the moisture problems that tissue paper or fabric can cause, though a ready-made bath bomb gift set saves you the job entirely. Add a small silica gel sachet inside each bag if your climate is humid, since bath bombs absorb ambient moisture and start to soften within days if left unprotected.
- Cellophane bags with a twist tie or ribbon
- Small kraft boxes lined with shredded paper for a sturdier gift
- A handwritten tag naming the scent, since "pine and clove" reads far nicer than an unlabelled ball
- A silica sachet for humid climates or long postage times
Store the rest properly
Bombs you're not gifting straight away belong in an airtight container away from direct sunlight, heat vents or a steamy bathroom, since even a small amount of moisture in the air will start softening the shell within a week. Stored correctly, a well-cured batch of xmas bath bombs holds its fizz and fragrance for two to three months, which is plenty of time to see you through the whole festive season.
Time for a festive soak
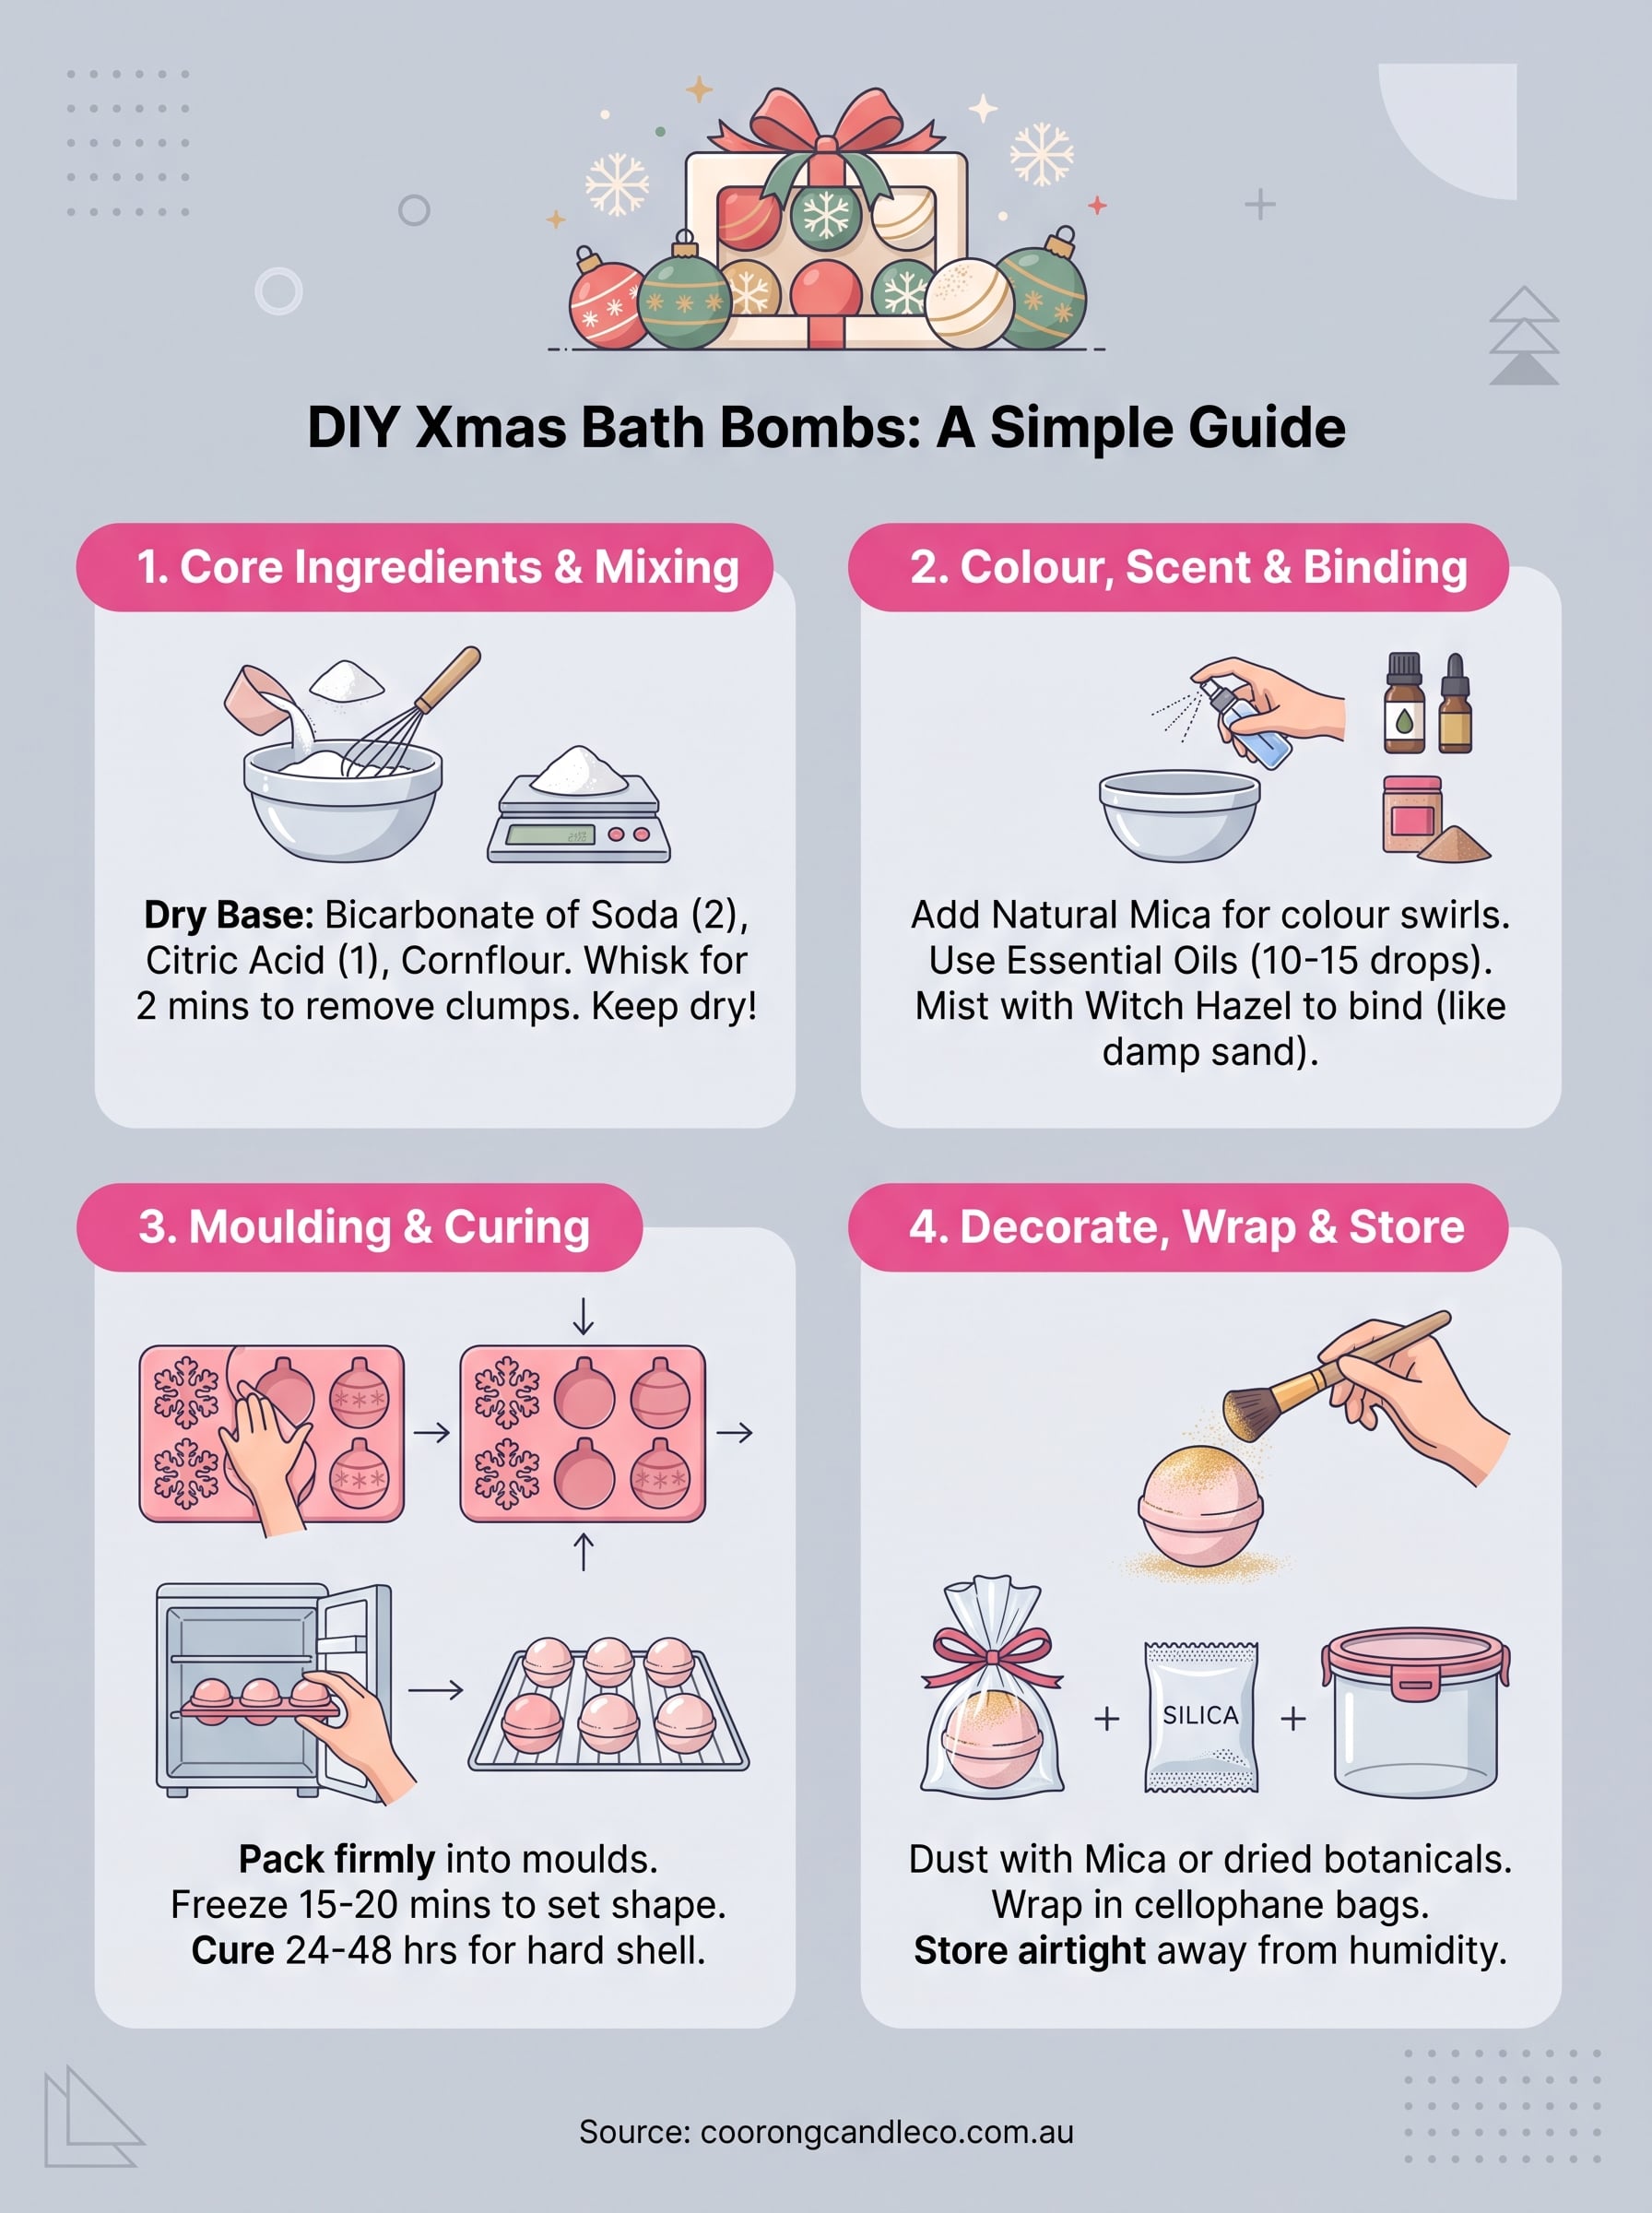
Making your own xmas bath bombs really comes down to four things done properly: precise dry ratios, a steady hand with the binder, a proper freeze before unmoulding, and patience through the cure. Get those right and you'll have a batch of fizzing, fragrant christmas bath bombs that hold their shape from the mould to the bathtub, whether they're wrapped up under the tree or sitting in your own bathroom for a well-earned soak after a long day of wrapping presents.
If a weekend of measuring citric acid and chasing air bubbles out of silicone moulds isn't how you want to spend your December, you don't have to. Our handmade bath bombs are already cured, scented and ready to gift, crafted in small batches right here in South Australia using the same natural ingredients this guide walks you through. Skip the mess, keep the fizz.