
Every soy candle we hand-pour at Coorong Candle Co. started the same way yours will: a saucepan, some wax, and a lot of trial and error. If you're searching for candle making for beginners, chances are you've got a kitchen bench cleared and a Pinterest board full of pretty jars, but no real idea where to start. That's normal. Candle making looks simple until your wax cracks, your scent throw disappears, or your wick drowns halfway through burning.
This guide answers the practical question you actually came here for: what you need and how to do it, in order, without wasting wax on guesswork. We'll walk through choosing the right soy wax, picking a wick size that matches your container, and getting your fragrance load right so the scent actually fills a room instead of fading after ten minutes.
By the end, you'll have made your first batch and understand why professional makers obsess over pour temperature and cure time. We'll cover the exact tools worth buying, the ones to skip, and the common mistakes that turn a promising candle into a smoky, tunnelled mess. Consider it the groundwork behind every candle you'll ever burn or gift.
What you'll need before you start
Before you melt a single gram of wax, get your gear sorted. Candle making fails more often from missing equipment than bad technique, and running to the shops mid-pour with hot wax cooling in your saucepan is how you end up with a lumpy, uneven candle. Gathering everything first means you can work through each step without stopping, which matters because wax temperature drops fast once it's off the heat.
Core equipment you can't skip
You don't need a commercial kitchen setup. Most of this you'll already own or can pick up cheaply from a kitchenware shop.
- A double boiler setup (or a heatproof jug inside a saucepan of water) for melting wax gently
- A kitchen scale accurate to at least 1 gram, for weighing wax and fragrance oil
- A candle or sugar thermometer that reads up to 100°C
- A pouring jug with a spout, ideally heatproof glass or stainless steel
- Wooden skewers or a wick centring tool to hold wicks straight
- A stirring spoon or spatula you're happy to dedicate to wax only
- Containers: glass jars, tins, or purpose-made candle vessels
Wax, wick and fragrance basics
This is where beginners overspend or underbuy. Soy wax is the easiest starting point because it pours at a lower temperature than paraffin, holds fragrance well, and burns cleaner, which is exactly why we use it in every Coorong candle. Buy a container blend soy wax specifically, not a pillar or votive blend, since container wax is formulated to adhere to glass without pulling away from the sides as it cools.
| Item | Beginner recommendation | Why it matters |
|---|---|---|
| Wax | Soy container blend (e.g. GW464 or similar) | Lower melt point, strong scent throw, clean burn |
| Wick | Cotton wick (CD or ECO series), sized to jar diameter | Wrong size causes tunnelling or excess smoke |
| Fragrance oil | Candle-specific, phthalate-free | Body-safe oils meant for skin can behave badly in wax |
| Wick stickers | Small adhesive dots | Keeps the wick base fixed while pouring |
| Containers | Heat-resistant glass jars or tins | Cheap glass can crack under hot wax |
Get your wick size roughly right before you start. Most Australian wax suppliers publish a sizing chart matched to jar diameter, and it's worth checking the Australian Competition and Consumer Commission's guidance on candle safety too, since an undersized wick is the single biggest cause of a candle that won't throw scent.
Get the wick size wrong and nothing else you do will fix the candle.
Safety gear and workspace prep
Molten wax sits between 60°C and 85°C depending on the stage you're at, hot enough to cause a serious burn if it splashes. Wear closed shoes, keep long hair tied back, and clear your bench of anything flammable within arm's reach. A pair of heatproof gloves or oven mitts is worth the few dollars, and keep a damp cloth nearby rather than water, since water and hot wax do not mix safely.
Once your gear's assembled, lay it out in the order you'll use it: wax and scale first, then wicks and containers, then thermometer and fragrance oil, then your pouring jug last. This isn't fussy, it's practical. Wax cools quickly once melted, so every minute spent hunting for a missing tool is a minute your pour temperature drifts. Working through candle making for beginners this way, methodically and with everything in reach, is what separates a smooth first batch from a frustrating one.
Step 1. Prepare your container and wick
Getting your container and wick right before you touch the wax saves you from redoing the whole candle later. This is the step beginners rush, and it's the one that determines whether your finished candle burns evenly or tunnels down the middle after two hours. Container prep and wick placement take ten minutes and they're non-negotiable.
Clean and check your containers
Wash every jar or tin in warm soapy water and dry it completely, since any residue or moisture will stop the wax bonding properly to the glass and can cause frosting or wet spots once it cools. Run your finger around the rim and base checking for chips or cracks, because hot wax poured into a stressed piece of glass can crack it outright. If you're reusing an old jar, make sure any old wax or sticker residue is fully scraped out first, a bit of metho on a cloth handles stubborn glue.
Centre and secure your wick
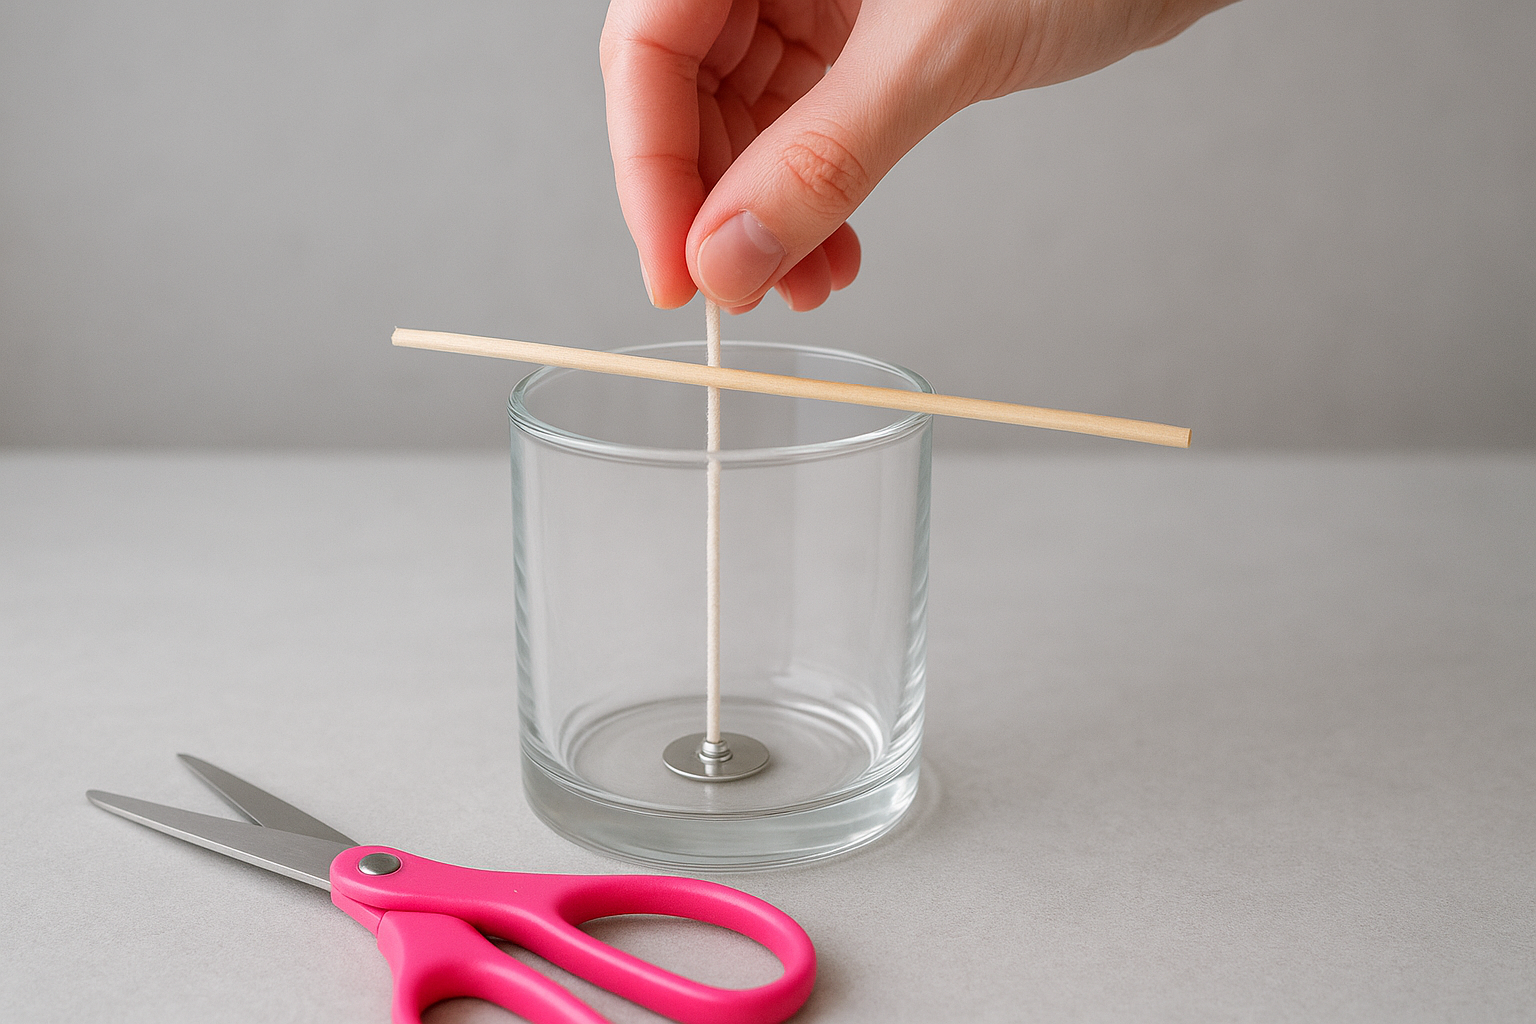
Match your wick size to your jar's diameter before you do anything else. Too thin and the flame drowns in its own melt pool, too thick and you get black smoke and a tunnelled edge.
| Jar diameter | Typical wick size (CD series) |
|---|---|
| 5–6 cm | CD10–CD12 |
| 7–8 cm | CD14–CD16 |
| 9 cm+ | CD18 or double wick |
Peel the backing off a wick sticker and press it firmly onto the base of the wick tab, then centre the tab on the bottom of the container and push down hard enough to feel it grip. This is where most first-time pours go wrong.
A wick that isn't dead centre before you pour will never sit straight once the wax sets.
Once the base is stuck down, hold the wick upright and use a wooden skewer, a clothes peg, or a purpose-made wick centring tool laid across the rim to keep it perfectly vertical and centred. Trim the wick to about 1.5 cm above where the tool holds it, just enough to keep it taut without flopping into the wax as you pour.
Line your containers up on the bench in the order you'll fill them, wicks centred and secured, before you go anywhere near the stove. Skipping this and trying to position a wick in already-poured wax is fiddly, messy, and almost never ends with it sitting straight. With containers ready and wicks locked in place, you're set to move on to melting your wax.
Step 2. Melt your wax safely
With your containers wicked and ready, it's time to turn on the heat. Melting wax is the step where most kitchen accidents happen, but it's also the simplest to get right once you understand that low, steady heat beats speed every time. Rushing this stage scorches the wax, ruins its scent-holding ability, and can even cause it to smoke or flash if it overheats.
Set up your double boiler
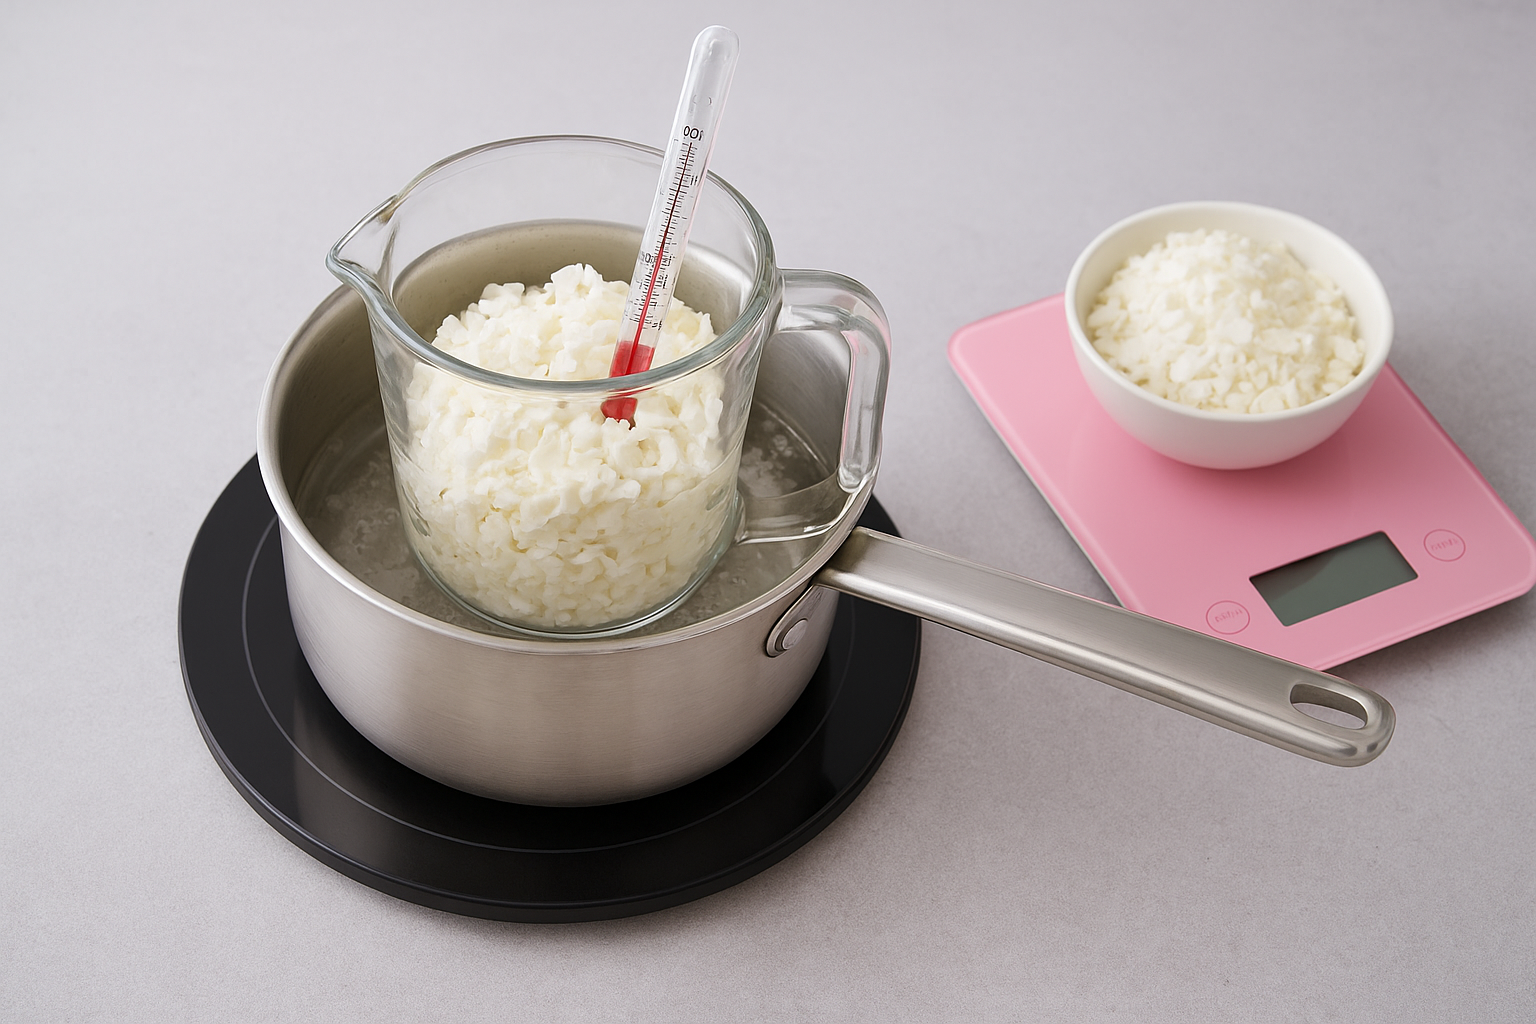
Fill a saucepan with about 5cm of water and bring it to a gentle simmer, not a rolling boil. Place your heatproof jug or a smaller pot inside, making sure no water can splash into the wax. Weigh your soy wax flakes on the kitchen scale, adding roughly 10 to 15 percent more than your container's volume to allow for the fragrance oil you'll add later, then tip it into the jug.
Melt slowly and watch the thermometer
Stir occasionally with your dedicated spatula as the flakes soften and liquefy, and clip your thermometer to the side of the jug so it sits in the wax without touching the base. Soy wax typically melts fully between 65°C and 75°C, and going much above that risks discolouring it or weakening its fragrance throw.
| Stage | Target temperature | What to watch for |
|---|---|---|
| Fully melted | 65–75°C | Clear liquid, no visible flakes |
| Fragrance addition | 60–65°C | Wax cooled slightly, still fluid |
| Pouring | 50–55°C | Thin enough to pour cleanly |
If your wax ever starts smoking, take it off the heat immediately and let it cool. Smoking wax has overheated and lost quality.
Keep a close eye on the pan the whole time. Never leave melting wax unattended, since it can overheat faster than you'd expect once it's fully liquid, and an unwatched pot is how kitchen fires start. Turn the element down rather than off if the wax is heating too quickly, giving you finer control than switching the heat on and off repeatedly.
Once your wax reads a clear, even temperature across the batch with no solid flakes remaining, remove the jug from the heat using your oven mitts and set it on a heatproof surface, ideally a wooden board or folded towel rather than a cold benchtop, which can shock the glass. Let it sit for a minute before moving to the next step. This brief pause matters because adding fragrance oil to wax that's still too hot burns off the scent before it ever reaches your finished candle.
Step 3. Add fragrance to your wax
Now that your wax has cooled to the right window, it's time to bring in the scent. This is the step that decides whether your finished candle fills a room or sits there looking pretty and smelling of nothing. Getting your fragrance load right matters more than almost any other variable in candle making for beginners, and it's also the easiest to get wrong by guessing instead of weighing.
Work out your fragrance load
Most soy container waxes are designed to carry between 6% and 10% fragrance oil by weight, though always check the specific guidance from your wax supplier since blends vary. Weigh your melted wax first, then calculate the oil based on that figure rather than eyeballing it.
| Wax weight | Fragrance load | Fragrance oil needed |
|---|---|---|
| 200g | 8% | 16g |
| 350g | 8% | 28g |
| 500g | 8% | 40g |
Go above 10% and you risk oil separating from the wax as it cures, leaving wet patches or oily pools on the surface. Go below 6% and you'll end up with a candle that smells faint even when it's burning.
A candle with too much fragrance oil sweats. A candle with too little never fills the room. Weigh it, don't guess it.
Mix it in properly
With your wax sitting between 60°C and 65°C, pour the weighed fragrance oil in slowly while stirring continuously. Keep stirring for a full two minutes, longer than most beginners expect, since fragrance oil needs to bind evenly through the whole batch rather than pooling near the surface.
- Pour the oil in a thin, steady stream rather than dumping it all at once
- Stir in a figure-eight motion to reach the edges and base of the jug
- Scrape down the sides of the jug with your spatula partway through
- Check the wax looks uniform, with no oily streaks or cloudy patches
Uneven mixing shows up later as patchy scent throw, where one side of the candle smells strong and the other barely registers. Two minutes of proper stirring now saves you from that outcome entirely.
Let it settle before pouring
After mixing, give the wax another minute or two to settle and confirm it's sitting in your target pouring range, usually 50°C to 55°C for soy blends. Fragrance oil cools the wax slightly as it's incorporated, so check your thermometer again rather than assuming it's still at the temperature you mixed it at. Your wax is now scented, settled, and ready for the pour itself.
Step 4. Pour your candle
With your scented wax settled at the right temperature, the actual pour takes seconds, but the setup around it decides whether your candle sets flat, cracks, or sinks in the middle. Pouring technique matters less than people assume, and temperature control matters more, so don't rush this step just because it looks easy.
Check your temperature one last time
Before you lift the jug, dip your thermometer in for a final reading. Soy container wax generally pours best between 50°C and 55°C, cool enough to avoid frosting on the glass but warm enough to flow evenly around the wick. Pouring too hot risks sinkholes as the wax shrinks unevenly while cooling, and pouring too cool leaves visible seam lines where the wax didn't bond in layers.
Pour slowly and steadily
Hold your pouring jug close to the rim of the container, tilting it gently rather than dumping the wax in from height, which introduces air bubbles you'll see as tiny pockmarks once set. Pour in one continuous motion, keeping the wick centred with your other hand or leaving your wick centring tool in place across the top.
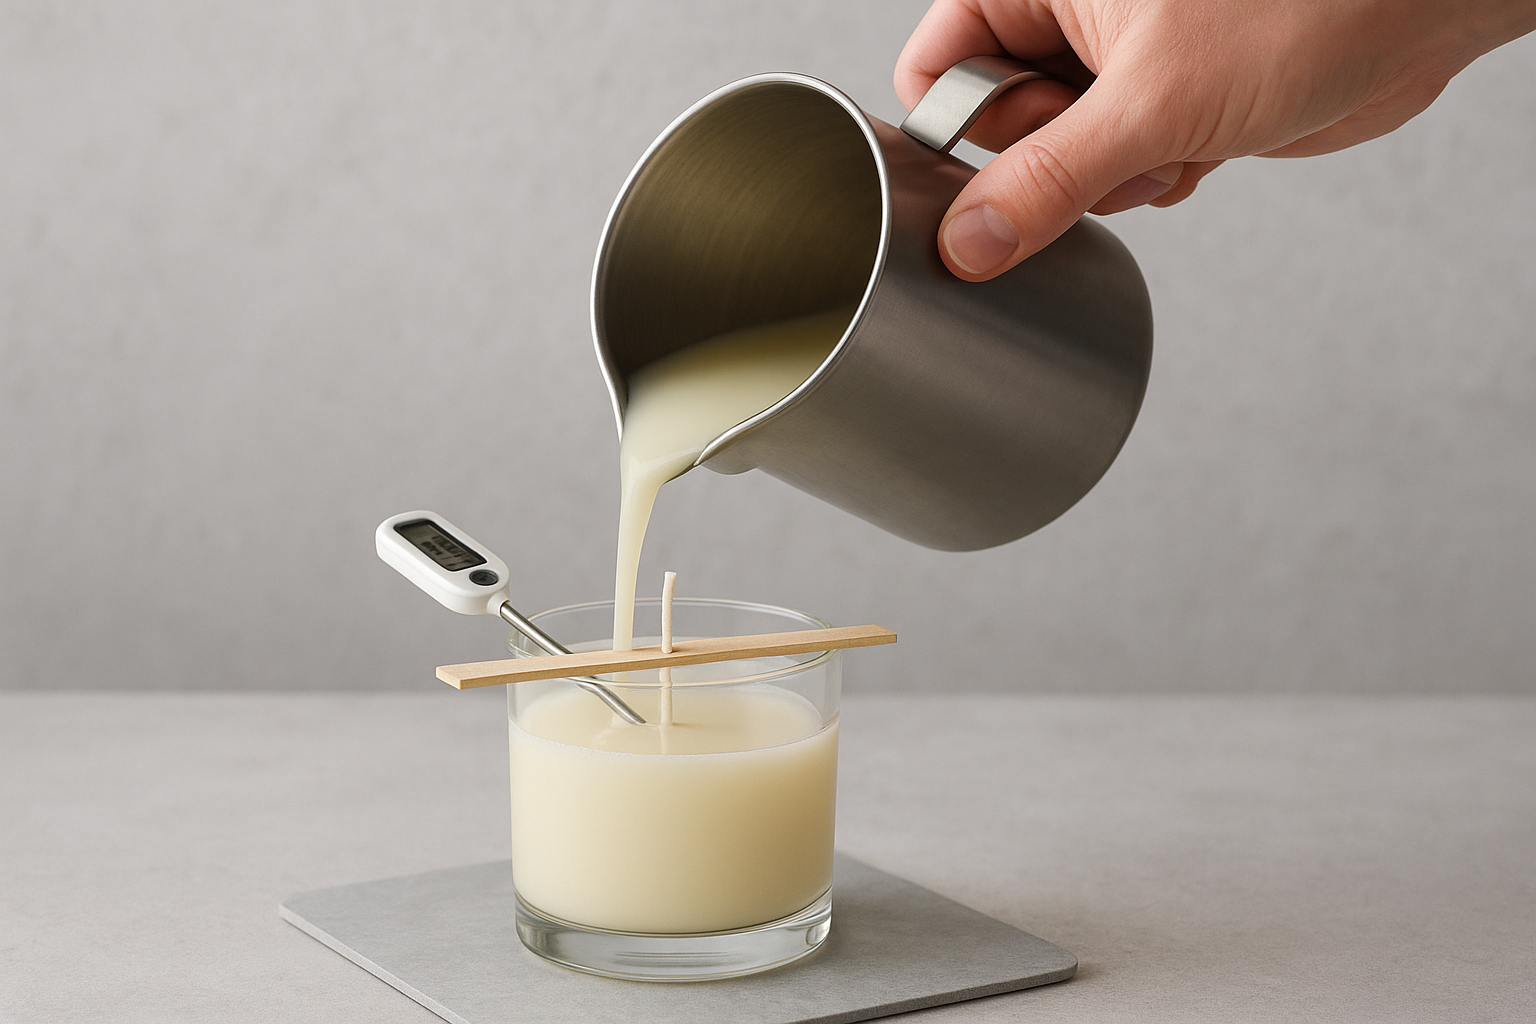
- Leave roughly 1 cm of headspace below the rim so the wax doesn't overflow once it settles
- Keep the wick vertical throughout, checking it hasn't drifted the moment wax hits the base
- Set the poured candle on a level, heatproof surface away from draughts or open windows
- Reserve about 10% of your melted wax in the jug for a top-up pour later
A draught during pouring is the most overlooked cause of a lopsided, cracked candle top.
Hold the wick and let it set
Once poured, keep the wick held straight for the first few minutes while the surface starts to firm up, since it can drift as the wax cools if left unsupported. A clothes peg balanced across the rim does this job perfectly and frees your hands for the next container in your batch. Leave the candle completely undisturbed for at least four hours, though overnight is better, resisting the urge to move it, touch the wax, or check on it repeatedly, since even small vibrations can create fine cracks across the surface as it hardens. Sinkholes or a slightly dipped centre around the wick are common at this stage and normal, which is exactly why you kept that reserved wax back. Once the candle's fully hardened, you'll use it for a second, thinner top-up pour that levels the surface before curing begins properly.
Step 5. Cure, trim and test burn your candle
Your candle looks finished the moment it's set, but it isn't ready to burn yet. Curing time is the step most beginners skip entirely, and it's the reason their first candle underperforms compared to anything bought from a proper maker. Soy wax needs time for the fragrance oil to bind fully into its crystal structure, and rushing this stage means you're burning off scent that never had the chance to settle in.
Give it time to cure
Leave your candle to cure somewhere cool, dark and out of direct sunlight for at least 48 hours before you do the top-up pour mentioned earlier, then a further 1 to 2 weeks before the first burn. Soy wax candles generally need longer curing than paraffin, since the fragrance binds more slowly into the softer wax structure.
| Cure time | What's happening | Result if skipped |
|---|---|---|
| 48 hours | Wax fully hardens, ready for top-up pour | Sinkholes remain visible |
| 3–7 days | Fragrance oil begins binding into wax | Weak, faint scent throw |
| 1–2 weeks | Full scent throw develops | Candle smells fine unlit, weak when burning |
Patience during curing is what separates a candle that smells good in the jar from one that fills the room when lit.
Trim your wick before every burn
Once cured, trim the wick to exactly 5mm to 7mm above the wax surface using proper wick trimmers or sharp scissors angled to reach down into the jar. A wick left too long causes a large, flickering flame, black soot on the glass, and a mushroomed carbon tip that shortens burn life. This isn't a one-off step, trim before every single burn for the life of the candle.
Do a proper test burn
Your first burn matters more than any burn after it, because it sets the memory ring in the wax that determines how every future burn behaves. Light the candle and let it burn until the melt pool reaches all the way to the edges of the container, which usually takes 2 to 4 hours depending on jar diameter. Blowing it out early creates a tunnel that the candle will follow for the rest of its life, wasting wax around the edges permanently.
Watch the flame during this first burn for warning signs: excessive smoke, a flame that's too tall, or wax climbing up the sides of the wick unevenly. A clean, steady flame around 3cm to 4cm tall with a full, even melt pool means your wick size and fragrance load were both right. If something looks off, note it now, because the fixes are usually straightforward once you know what you're looking at.
Troubleshooting common candle making problems
Even with careful measuring, your first few candles will probably show at least one of these issues. That's normal, and it's exactly how every experienced maker learnt their craft. Diagnosing the problem correctly means you fix the actual cause next time instead of guessing and wasting another batch of wax.
Reading the symptoms
Getting candle making for beginners right often comes down to recognising what a finished candle is telling you. A tunnel down the centre, a sunken top, or a wick that drowns itself all point to specific, fixable causes rather than bad luck.
| Problem | Likely cause | Fix next time |
|---|---|---|
| Tunnelling down the middle | Wick too small, or first burn stopped too early | Size up the wick, burn until melt pool reaches the edge |
| Sinkhole or dipped top | Wax cooled too fast, or no top-up pour done | Pour slightly warmer, reserve wax for a second pour |
| Weak scent throw | Fragrance load too low, or cure time too short | Weigh oil to 8% of wax weight, cure a full two weeks |
| Frosting on the glass | Wax poured too hot, or cooled in a draught | Pour at 50–55°C away from open windows |
| Wet spots on the jar | Container wasn't warm enough, or humidity was high | Warm jars slightly before pouring |
| Black soot on the glass | Wick left untrimmed, or wick sized too large | Trim to 5–7mm before every burn |
Fixing the fragrance and finish
Mushrooming on the wick tip, that little carbon bulb that forms at the top, usually means your fragrance load crept above 10% or your wick is oversized for the jar. Pull the wick size down one increment and re-check your fragrance weight against your wax total rather than the finished candle weight, since that small distinction throws the whole ratio off.
Most candle faults trace back to one of three things: wick size, pour temperature, or cure time. Fix those three and the rest tends to sort itself out.
Patchy colour or a rough, uneven top surface often comes from stirring too vigorously after adding fragrance, which whips air into the wax. Slow, steady stirring in a figure-eight motion avoids this entirely.
Second-guessing every small flaw is a waste of energy at this stage. Treat your first batch as data, not a finished product to judge yourself against. Write down what wax temperature, wick size and fragrance percentage you used for each jar, then compare the burn results a week later. That simple habit turns troubleshooting from frustrating guesswork into a repeatable process you'll refine with every pour.
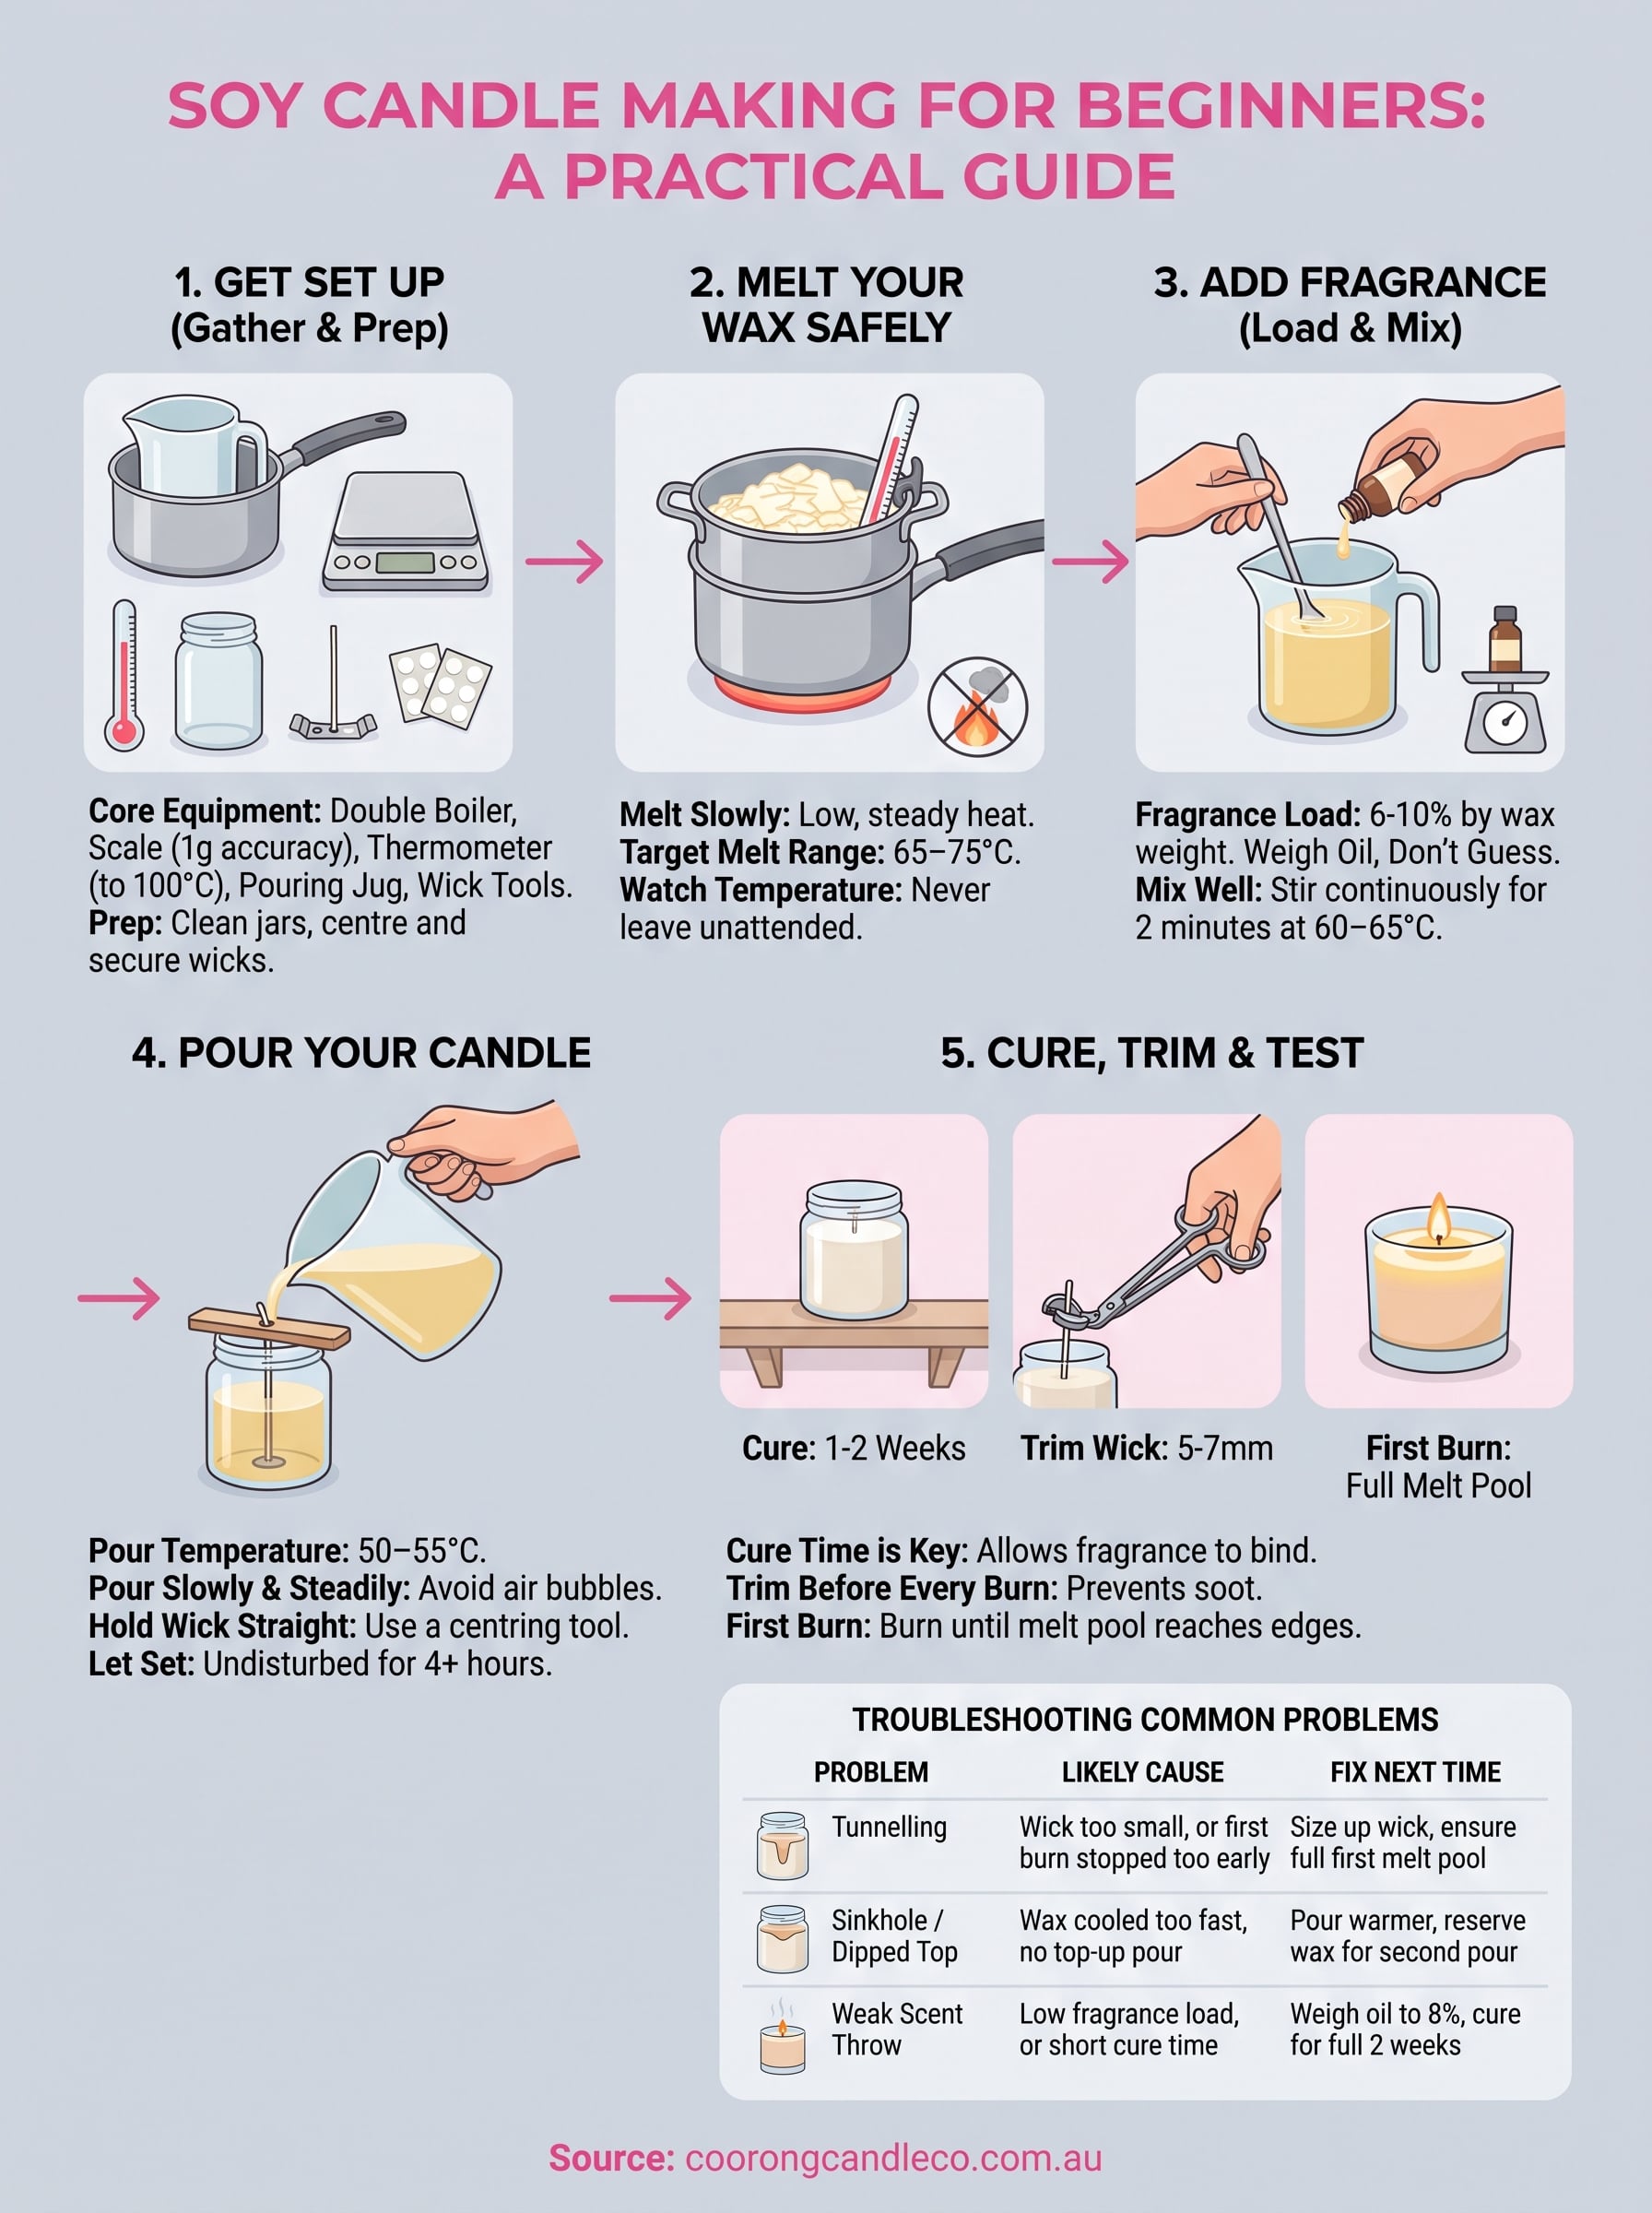
From first pour to finished candle
You now know more about candle making for beginners than most people ever bother to learn before lighting a match. Wick size, pour temperature, and cure time decide almost everything, and you've got the numbers and the process to get all three right on your next batch. Your first candle won't be perfect, and that's fine. Every maker's early jars had sinkholes and faint scent throw before they worked out the fixes you've just read.
If your first attempts have you appreciating just how much care goes into a properly cured, evenly scented candle, that's exactly the point where handmade quality starts to matter. When you'd rather skip the trial and error altogether, browse our hand-poured soy candles and see what a fully cured, professionally tested candle actually smells like from first light to last.