
Your favourite reed diffuser has gone quiet and a replacement bottle costs nearly as much as the original. Before you buy another one, it's worth learning how to make reed diffuser oil yourself. All you need is a carrier oil, some fragrance or essential oil, and a splash of alcohol to help the scent travel up the reeds properly.
This guide walks you through a proper diffuser reed diy recipe using ratios that actually work, not guesswork. You'll learn which oils thin out well, why plain vegetable oil often clogs reeds, and how to adjust strength depending on room size. It's the same logic behind any good homemade reed diffuser refill, just scaled to suit your own bottle and reeds at home.
We'll also cover reed reversal, timing, and how to keep your mixture smelling strong for weeks rather than days. At Coorong Candle Co., we spend our days blending soy wax and natural oils inspired by South Australia's coastline and bushland, so we know a thing or two about what makes a fragrance last. Consider this your practical, no-nonsense recipe for a refill that actually performs.
What you need to make reed diffuser oil at home
Getting a proper homemade reed diffuser refill right comes down to using the correct ratio of a handful of basic ingredients, not a long shopping list. Most failed attempts happen because people swap in kitchen oils that were never designed to travel up a reed, or skip the alcohol that helps the scent throw properly. Before you start mixing, gather everything below so you're not halfway through and reaching for a substitute that won't perform the same way.
A reed diffuser only works as well as its carrier oil, so don't skimp on getting that part right.
Core ingredients
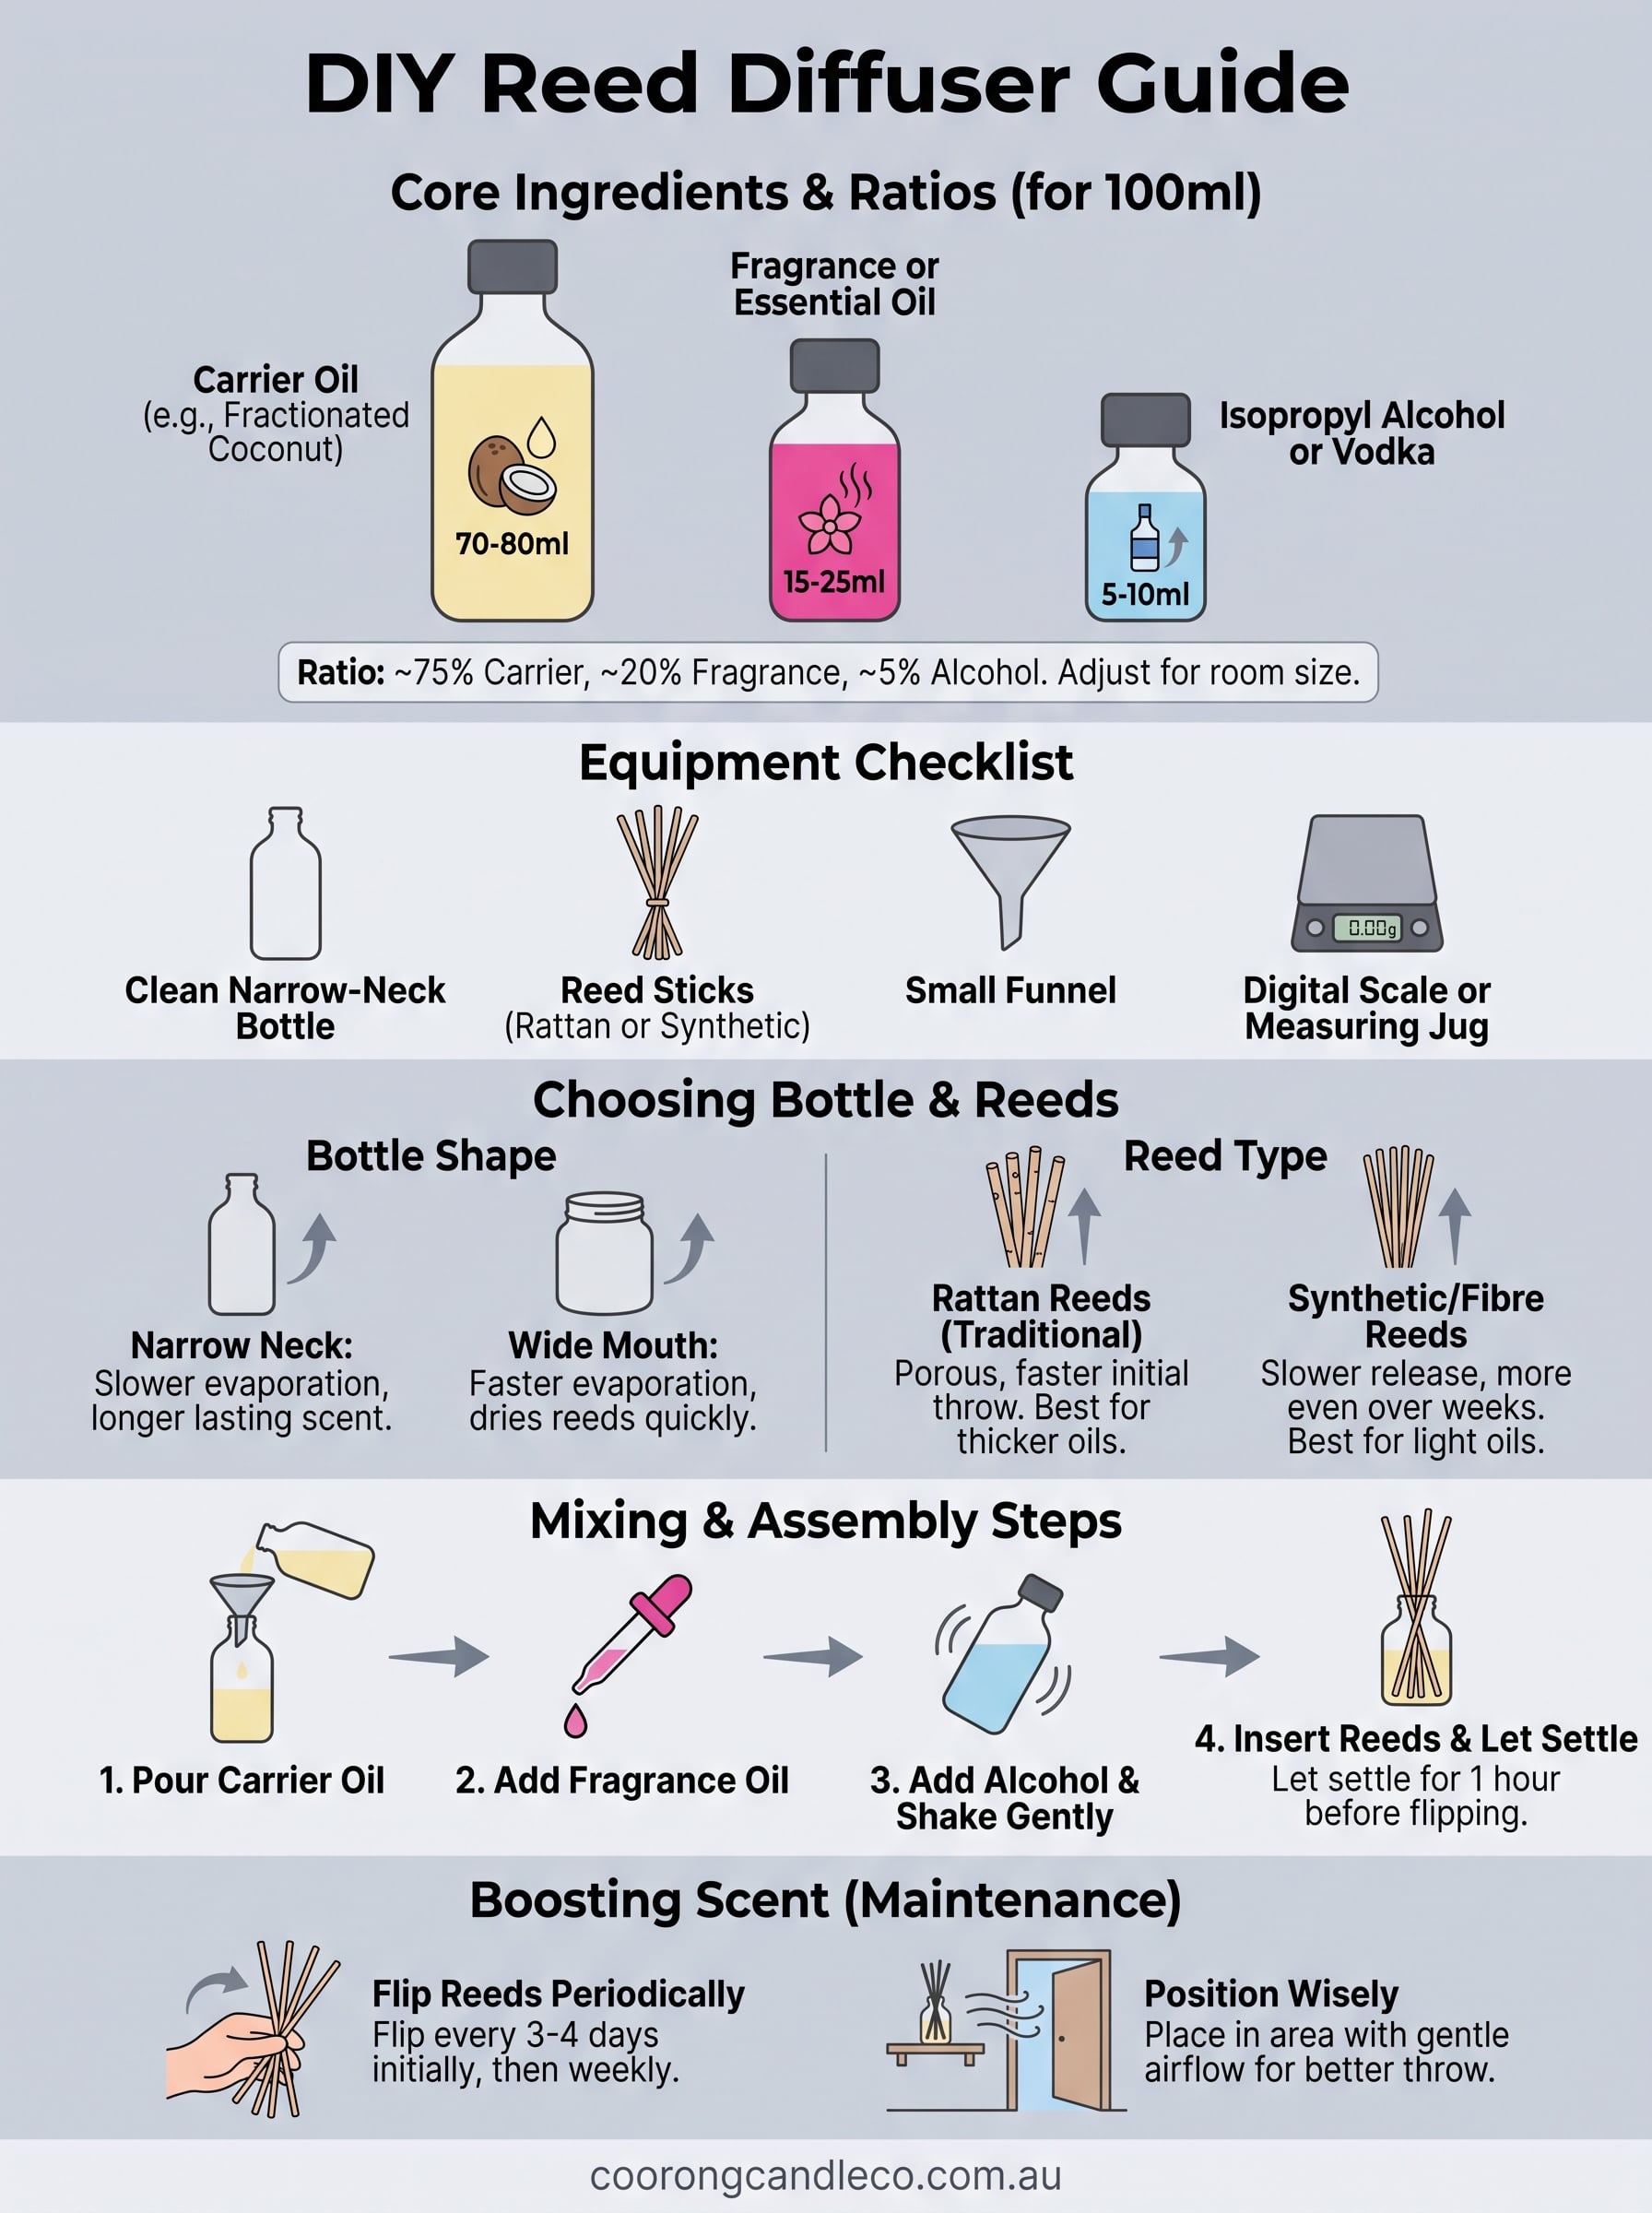
You need three components, and each one does a specific job. The carrier oil carries the fragrance up the reeds without clogging them. The fragrance oils made for reed diffusers provide the scent itself, and the alcohol thins the mixture so it moves through the reeds rather than sitting stagnant at the bottom of the bottle.
| Ingredient | Role | Typical amount (for 100ml) |
|---|---|---|
| Carrier oil (e.g. odourless mineral oil, fractionated coconut oil) | Base that carries scent up the reeds | 70-80ml |
| Fragrance oil or essential oil blend | Provides the scent | 15-25ml |
| Isopropyl alcohol or vodka | Thins the mix so it wicks properly | 5-10ml |
These proportions aren't fixed rules, they're a solid starting point you'll adjust once you've tested how your reeds and room respond. A reed diffuser refill recipe with too little alcohol will smell strong in the bottle but barely register in the room, while too much will burn off the scent too quickly.
Tools and equipment
Beyond the liquid ingredients, you'll want a few practical items on hand before you start pouring. None of these are expensive or hard to find, and most you'll already have around the house.
- A clean glass bottle with a narrow neck, ideally one you're reusing from a previous diffuser
- Reed sticks, either rattan (traditional, more porous) or synthetic (denser, slower release)
- A small funnel to avoid spills when pouring into a narrow bottle neck
- A digital kitchen scale or measuring jug for accurate ratios
- Gloves, since fragrance oils can irritate skin with prolonged contact
- A cloth or paper towel to wipe reeds during flipping
Once you've got these together, working out how to make reed diffuser refill batches becomes a repeatable process rather than a one-off experiment, much like topping up reed diffuser oil in a bottle you already own. Keep your measurements written down somewhere, because the batch that works brilliantly in your living room this month is the one you'll want to recreate exactly next time your bottle runs low.
Step 1. Choose your bottle and reeds
Your bottle and reeds decide how well the whole recipe performs, so this isn't a step to rush. Bottle shape matters more than colour or looks: a narrow neck slows evaporation and stops the fragrance oil burning off in a week, while a wide-mouthed jar lets scent escape too fast and dries out reeds within days. If you're reusing an old diffuser bottle, give it a proper wash with hot soapy water first, then dry it completely, because leftover residue from the previous fragrance oil will clash with your new blend.
Get the bottle and reeds right first, because no fragrance recipe can fix a container that evaporates too fast or reeds that won't wick properly.
Choosing the right reeds is where most people learn how to make reed diffusers work properly, and it comes down to picking the right material for your oil blend. Rattan reeds are the traditional choice, they're more porous and pull scent through faster, which suits thicker carrier oils. Synthetic reeds, often labelled fibre reeds, release scent more slowly and work better with lighter, more volatile blends since they won't flood the room in the first few hours.
| Reed type | Best for | Scent throw |
|---|---|---|
| Rattan | Thicker carrier oils, natural look | Faster, stronger initial throw |
| Synthetic/fibre | Light oils, subtle fragrance blends | Slower, more even over weeks |
Use between six and eight reeds for a standard 100ml bottle. Fewer reeds mean a fainter scent, while overcrowding the neck can restrict airflow and choke the throw entirely. Trim reeds so they sit a few centimetres above the bottle, since reeds cut flush with the rim tend to drip oil down the outside rather than up into the room.
Step 2. Pick a carrier oil or diffuser base
Once your bottle and reeds are sorted, the next decision is the diffuser base that actually carries the scent. Understanding what carrier oils actually are helps here, because yours needs to be thin enough to travel up the reeds but stable enough not to evaporate within days, and this is where most homemade reed diffuser refill attempts go wrong. People often reach for whatever's in the pantry, but olive oil, sunflower oil, or anything with a strong smell of its own will fight your fragrance rather than support it. The right base stays odourless, doesn't discolour over time, and won't leave a greasy film around the reed holes.
Choose a carrier oil that disappears into the background, because the reeds should carry your fragrance, not compete with it.
Best carrier oils for reed diffusers
Fractionated coconut oil and odourless mineral oil are the two most reliable oils for reed diffusers if you're working out how to make home fragrance diffuser blends at home. Both are light, colourless, and won't turn rancid the way natural cooking oils do after a few weeks sitting in a warm room. Dipropylene glycol (DPG) is another option favoured by candle and diffuser makers because it blends cleanly with most fragrance oils and thins the mix without needing much extra alcohol.
| Carrier oil | Pros | Cons |
|---|---|---|
| Fractionated coconut oil | Odourless, stable, widely available | Slightly thicker, needs more alcohol |
| Odourless mineral oil | Cheap, very stable, low odour | Petroleum-based, not ideal for natural blends |
| DPG (dipropylene glycol) | Mixes well, thin consistency | Harder to find in small quantities |
Oils to avoid
Skip olive oil, vegetable oil, and other kitchen staples entirely. They're too thick to wick properly, they'll clog your reeds within a fortnight, and they tend to go rancid, which ruins the whole batch no matter how good your fragrance oil is.
Step 3. Mix your fragrance and carrier oil ratio
Getting the fragrance oil ratio right is where a homemade batch either matches a shop-bought diffuser or fades into nothing after a week. Most fragrance and essential oils sit somewhere between 15% and 25% of the total mixture, with carrier oil making up the bulk and alcohol thinning things out. Start at 20% fragrance oil for a standard living room, then adjust up if you've got a larger space or open-plan layout, and down if you're diffusing in a small bedroom or bathroom.
Twenty percent fragrance oil to eighty percent carrier and alcohol is the ratio to memorise, everything else is just fine-tuning.
A working recipe for 100ml
Use this as your baseline reed diffuser refill recipe, then tweak the fragrance percentage once you've tested it for a few days.
- 70ml carrier oil (fractionated coconut oil or odourless mineral oil)
- 20ml fragrance oil or essential oil blend
- 10ml isopropyl alcohol or high-proof vodka
Essential oils behave differently to fragrance oils, so if you're working with essential oils like eucalyptus or lavender, push closer to 25ml since they tend to throw scent less aggressively than synthetic fragrance oils.
Mixing method
Pour the carrier oil into your bottle first, followed by the fragrance oil, then the alcohol last. Screw the lid on and shake gently for about thirty seconds so everything combines evenly rather than sitting in separate layers.
Leave the mixture to settle for an hour before inserting reeds, because a freshly shaken blend can push air bubbles up the reeds and cause dripping. If you're batching a larger amount for gifting or refilling multiple bottles, scale the recipe up proportionally rather than eyeballing it, since even a 5% error in fragrance oil throws the whole balance off once it's diluted across a bigger volume.
Step 4. Assemble your diffuser and boost the scent
With your mixture settled, insert the reeds into the bottle and leave them untouched for the first hour so the oil starts wicking upward. Newly inserted reeds need this quiet period before you touch them again, otherwise you'll disturb the wicking action before it's properly started. Position the bottle somewhere with gentle airflow, like a hallway shelf or near a doorway, since a sealed-off corner won't carry the scent anywhere near as far as a spot with some natural air movement.
Flipping your reeds every few days is the single easiest way to keep a homemade diffuser smelling strong for weeks instead of days.
Reed reversal and timing
This flipping technique, often called reed reversal, is the trick most shop-bought diffusers rely on and one you should build into your routine from day one. Turn the reeds over every three to four days so the saturated end faces down and the drier end pulls fresh oil upward. Doing this consistently roughly doubles the working life of a batch compared to leaving reeds sitting in one position the whole time, and it's one of several ways to make a reed diffuser last longer.
- Flip reeds every 3-4 days for the first two weeks
- After that, flipping once a week is usually enough
- Wipe excess oil off the exposed end with a paper towel before flipping back in
- Replace reeds entirely once they feel stiff or discoloured, usually after 6-8 weeks
Boosting scent strength
Rooms with high ceilings or lots of airflow will need a stronger throw than the standard recipe gives you. Adding two or three extra reeds, or nudging your fragrance oil up towards 25%, both lift the throw without needing to remake the whole batch. Squeezing the saturated ends of the reeds gently between your fingers once a week also pushes a small burst of concentrated oil into the air, handy before guests arrive or when you just want a stronger hit of scent for an evening.
Enjoy your naturally fragrant home
Making your own homemade reed diffuser refill isn't complicated once you understand the ratios: a stable carrier oil, the right percentage of fragrance, a splash of alcohol to help it wick, and reeds you flip every few days. Get those fundamentals right and you'll stretch a single bottle for months rather than weeks, at a fraction of the cost of buying replacements.
That said, some evenings you want a fragrance ready to go without measuring anything out. If mixing your own reed diffuser refill isn't how you want to spend a Sunday afternoon, we've already done the blending for you. Our natural reed diffusers are hand-blended in South Australia using the same principles covered here, just tested and perfected so you don't have to be. Whichever route you take, your home deserves a scent that actually lasts.