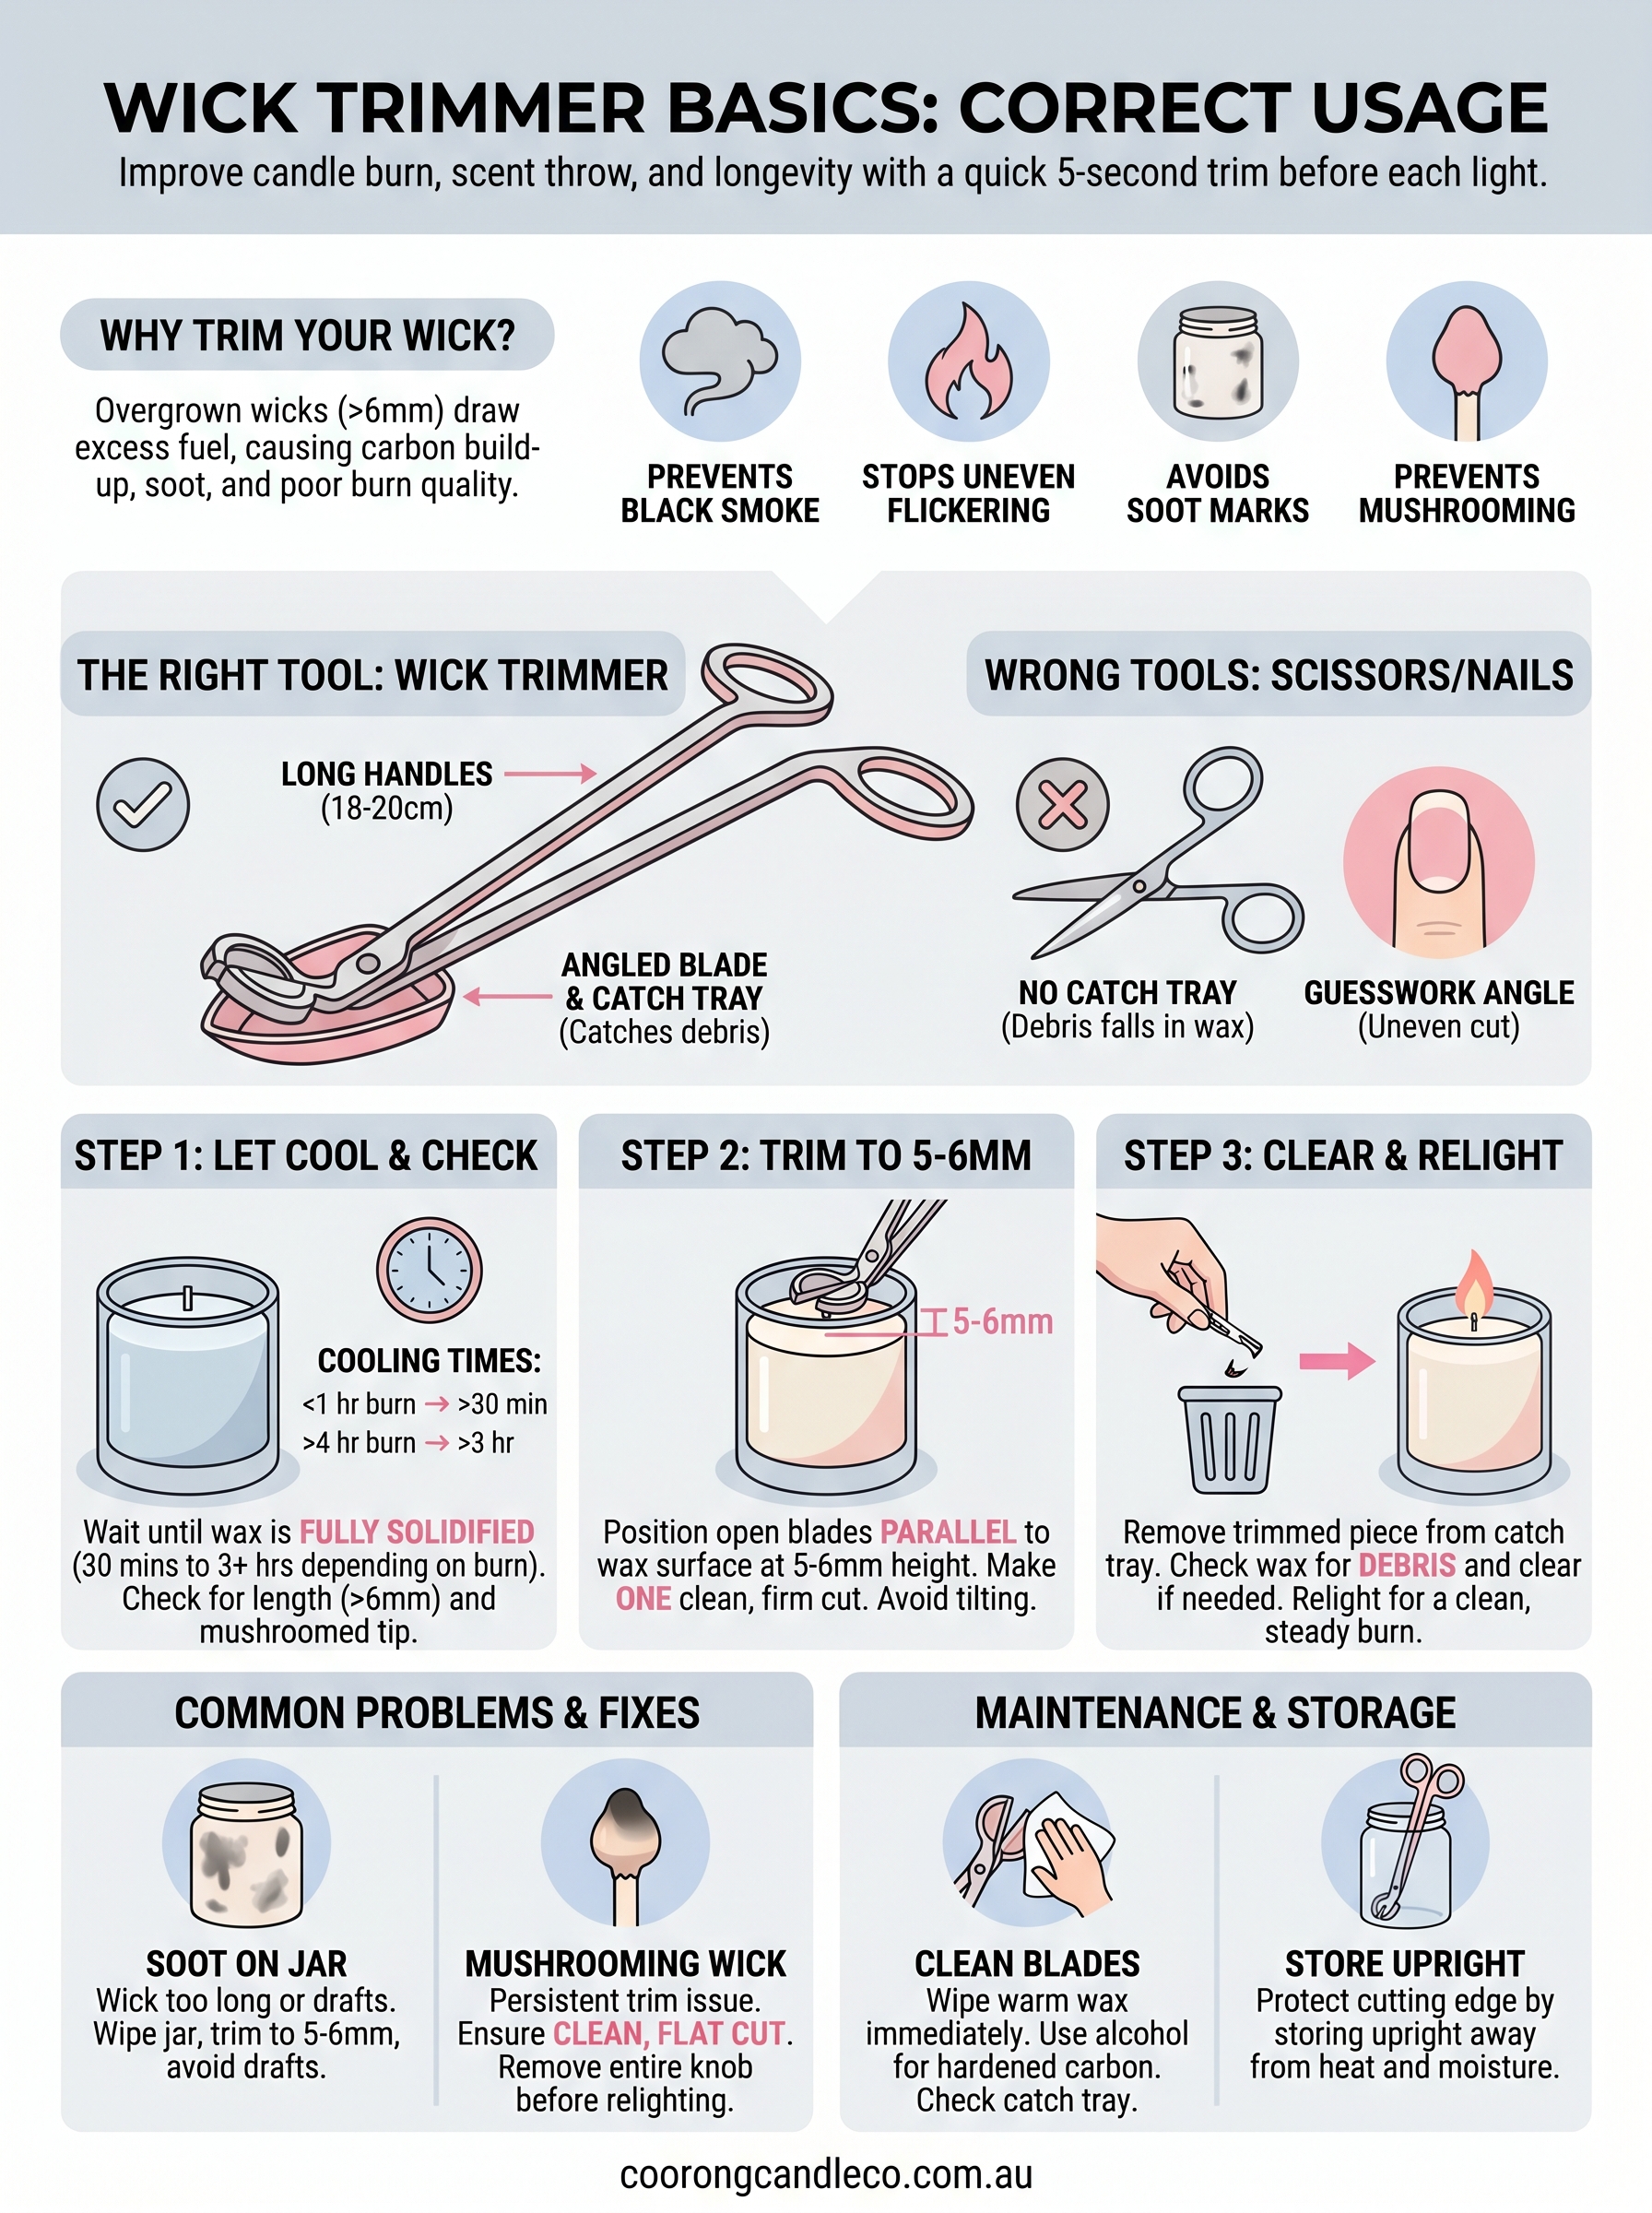
If you've ever noticed your candle producing black smoke, flickering unevenly, or leaving soot marks on the glass, there's a good chance your wick needs attention. Knowing how to use a wick trimmer is one of the simplest things you can do to improve the way your candles burn, and it takes about five seconds before each light.
At Coorong Candle Co., we hand-pour every soy candle with lead-free cotton wicks designed for a clean, even flame. But even the best wick won't perform properly if it's left untrimmed between burns. That's why we always recommend trimming to roughly 5–6 mm before striking a match. A wick trimmer makes this easy and precise, and it works far better than household scissors or your fingernails.
This guide walks you through exactly how to use one, the correct technique, the right timing, and why this small habit protects both your candle's scent throw and its overall burn life. Whether you're new to soy candles or just want to get more from every jar, these steps will help you burn smarter. Let's get into it.
What a wick trimmer does and why it helps
A wick trimmer is a long-handled cutting tool designed specifically to reach inside candle jars and trim the charred tip of the wick down to the correct burning length. Unlike scissors, the angled blade and built-in debris tray catch the trimmed piece instead of letting it fall back into the wax. This keeps your candle clean, gives the flame a stable base to work from, and prevents the common problems that come with an overgrown wick.
How a wick trimmer is built differently from scissors
Most wick trimmers share the same core design: long handles (usually 18–20 cm) that keep your hands well away from the wax pool, a curved or angled cutting blade positioned at roughly 45 degrees, and a small flat tray directly below the blades that catches the snipped wick end. That tray is the key difference. When you trim with scissors, the cut piece falls straight into the candle, and fishing it out risks disturbing the wax or dragging debris through the melt pool.
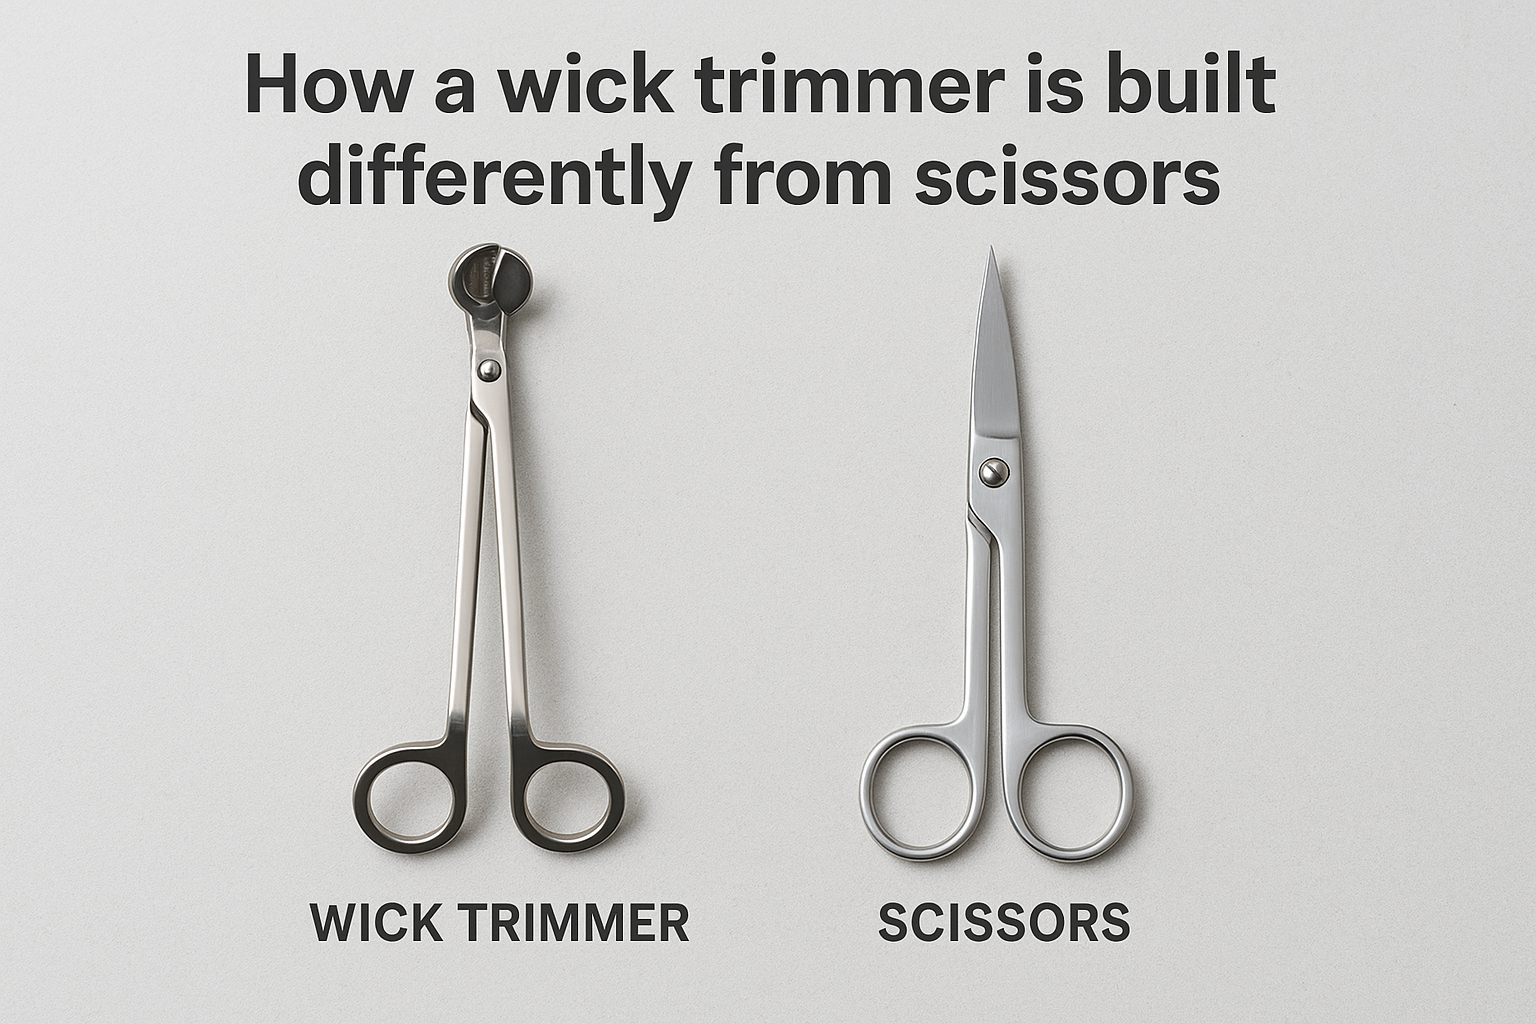
The angled blade also means you can see exactly where you're cutting even when the wick sits deep inside a tall jar. Standard scissors force you to guess the angle, which often results in an uneven cut or a wick that's still too long on one side. A wick trimmer removes that guesswork, giving you a clean, flat cut every time without straining or tilting the candle.
What happens when you skip trimming
When a wick grows longer than 6 mm, it draws more fuel than the flame can cleanly burn. The excess carbon builds up at the tip and forms a mushroom-shaped knob at the top of the wick. That mushroom causes the flame to grow too large, flicker erratically, and release black soot into the air and onto the inside of your candle jar.
A mushrooming wick is the leading cause of soot marks, tunnelling, and shortened candle life, and it is entirely preventable with a five-second trim before each burn.
Skipping the trim also affects scent throw. A flame that burns too hot moves through the fragrance oil too quickly, which can cause the scent to smell sharp or one-dimensional rather than the warm, layered note the candle was designed to produce. This is especially noticeable with natural soy wax candles, where the fragrance is blended to release gradually at a lower, steadier temperature.
Why a wick trimmer is worth having
Understanding how to use a wick trimmer correctly starts with understanding what it protects. Every trim you take before lighting extends the candle's burn time, keeps the wax pool clear of carbon debris, and ensures the fragrance releases the way it was intended. For a hand-poured soy candle, where the wax, wick, and fragrance ratio has been carefully balanced, using the right tool to maintain the wick is the single most effective thing you can do between burns.
Proper trimming also protects the vessel itself. Soot stains on glass are difficult to remove once they set, and a consistently oversized flame causes uneven heat distribution that can stress certain containers over time. A quick, accurate trim before every light prevents both cosmetic and structural damage without adding any real effort to your candle routine.
What you need before you start
Gathering everything before you start means the trim takes five seconds and nothing gets rushed or missed. You don't need much to learn how to use a wick trimmer properly, but having the right items ready before you reach for the lighter makes the whole process cleaner and more consistent.
The right wick trimmer
A good wick trimmer has long handles and an angled blade with a catch tray beneath it. When you're choosing one, look for a trimmer with blades that meet cleanly at the cutting point and a tray deep enough to hold the snipped wick without it falling out when you lift the tool away. Stainless steel trimmers are a reliable option because they resist wax build-up and wipe clean easily between uses.
If your trimmer's blades don't close flush, you'll end up with a ragged wick edge that burns unevenly, so check this before you use it for the first time.
You can test the blade quality on a piece of paper before using it on your candle. A clean, single-stroke cut means the trimmer is ready to use. A torn or crushed edge means the blades need adjusting or replacing before you go near your candle.
Your candle and a clean cloth
Your candle should be completely cooled and solid before you trim the wick. Trimming into soft or liquid wax risks pushing the cut piece below the surface, where it can block the wick on the next burn. Place the candle on a flat, stable surface with good lighting so you can see the wick clearly inside the jar.
Keep a small dry cloth or paper towel beside you to wipe the trimmer blades after each use. Wax and carbon residue builds up on the blades over time, and a quick wipe after every trim keeps the cutting edge sharp and the tray clean. This also stops old carbon from transferring back into your fresh candle wax.
Here is a quick reference for what to have ready:
| Item | What to check |
|---|---|
| Wick trimmer | Blades meet flush, catch tray intact |
| Cooled candle | Wax fully solid, wick visible |
| Dry cloth or paper towel | Clean and lint-free |
| Good lighting | Enough to see inside the jar clearly |
Step 1. Let the candle cool and check the wick
Before you reach for your trimmer, you need to give the candle time to cool completely. Trimming into a warm candle is the most common mistake people make when learning how to use a wick trimmer, and it causes two specific problems: the trimmed wick piece can sink below the wax surface, and the soft wax can close around it, blocking the wick on your next burn. Starting with a fully solidified candle removes both risks before they have a chance to occur.
How long to wait before you trim
The time you need depends on how long the candle was burning before you extinguished it. A candle that burned for one hour needs at least 30 minutes. A candle that burned for three or more hours needs a full two hours before you should trim. The wax needs to return to its original firm, opaque state all the way to the edges of the vessel, not just on the surface.
If the wax still looks shiny or feels soft when you press lightly near the edge, give it more time before you touch the wick.
Use the table below as a quick reference:
| Burn duration | Recommended cooling time |
|---|---|
| Up to 1 hour | At least 30 minutes |
| 1 to 2 hours | At least 1 hour |
| 2 to 4 hours | At least 2 hours |
| Over 4 hours | At least 3 hours |
What to look for when you check the wick
Once the wax is firm, hold the candle under a direct light source and look straight down into the jar. You're checking two things: the wick length and the condition of the tip. A wick sitting longer than 6 mm needs trimming. A tip with a visible rounded or bulbous knob at the top has mushroomed and definitely needs to come off before the next burn.
Run your eyes along the full length of the wick rather than just glancing at the tip. Sometimes the base of the wick bends or sits at an angle, which affects how the flame behaves once lit. If the wick is leaning toward one side of the jar, note that as well before you trim, as a straight, centred wick gives you the most even melt pool.
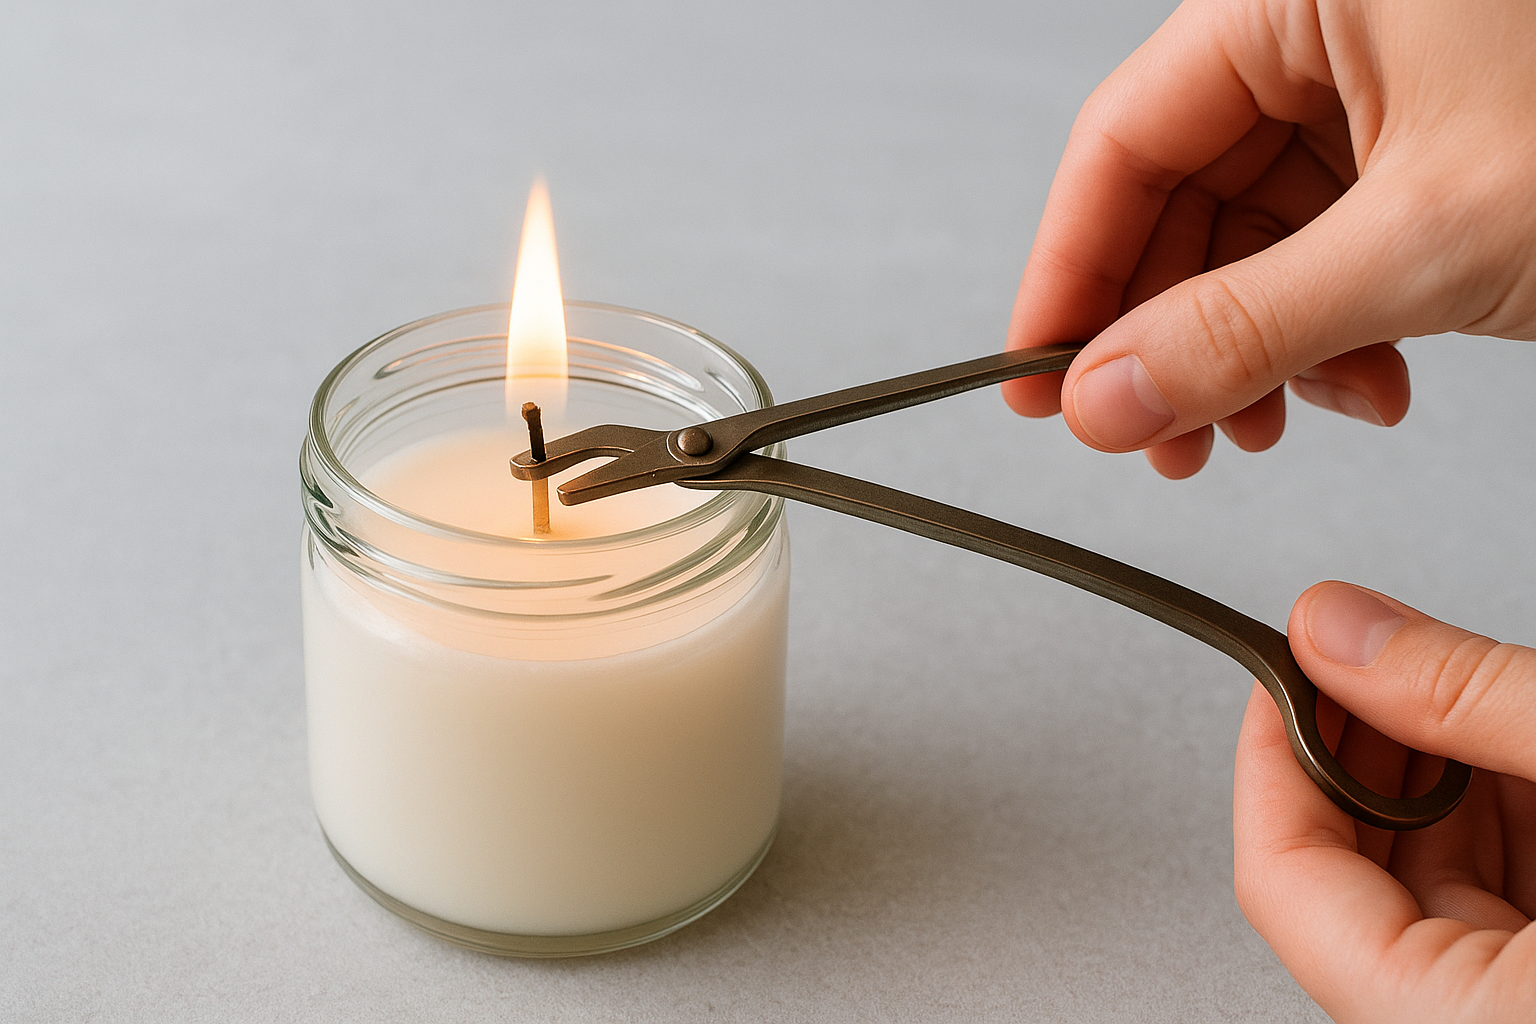
Step 2. Trim the wick to the right length
With a cool, solid candle in front of you and the wick condition confirmed, you're ready to make the trim. The target length is 5–6 mm measured from the wax surface to the tip of the wick. At this length, the flame draws fuel at the right rate, burns cleanly, and produces a steady, controlled light without the excess carbon build-up that causes mushrooming. Getting this step right is where knowing how to use a wick trimmer correctly pays off across every burn that follows.
How to position the trimmer
Hold the trimmer by the handle and lower the open blades straight down into the jar until the cutting edge sits at the 5–6 mm mark above the wax surface. The angled blade naturally faces upward, so keep the catch tray directly below the blades to intercept the trimmed piece the moment you close the handles. Avoid tilting the trimmer sideways as you lower it, because an angled approach often results in a cut that removes more wick from one side than the other, leaving an uneven tip that burns with a lopsided flame.
If your jar is narrow or the wick sits deep, press the handle gently against the inside rim of the vessel to steady the trimmer before you cut.
Once the blades reach the correct height, take a moment to confirm alignment before closing the handles. The cutting edge should sit parallel to the wax surface, not at a diagonal. A parallel cut produces a flat, even wick tip, which gives you the most centred and consistent flame on the next light.
Making the cut
Squeeze the handles together firmly in one smooth, complete motion. Do not saw or reopen the blades mid-cut, as this shreds the wick fibres and leaves a ragged edge that burns inconsistently from the first minute. One clean closure is all it takes.
After the cut, lift the trimmer straight up and out of the jar without tilting it to either side. Tilting risks tipping the catch tray and dropping the wick piece back into the wax. Once the trimmer clears the jar, glance at the tray to confirm the trimmed piece is sitting there, then set the trimmer down flat on your cloth so the debris stays contained until you're ready to dispose of it.
Step 3. Clear debris and set up a clean relight
After the trim, your job isn't quite done. Before you light the candle again, you need to confirm the wax surface is clean and the trimmed wick piece has been fully removed from the jar. Even a small fragment of carbon sitting in the melt pool can catch alight independently, float toward the wick, or leave a grey smear through the wax on the next burn. Taking thirty seconds to clear the jar now prevents that entirely.
Remove the trimmed piece and inspect the wax
Tip the catch tray of your trimmer over a bin or paper towel and tap lightly to release the clipping. Avoid blowing it out or shaking the trimmer directly over the open jar, as that risks sending the piece straight back into the wax. Once the trimmer is clear, look straight down into the jar and scan the entire wax surface for any stray fragments.

If you spot a small piece of wick or carbon sitting on the wax, use the flat edge of your trimmer or a clean wooden toothpick to lift it out carefully without pressing it below the surface. Dragging it across the wax leaves a carbon trail through the top layer that affects the next melt pool. Run through this quick checklist before you consider the candle ready to relight:
- No trimmed wick pieces sitting in or on the wax
- Wax surface is smooth, unbroken, and free of debris
- Wick is standing upright and centred in the jar
- Wick tip is flat and even, not frayed or crushed
Set up a clean relight
With the wax clear and the wick trimmed, your candle is ready to burn at its best. Place it on a stable, heat-safe surface away from draughts, curtains, and anything flammable. A steady environment means the flame settles quickly into its correct size rather than flickering and drawing excess fuel during the first few minutes of the burn.
A centred, debris-free wax pool before lighting is the clearest sign that you have followed how to use a wick trimmer correctly from start to finish.
Strike your match or hold the lighter close to the base of the wick rather than hovering it above the tip. This lights the wick cleanly without scorching the top fibres, and you will see the flame settle into a calm, even burn within the first minute if the trim was done right.
Fix common problems like soot and mushrooming
Even when you know how to use a wick trimmer correctly, a few common problems can still appear if your routine slips or the conditions of a burn aren't quite right. Most of these issues trace back to wick length and carbon build-up, and the fixes are straightforward once you understand what's causing them.
When soot marks appear on the jar
Soot on the inside of a candle jar usually means the wick was too long when you lit the candle, causing the flame to burn hotter than the wax could support. The excess heat produces unburned carbon particles that travel upward with the heat column and deposit on the glass. Wipe the marks away with a dry cloth or cotton pad before your next burn, then trim the wick to 5-6 mm and confirm the candle is away from draughts, which force the flame sideways and amplify soot production.
If soot marks keep appearing despite consistent trimming, check whether the candle is sitting near an air vent, open window, or fan, because an unstable flame produces far more carbon than a settled one.
When the wick mushrooms after every burn
A mushroom-shaped carbon knob at the tip of the wick after every burn tells you the flame is consuming more fuel than it can cleanly process. This is normal to some degree with cotton wicks, but a mushroom that forms within the first hour of a burn indicates a persistent trim issue rather than a one-off occurrence. Check that your previous trim left a clean, flat cut rather than a compressed or frayed tip, because a crushed wick draws fuel unevenly and accelerates carbon build-up.
Remove the mushroom completely with your trimmer before each light. Position the blades just below the knob so the entire carbon mass comes away with the cut, leaving a clean fibre base behind. If your trimmer's blades are blunt or don't meet flush, the knob may not separate cleanly, so test the blades on paper first and replace the trimmer if the cut tears rather than slices. A sharp, well-maintained trimmer is the most reliable way to prevent repeat mushrooming across the life of your candle.
How to clean and store your wick trimmer
A wick trimmer lasts for years if you treat it well between uses. Carbon residue and wax build-up on the blades are the two things that dull the cutting edge fastest, and both are easy to clear in under a minute. Keeping the trimmer clean also means you're not transferring old debris into a fresh candle the next time you learn how to use a wick trimmer on a new jar.
A trimmer with dirty blades will compress the wick rather than slice it cleanly, which is exactly the condition that causes mushrooming to repeat burn after burn.
Cleaning the blades after each use
Wipe the blades with a dry cloth or paper towel immediately after each trim while any wax residue is still soft. For carbon build-up that has hardened on the blade surface, dip a cotton pad in rubbing alcohol or white vinegar and rub along the blade face in a single direction from base to tip. Avoid scrubbing back and forth, because that pushes debris into the blade joint where it is harder to remove.
Check the catch tray as well as the blades. Carbon dust collects in the tray corners and can transfer back onto the next trimmed wick if it is not cleared. Use a dry cotton swab to reach the corners, then wipe the tray flat with your cloth. Run through this quick cleaning checklist after every trim session:
- Wipe blades dry immediately after use
- Remove hardened residue with alcohol or white vinegar on a cotton pad
- Clear the catch tray with a cotton swab
- Check the blade joint for trapped debris and clear with a toothpick if needed
- Dry the trimmer fully before storing
Storing the trimmer between burns
Once the trimmer is clean and dry, store it upright in a small jar or candle accessory tray rather than lying flat in a drawer. Storing it upright keeps the blades from pressing against hard surfaces, which protects the cutting edge from nicks and misalignment over time. Many wick trimmers come with a small pouch or box, and using that is a straightforward way to keep the tool protected and easy to find before each burn.
Keep the trimmer away from direct heat and moisture, such as on a bathroom shelf directly above a bath or next to a stove. Heat causes metal components to expand and contract, which can loosen the blade joint over repeated cycles and affect the accuracy of the cut.
Quick takeaways
Knowing how to use a wick trimmer correctly comes down to three consistent habits: trim to 5–6 mm before every burn, always start with a fully cooled candle, and clear any debris from the wax surface before you relight. A clean, flat cut with a well-maintained trimmer prevents mushrooming, reduces soot, and extends the life of your candle across every burn session. Your trimmer works best when the blades meet flush, so test them on paper occasionally and wipe them down after each use.
These small steps protect both the fragrance and the vessel, keeping every burn as clean and even as the first. If you want a candle that rewards proper care from the very first light, hand-poured soy candles with lead-free cotton wicks give you the best foundation to work with. Browse the full range at Coorong Candle Co. and find a scent worth burning right.